If you want to reinstall the system on a Linux VPS host, generally speaking, you can just choose a distribution version directly from the host provider. The SolusVM official website provides a lot of images. If you are using a standalone server, such as a DediPath standalone server, then we can use the IPMI provided by the host provider to install your own operating system.
However, many students like to install the operating system by themselves. For example, some time ago, a customer of his cloud host wanted to install the Windows operating system on the VPS. In the absence of a Windows image, we can use the powerful Linux DD command to install Windows operating system on Linux VPS host.
This article will share one-click installation of Windows operating system and Linux system on Linux VPS host. This method is also applicable to independent servers. The process of installing the operating system on an independent server through IPMI is very long, usually due to slow local network speed. Using the network to install the system cleanly with one click can solve this problem.
For more tutorials on using VPS hosting and dedicated servers, here are:
- VPS host acceleration method – one-click installation of acceleration module to increase VPS host speed from “software”
- Linux Crontab command scheduled task basic syntax and operation tutorial-VPS/Server Automation
- Use SolusVM to set up a NAT VPS host on the server/VPS - integrate WHMCS to sell NAT VPS
PS: Update record:
1.Updated the script and usage instructions. 2020.10.10
2.Windows requires larger memory to run. We can also directly install the Linux desktop environment. Reference: CentOS and Ubuntu system installation desktop-Gnome desktop, browser and installation configuration VNC. 2019.9.11
3.A simpler and more convenient one-click method to install and run Chrome browser on Linux system: Linux VPS host one-click installation of desktop environment and RDP remote desktop connection - run Chrome and Firefox browser. 2019.11.6
1. One-click installation of Windows and Linux systems on Linux VPS and independent servers
project:
- HTTPS://GitHub.com/meow love/network-reinstall-system-modify
- Similar script : VPS one-click installation of pure Debian/Ubuntu/CentOS and fully automatic DD installation of Windows
1.1 Notes
The VPS host or server is required to have any Linux system booted by GRUB or GRUB2 installed (RedHat/CentOS/Debian/Ubuntu/Etc.). The default password for all systems after installation is [cxthhhhh.com]. In order to prevent brute force cracking, you must change the default password immediately after installation!

Some VPS/cloud platforms/independent servers without DHCP cannot access the network after installation. You need to log in to VNC/IPIM/KVM and manually configure the network card IP. Due to different hardware configurations and network environments, the entire installation process takes 15-60 minutes, so please be patient. After the installation is complete, you can connect via IP:22(Linux SSH)/IP:3389(Windows RDP).
Preparations before reinstalling and installing the system:
# RedHat/CentOS:
yum install -y xz openssl gawk file

# Debian/Ubuntu:
apt-get install -y xz-utils openssl gawk file
1.2 Reinstall/install Windows and Linux with one click
Updated on October 10, 2020 as follows:
Execute the following command to start the installation:
#如何使用
1、下载脚本(通过root用户执行)
wget --no-check-certificate -qO ~/Network-Reinstall-System-Modify.sh 'https://www.cxthhhhh.com/CXT-Library/Network-Reinstall-System-Modify/Network-Reinstall-System-Modify.sh' && chmod a+x ~/Network-Reinstall-System-Modify.sh

2、安装系统(任选其一)
【图形化UI界面选择】(推荐)
bash ~/Network-Reinstall-System-Modify.sh -UI_Options

【合并执行】一键启动图形化UI界面,选择安装系统(包含下载+执行):
wget --no-check-certificate -qO ~/Network-Reinstall-System-Modify.sh 'https://www.cxthhhhh.com/CXT-Library/Network-Reinstall-System-Modify/Network-Reinstall-System-Modify.sh' && chmod a+x ~/Network-Reinstall-System-Modify.sh && bash ~/Network-Reinstall-System-Modify.sh -UI_Options

【安装 裸机系统部署平台】(推荐)
bash ~/Network-Reinstall-System-Modify.sh -CXT_Bare-metal_System_Deployment_Platform

【安装 Linux】(推荐)
bash ~/Network-Reinstall-System-Modify.sh -CentOS_8
bash ~/Network-Reinstall-System-Modify.sh -Debian_10
bash ~/Network-Reinstall-System-Modify.sh -Ubuntu_20.04

【安装 Windows】(推荐)
bash ~/Network-Reinstall-System-Modify.sh -Windows_Server_2019

【安装 指定自定义 DD镜像】(推荐)
bash ~/Network-Reinstall-System-Modify.sh  -DD "%URL%"
General instructions are as follows:
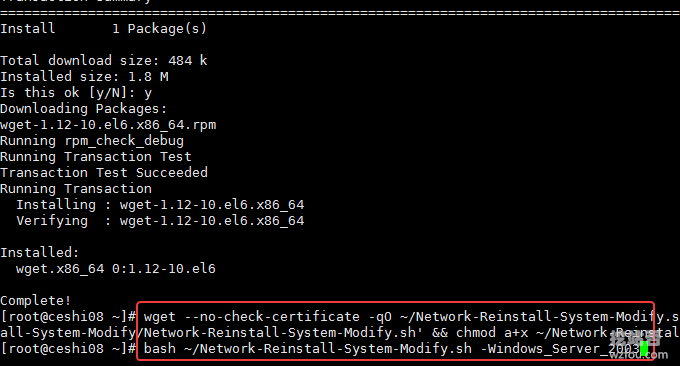
1. After you execute the above two lines of commands, your server will start to reinstall the pure system on the network. You will not be able to manage the connection until the installation is complete. Due to different hardware configurations and network environments, the entire installation process takes 15-60 minutes, so please be patient. After the installation is complete, you can connect via IP:22(Linux SSH)/IP:3389(Windows RDP).
2. To ensure higher compatibility. It is recommended that before reinstalling a pure system, your current system version is: CentOS 7 / Debian 9 / Ubuntu 18.04. (When your service provider does not provide the above operating system, you can consider using other systems)
3. Original system recommendation priority: C7 > U18 > D9 > U16 > D8 > other systems provided by merchants
Default account:
Usually, use your own image, or the author of your image does not clearly indicate the user name and password of the system.
For Microsoft Windows.
The default username is: Administrator
The default password is: cxthhhhh.comFor Linux (CentOS/Debian/Ubuntu), bare metal system deployment platform, etc.
The default username is: root
The default password is: cxthhhhh.com
safety warning:
[Tip] After the system reinstallation is completed, please be sure to change the system's default password [cxthhhhh.com] immediately, and do system updates and security patches, otherwise your server may face security risks. (Since the default password of this site is a public URL, it may have been included in the password dictionary)
(The following is the original tutorial) Execute as shown below:
Advanced mode account and verification password allow UEFI boot installation and advanced functions (UserName: root / PassWord: cxthhhhh.com). When using the bare metal system deployment platform, disk modification will be performed. Please back up your original (Old) data. Otherwise, irreparable losses will be caused.
2.2 Custom installation of any system
Follow step 1.2 above to run the script command. Do not choose the Linux or Windows system installation command. Use the following command instead:
#安装裸机系统部署平台
bash ~/Network-Reinstall-System-Modify.sh -CXT_Bare-metal_System_Deployment_Platform
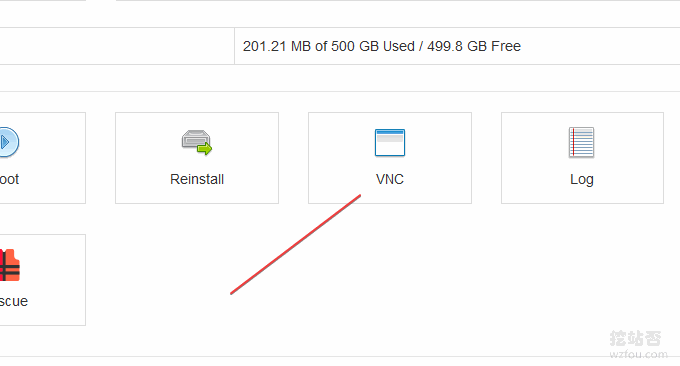
After executing the command, the host will restart. At this time, if you are using a VPS, please open VNC to enter.
3. Install your own operating system with one-click DD
If you have your own DD operating system image, this script also supports installing your own DD image. Still the same, follow step 1.2 above to run the script command. Do not choose the Linux or Windows system installation command. Use the following command instead:
#安装自己的DD系统 %ULR%应该替换为您自己的映像地址。

bash ~/Network-Reinstall-System-Modify.sh -DD "%URL%"
4. Share several Windows and Linux ISO and DD images
There are several public Windows and Linux ISO and DD image download addresses here. Because they are public, please consider carefully when choosing (some do not have passwords, and some have their own passwords, which can be viewed on the DD package details page).
1.80host ISO: http://down.80host.com/iso/
2.down.childhood: HTTPS://down.childhood/Windows/ISO/
3.Technical: https://opendisk.cxthhhhh.com/
4. Fingertip: https://pan.fingerit.cn/
The public DD packages are as follows:
#80host DD包

http://down.80host.com/iso/dd/WS2008R2Enterprise-Joodle-Template.gz
http://down.80host.com/iso/dd/Windows2012R2-Joodle-Template.gz
Username:Administrator
Password:Password147

http://down.80host.com/iso/dd/Windows7-Joodle-Template.gz
http://down.80host.com/iso/dd/Windows8.1-Joodle-Template.gz
Username:Admin
Password:Password147

http://down.80host.com/iso/dd/7.ENT.EVAL.64.VIRTIO-SCSI.gz
Username:WhatUpTime.com
Password:P@ssword64

http://down.80host.com/iso/dd/win7_cn_5gb_virtio_scsi.gz
Username:administrator
Password:www.80host.com
#支持OVH VPS的scsi磁盘驱动,其他viostor的DD包在上面会蓝屏

http://down.80host.com/iso/dd/win7_cn_5gb_virtio_scsi_faster.gz
Username:administrator
Password:www.80host.com
#支持OVH VPS的scsi磁盘驱动,其他viostor的DD包在上面会蓝屏

http://down.80host.com/iso/dd/Kimsufi2003.gz
Username:Administrator
Password:password!yxz.me

http://down.80host.com/iso/dd/win2003_with_update.gz
Username:administrator
Password:80hostkvmlamjj

http://down.80host.com/iso/dd/ikoula92.gz
Username:administrator
Password:Abcd123400


#Laiboke.com制作的中文版2012R2

http://down.80host.com/iso/dd/Win2012R2ZW.gz
Username:Administrator
Password:Laiboke.com

#moerats.com提供
#Windows Embedded 8.1 Industry Pro x64 (2.87G;KVM;XEN;Hyper-V;未激活)
https://moeclub.org/get-win8embx64-auto
#备用地址
https://down.moerats.com/Windows/win8embx64-auto.gz
5. Summary
With one-click reinstallation and installation of Windows and Linux systems on Linux VPS hosts and servers, even users who are not very familiar with Linux commands can install the Windows system on the VPS host in the shortest time. It should be noted that Windows needs to be genuine Only available with authorization.

During the use of the mining site, it was found that the remote desktop of the local computer could not be used. If you also encounter this problem (Windows 10), please use the following methods to solve it:
1. Just download and install an automation tool, address: https://github.com/binarymaster/rdpwrap/releases. The compressed package contains a tool to enable remote desktop and a configuration tool (because there is no configuration interface in the system properties, this configuration tool is required).
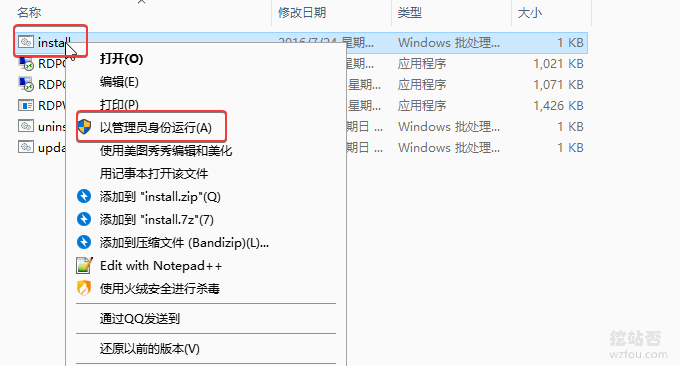
2. First click
RDPCcheck.exeto check whether the machine supports Remote Desktop Services. If it is the home version, it will most likely prompt that the connection failed. If it fails, right-clickand runinstall.bat as system administrator. After the installation is complete, you can make a remote desktop connection!
As shown below:
