
After purchasing a dedicated server, we may think of using the large bandwidth and large hard disk of the dedicated server to virtualize more VPS hosts for other people to use. SolusVM, a powerful server control panel, makes it easy to virtualize VPS from a dedicated server. Easy, almost similar to creating multiple virtual hosts in Cpanel.
SolusVM is divided into two parts: the main control terminal Master and the controlled terminal Slave. You can install the main control terminal Master and the controlled terminal Slave separately, or you can install the main control terminal Master and the controlled terminal Slave on the same server (this can only Open OpenVZ on the server, which is common in NAT VPS hosts) and supports KVM and OpenVZ architectures.
SolusVM is now widely used, especially some foreign merchants basically use SolusVM panels, and many domestic merchants are also using SolusVM to install VPS virtual platforms. The most popular NAT VPS recently is SolusVM+. WHMCS NAT plug-in is done, such as CloudIPLC and Uovz VPS.
It is the simplest to open an OpenVZ VPS with SolusVM. You can set it up after direct installation. It is a little more complicated to open a KVM VPS with SolusVM, mainly involving the configuration of the network card. This article will share the SolusVM installation process and how to open a KVM VPS. If you are looking for a VPS host, you can refer to: VPS host ranking list.
For more experience using independent servers, there are:
- Use SolusVM to set up a NAT VPS host on the server/VPS - integrate WHMCS to sell NAT VPS
- Server virtualization panel SolusVM installation and use - supports new management of OpenVZ, KVM and Xen VPS
- Solution to Linux system disk space full-No Space Left on Device error
PS: Updated on December 11, 2018, The method in this article is operated on the DediPath independent server. Regarding the DediPath server evaluation, please refer to: DediPath independent server evaluation - Los Angeles independent server performance, speed and route evaluation.
1. Preparation before installation
1.1 Obtain SolusVM authorization
website:
- HTTPS://so路SVM.com/
Although there are many special editions of SolusVM on the Internet, if you use it in a production environment, it is recommended to obtain SolusVM authorization. The price is not expensive. The master is US$2.5/month/unit + the slave is US$10. /month/piece, you can get it with a monthly payment of US$12.5.

2.2 Independent Server Partition
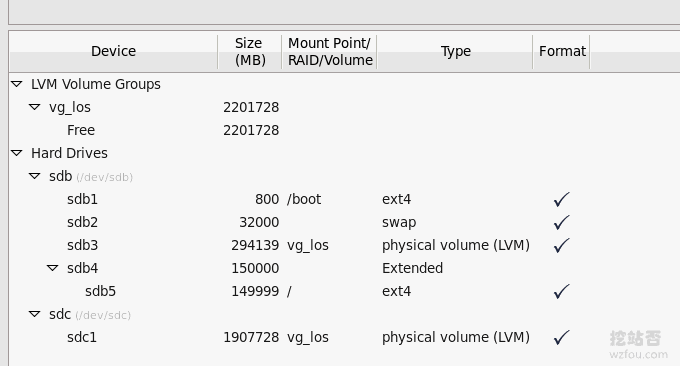
SolusVM currently supports operating systems such as CentOS 6/7, RHEL 6/7, and Scientific Linux 6/7. Please follow the following requirements to partition your server before installation.
Xen PV/HVM Host
/ 80GB+ (XEN templates & iso's will be stored in /home/solusvm/xen)
SWAP 4GB max (Virtual servers won't use the host swap)
Logical Volume Group (LVM) remaining space (Logical Volume Group Only, SolusVM will create the logical volumes for the virtual servers inside this group)The PE Size should be set to 128M not the Default of 4M, if manually creating the Volume Group you can use the ‘-s 128M’ flag.
KVM Host
/ 80GB+ (KVM templates & iso’s will be stored in /home/solusvm/kvm)
SWAP 4GB+ (Virtual servers may use host swap if there is a real memory shortage)
Logical Volume Group (LVM) remaining space (Logical Volume Group Only, SolusVM will create the logical volumes for the virtual servers inside this group)The Volume Group Name CANNOT be KVM as /dev/kvm/ is a directory created on install.
The PE Size should be set to 128M not the Default of 4M, if manually creating the Volume Group you can use the '-s 128M' flag.
OpenVZ Host
/80GB
SWAP 2 times RAM (if RAM ⇐2GB otherwise RAM + 2GB is plenty)
/vz remaining space (templates & virtual servers will be stored here)
Here wzfou.com uses the KVM controlled terminal. According to the requirements, allows more than 80GB of space to be mounted in "/", maintains more than 4GB of SWAP, and the remaining space is all given to Logical Volume Group (LVM), only Logical Volume Group Only. And PE is set to 128M.
PS: Updated on November 21, 2018 , friends who don’t know how to partition can check out my operation demonstration: Independent server uses IPMI to install the operating system graphic tutorial - iKVM use, hard disk partitioning and mounting ISO
2. SolusVM installation process
2.1 SolusVM master control terminal Master installation
Find a clean VPS host or independent server and execute the command:
wget https://files.soluslabs.com/install.sh
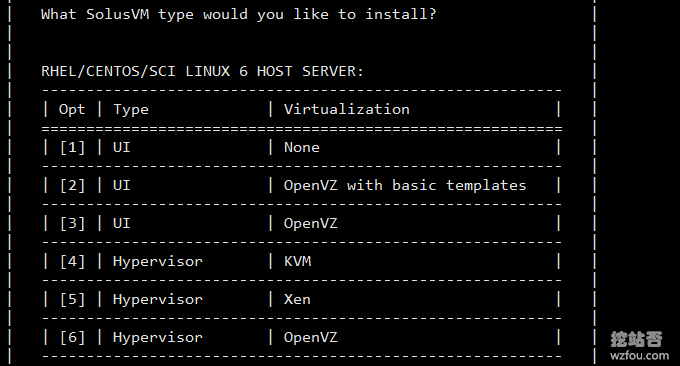
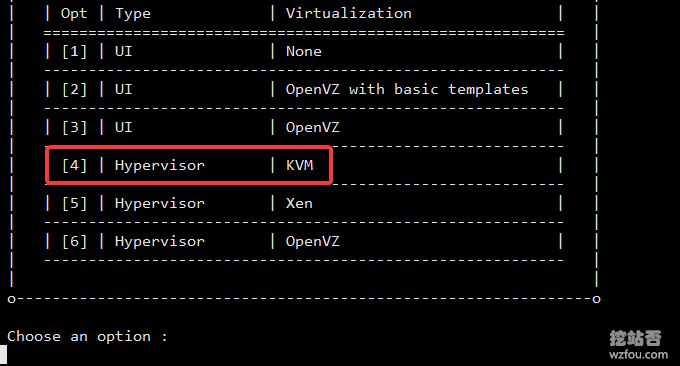
sh install.shThen we choose 1, that is, only install the main control terminal.
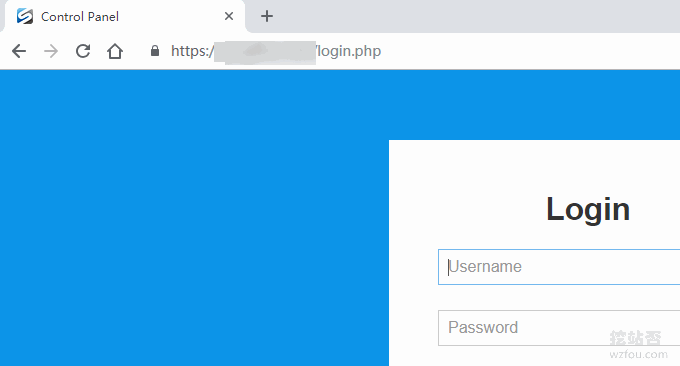
After a while, the SolusVM master will be installed. At this time, the background login address and password will be given, and this information will be recorded.
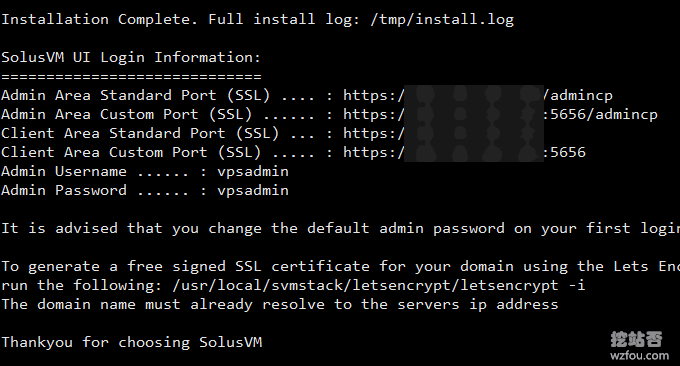
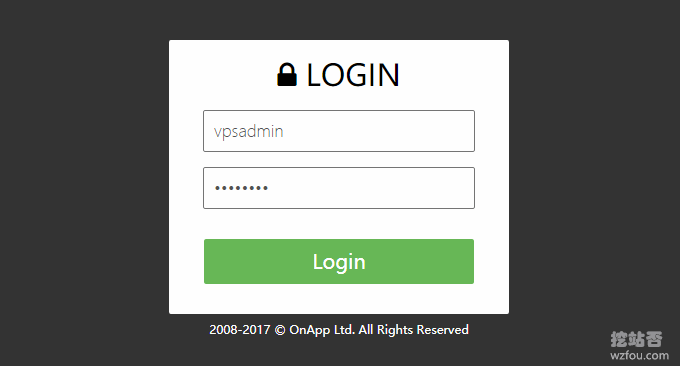
Open the administrator login address and enter the default account and password to log in.
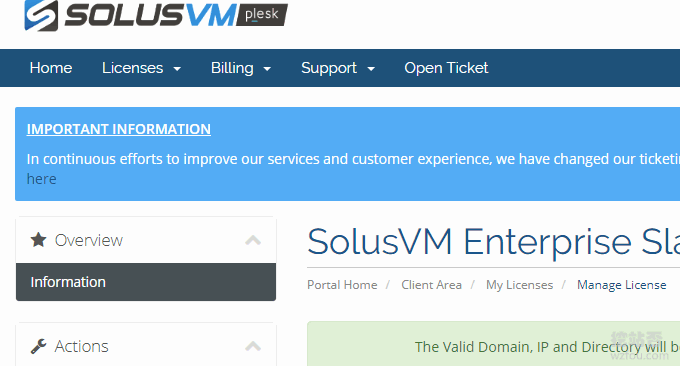
After logging in to the SolusVM master, the first step will be to fill in the SolusVM authorization code, otherwise you will not be allowed to use it at all. At this time, you need to go to the SolusVM official website to copy the authorization code.
This is the SolusVM management panel. For detailed instructions, see: Server Virtualization Panel SolusVM Installation and Use.

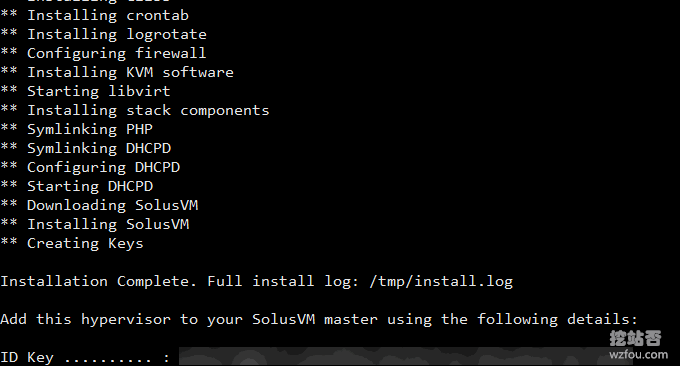
2.2 SolusVM controlled Slave installation
Find a clean independent server and execute the command:
wget https://files.soluslabs.com/install.sh
sh install.sh
Then we choose 4, which is to install only the controlled terminal of KVM.
After a while, we can complete the installation of the SolusVM controlled Slave and note down the given ID and Key.
2.3 Set up KVM Bridge
PS: Updated on January 11, 2019, This part involves Linux network configuration. For related command usage tutorials, refer to: VPS host and independent server network configuration method-Linux manual setting of IPv4 and IPv6 addresses.
Because we are running KVM, we need to set up the network card after installing the SolusVM controlled slave. First install the bridge-utils package.
yum install bridge-utils -yThen view your existing network card configuration file.
#你的网卡名字可能有差别,总之选你外网IP的那个
cat /etc/sysconfig/network-scripts/ifcfg-eth0
#内容大概如下
DEVICE=eth0
BOOTPROTO=static
ONBOOT=yes
HWADDR=MAC地址
IPADDR=公网IP
NETMASK=子网掩码
NETWORK=网络号
GATEWAY=网关
BROADCAST=广播地址
IPV6INIT=yes
IPV6_AUTOCONF=yes
Back up your configuration.
cp /etc/sysconfig/network-scripts/ifcfg-eth0 /etc/sysconfig/network-scripts/backup-ifcfg-eth0Create a Bridge configuration file based on your network card configuration.
vi /etc/sysconfig/network-scripts/ifcfg-br0
#内容参照如下
DEVICE=br0
TYPE=Bridge
BOOTPROTO=static
ONBOOT=yes
IPADDR=公网IP
NETMASK=子网掩码
NETWORK=网络号
GATEWAY=网关
BROADCAST=广播地址
PS. You can fill in this part according to your own needs. If not, go to the server panel to check. Some of them, such as the broadcast address and network number, are actually unnecessary and optional. In addition, if you have an IPv6 address, fill it in as a reference. You need to pay attention to this, as follows
#Hetzner的IPv6在CentOS下大概配置文件需要加这些,最后一行少了不行,倒数第二行不能改
IPV6INIT=yes
IPV6ADDR=IPv6地址/64
IPV6_DEFAULTGW=fe80::1
#在Bridge中这儿应该是br0
IPV6_DEFAULTDEV=eth0
Modify the original network configuration.
vi /etc/sysconfig/network-scripts/ifcfg-eth0
DEVICE=eth0
HWADDR=MAC地址
IPV6INIT=yes
IPV6_AUTOCONF=yes
ONBOOT=yes
BRIDGE=br0
This IPV6_AUTOCONF is not needed if you configured IPv6 manually above. Some computer rooms have automatic DHCP allocation of IPv6 and can enable this. Restart the network
/etc/init.d/network restartIt is recommended to be cautious in this part, especially if your machine does not have KVM or IPMI. If you make a mistake, you may have to reinstall it. However, you can also make a fault repair script.
#配置重启后的计划任务,删除Bridge配置,覆盖原配置文件然后重启网络
echo "@reboot rm -rf /etc/sysconfig/network-scripts/ifcfg-br0 && cp /etc/sysconfig/network-scripts/backup-ifcfg-eth0 /etc/sysconfig/network-scripts/ifcfg-eth0 && /etc/init.d/network restart" >> /var/spool/cron/root
chmod 600 /var/spool/cron/root
service crond reload
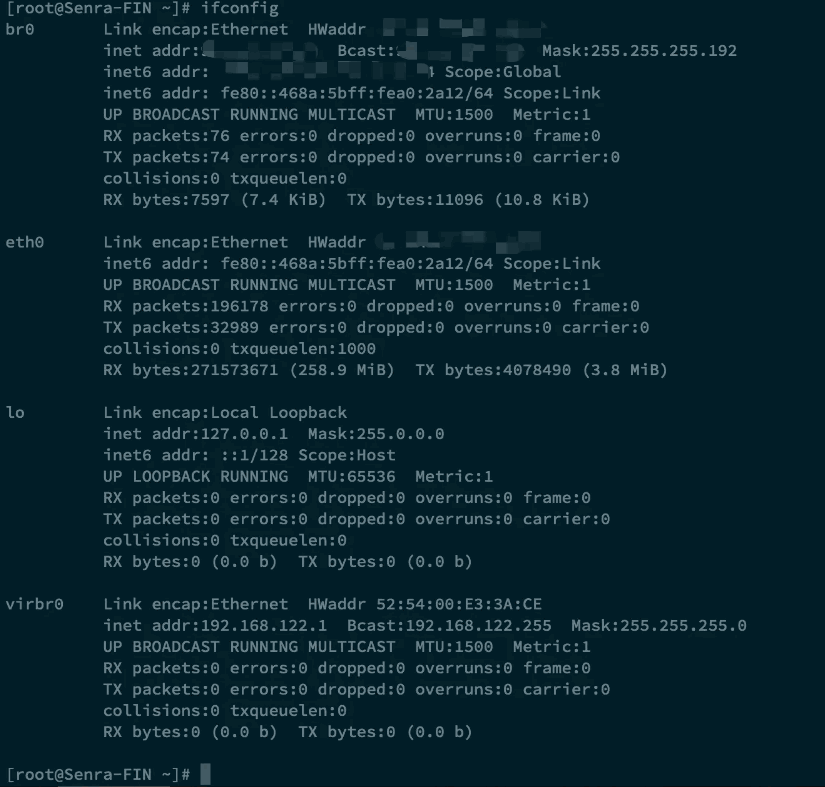
service crond restartAfter configuring this, if you find that your server is disconnected, please use Restart on the control panel to restart the machine and restore it. Of course, remember to delete the scheduled task after you successfully configure it. is probably like this after configuration. Don't worry about virbr0, it is automatically added. If you look at the official documentation, you can also configure a Bridge for intranet use. This depends on your own needs.
Note: The above configuration will be different on different servers. The main thing is to pay attention to the network card name and replacement content. Do not modify the configuration content of the original network card at will. You only need to replace the network configuration in br0. Just configure the original network card. For details, please study the official website documentation: https://docs.solusvm.com/display/DOCS/KVM+Bridge+Setup
3. SolusVM opens KVM VPS
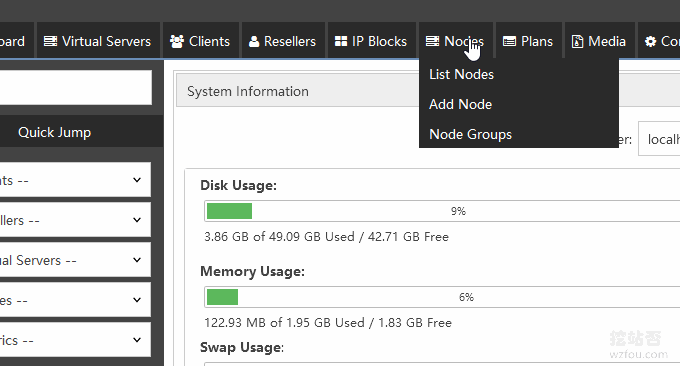
3.1 Add server node
Enter the SolusVM host Master and click Add Node.
Fill in the basic information of your Node and enter the ID and Key generated by the controlled Slave of SolusVM you just installed. Special note: The value of LV Group must be filled in the same as the name we specified for the previous partition . If you do not know the name, please use the command: vgdisplay to check it. (Click to enlarge)

3.2 Add IP address
First click IP Blocks-Add IPv4 Block, and fill in the Gateway IP with the IP address previously in the controlled network card configuration file route-br0. Node must check the newly added server node we just added.
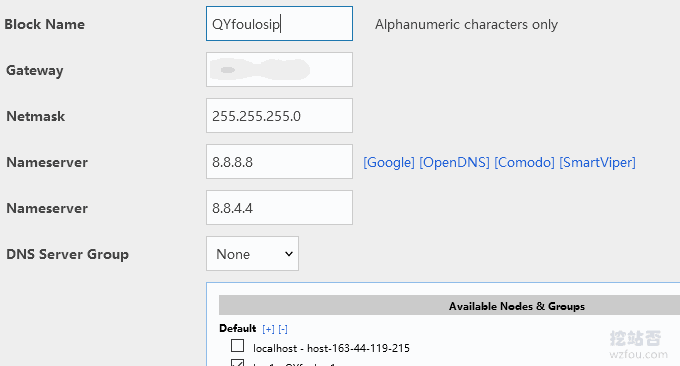
After adding the IP group, we can add specific IP addresses to the group.

3.3 Add operating system template
website:
- https://mashedpotato.solusvm.com/
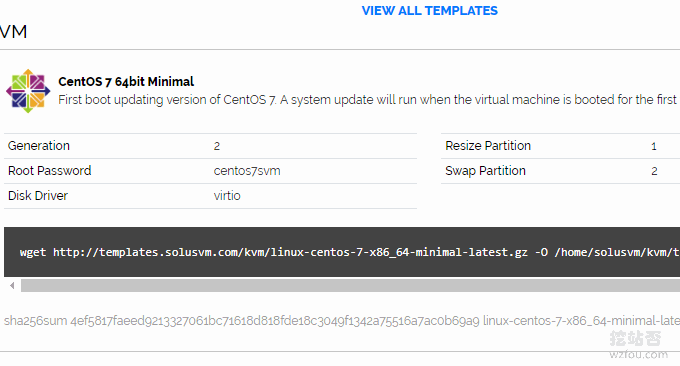
First go to your master and use the following command to download the operating system template (example):
wget http://templates.solusvm.com/kvm/linux-centos-7-x86_64-minimal-latest.gz -O /home/solusvm/kvm/template/linux-centos-7-x86_64-minimal-latest.gz
Then go to the SolusVM backend and click Media-Add KVM Template. (Click to enlarge)
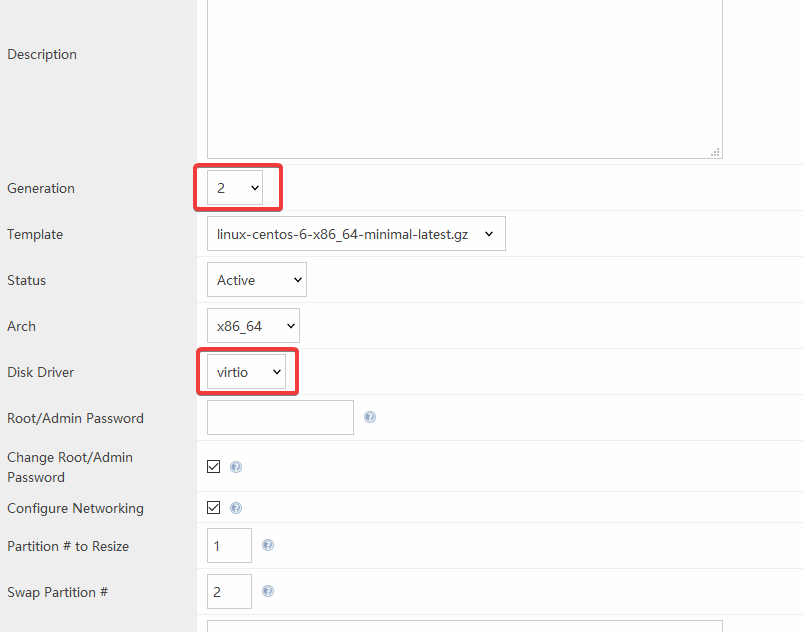
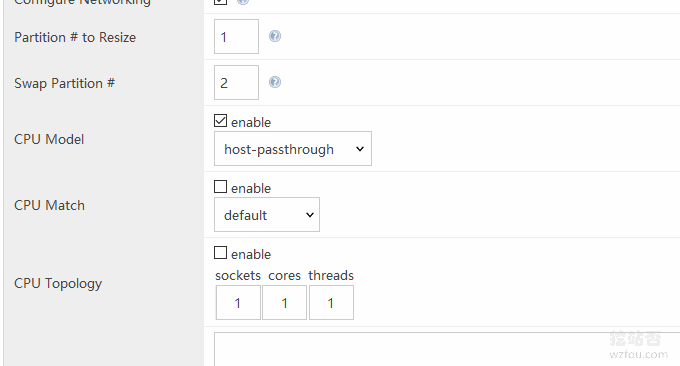
Regarding the settings of Generation, Disk Driver, Resize Partition, and Swap Partition, please follow the prompts on the official website.
You can also enable CPU Model and change the mode to host-passthrough. In this way, customers can check the CPU model of the mother machine on their VPS host.
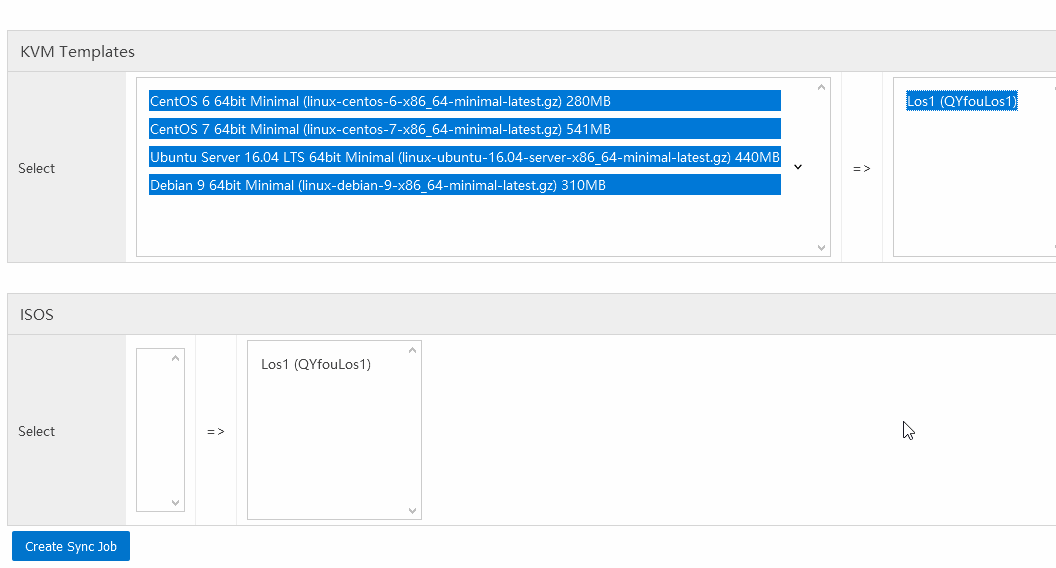
After adding the operating system, we also need to synchronize the template to the SolusVM controlled end, as shown below:
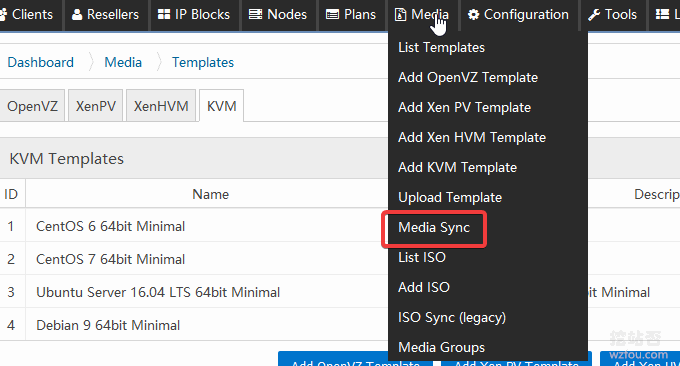
Select the template and the target node you want to synchronize.
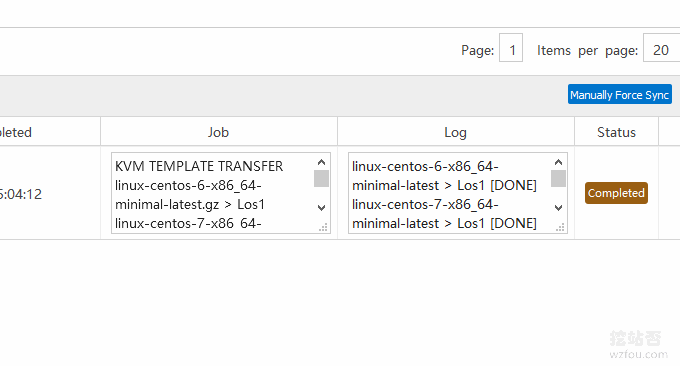
When you see the following prompt, it means the installation has been successful.
3.4 Add VPS hosting package
Click Plans-Add KVM Plan to set the VPS configuration such as hard disk, bandwidth, memory, etc.
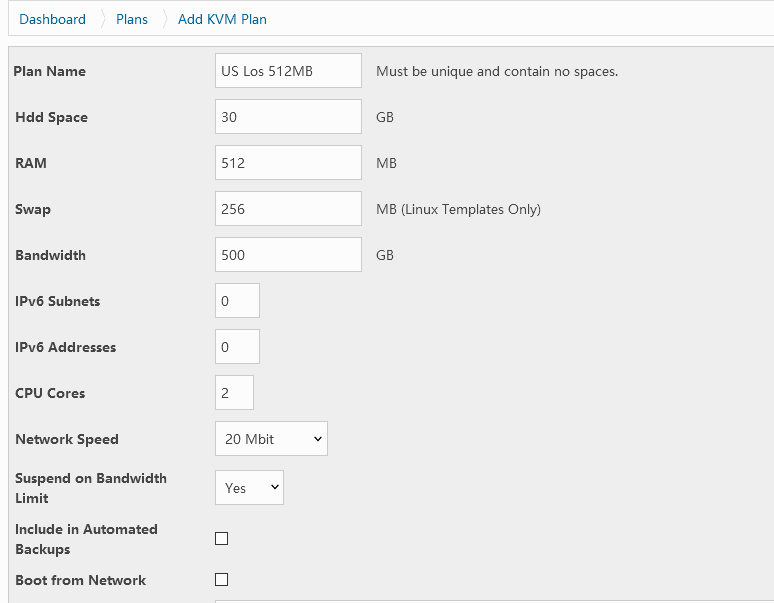
Remember to check the operating systems that can be installed on the customer's VPS below, otherwise users will not be able to see the content.

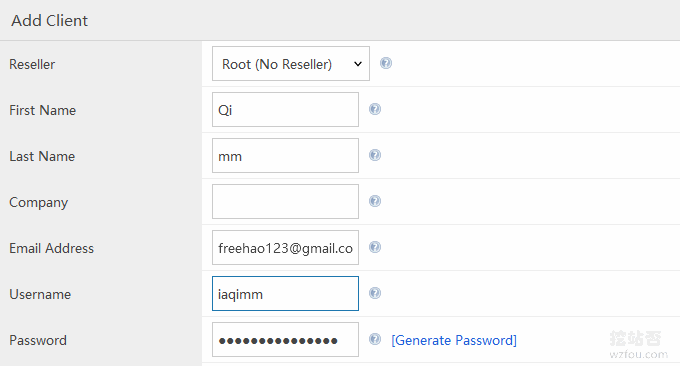
3.5 Add user
Click Add Client on the left and fill in the corresponding information.
3.6 Activate KVM VPS host
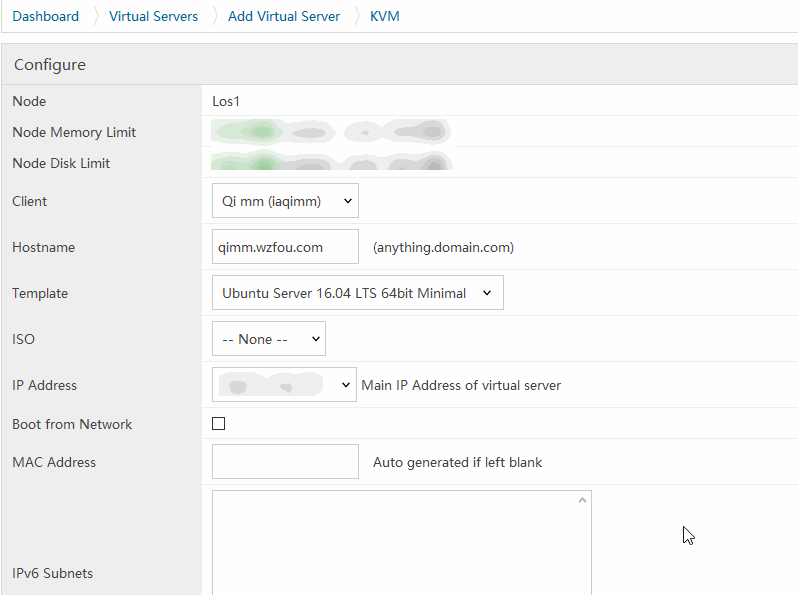
Choose to activate KVM VPS.
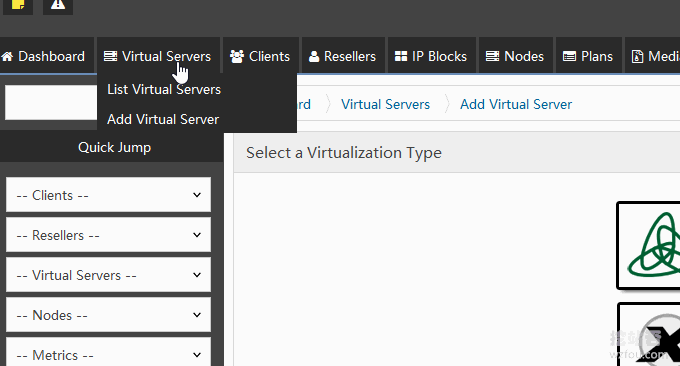
p>Select the node and package where the VPS is stored.

Set the host name and specified IP address for the VPS, click OK, and the VPS is successfully activated.
4. SolusVM VPS usage optimization
4.1 Set SolusVM to Chinese
This is the Chinese language template for SolusVM customer panel, the command is as follows:
cd /usr/local/solusvm/language/client/
wget "https://documentation.solusvm.com/download/attachments/7667936/Simplified-Chinese.lang.txt?api=v2" -O Chinese.lang.txt
chown solusvm:solusvm Chinese.lang.txt
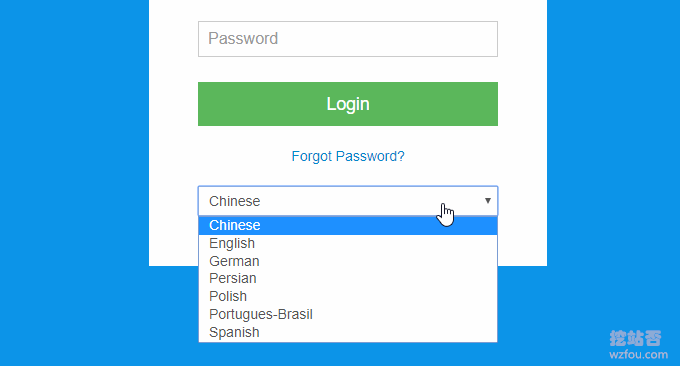
In this way, SolusVM customers can choose Chinese when logging in.
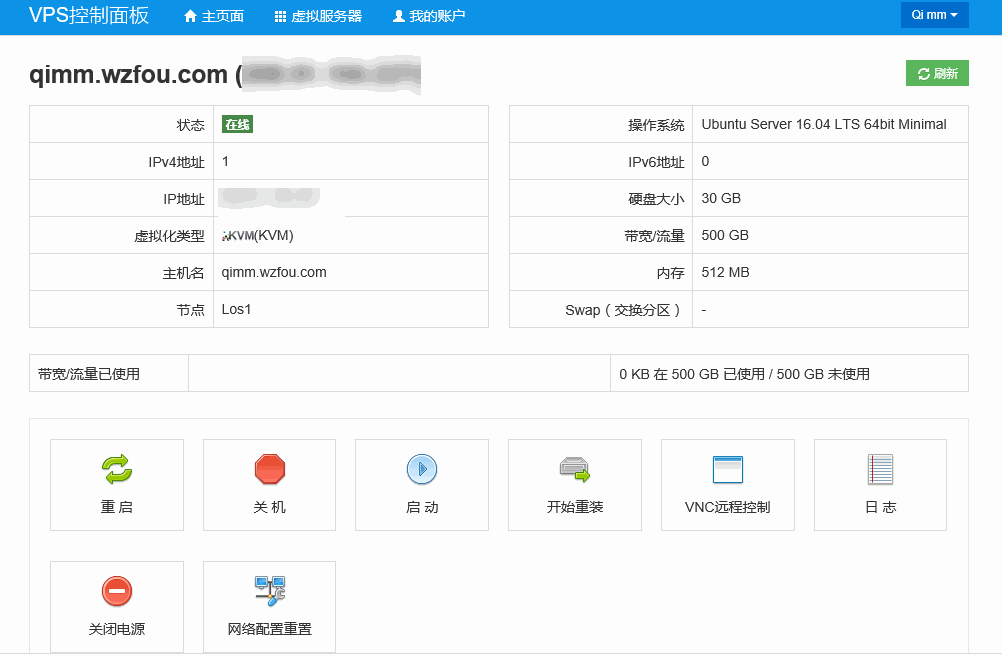
This is the SolusVM customer management VPS host panel, as shown below: (Click to enlarge)
4.2 SolusVM reinstall the system
If there is a "No media found for this virtual ser" error on the SolusVM reinstallation system page, it is because we have not synchronized the media group to the server. The operation method is as follows:
1. Log in to the SolusVM backend;
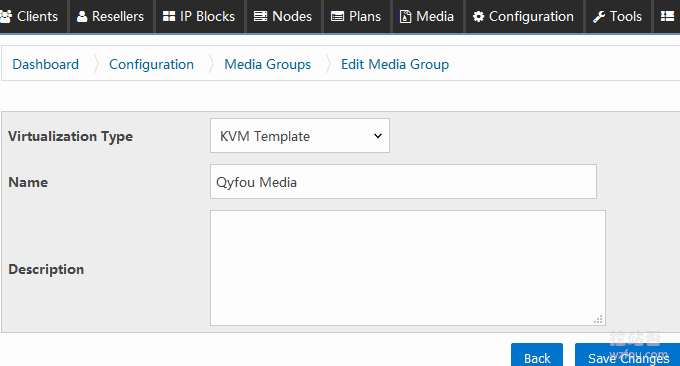
2. Create a media group in Media > Media Groups > Add Media Group;
(Virtualization of the media group created by default Type is OpenVZ, please remember to modify it according to the actual situation)3. Add all templates to the media group just created in Media > List Templates;
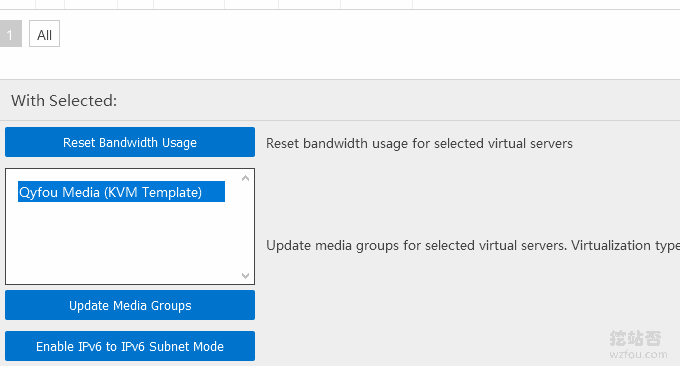
4. Select all virtual machines in Virtual Servers > List Virtual Servers, then select the media group just created in With Selected below, and click Update media groups Update media groups;
5. Done.
This is adding a media group.
This synchronizes the media group to the server.
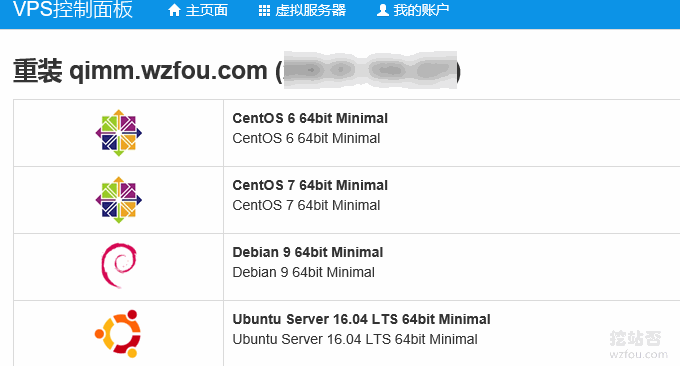
Customers can directly reinstall the system through SolusVM.
There is no problem in using the KVM VPS host opened by SolusVM. As shown below:

4.3 SolusVM adds SSL certificate
If you have your own certificate, just replace the following certificate and key files.
/usr/local/svmstack/nginx/ssl/ssl.crt
/usr/local/svmstack/nginx/ssl/ssl.key
If you want to install a let’s encrypt certificate, please refer to this article to install acme.sh: apply for a website to install a letsencrypt free SSL certificate in three simple steps. Then install it using the following command:
acme.sh  --installcert  -d  solus.wzfou.com
        --key-file   /usr/local/svmstack/nginx/ssl/ssl.key
        --fullchain-file /usr/local/svmstack/nginx/ssl/ssl.crt
        --reloadcmd  "service svmstack-nginx restart;
	/usr/local/svmstack/sshwebsocket/quit;
        /usr/local/svmstack/sshwebsocket/port_check;
        cd /usr/local/svmstack/nginx/ssl && cat ssl.key ssl.crt > ssl.pem"
Refresh the browser and you will see that the SSL certificate has been successfully used.

5. Summary
SolusVM installation is quite simple. If you use SolusVM to open OpenVZ, you can use it directly after installing SolusVM. If you use SolusVM to open KVM, you also need to modify the network card configuration according to the official documentation.
With SolusVM, we can open VPS for other people to use. Some friends may have thought of integrating SolusVM with WHMCS to realize self-service purchase and VPS activation. For WHMCS tutorials, please refer to: WHMCS from entry to proficiency.