In the process of using WordPress to build a website, many "detours" have been taken in optimizing WordPress performance and speeding up website access. When the website access is slow and the CPU memory is exhausted, the first thing I think of is upgrading the server configuration. Later, I find that some unscrupulous VPS merchants severely restrict resources behind the scenes, and it is really hurtful to pay more to upgrade.
The biggest experience is that with the same configuration, I run the same website from different VPS merchants. Under the same traffic conditions, one is smooth and the other is stuck. The biggest feeling for me is that I must read it before buying a VPS. You must carefully compare other people’s reviews, especially VPS host performance reviews, otherwise you will easily spend a lot of money.
Later, when optimizing WordPress, I focused on page caching. Caching plug-ins I have used before include but are not limited to WordPress Super Cache, WP Fastest Cache, W3 Total Cache, cos-html-cache, Cachify... In general, I installed it. Caching the plug-in is still effective in speeding up, but it also brings a lot of problems.
For example, complex configurations, generated rules, plug-in conflicts, and the inability to cope with sudden traffic, which means that using caching plug-ins is still unable to cope with the impact of large traffic. Finally, on the recommendation of a friend, I enabled the Nginx fastcgi_cache cache and directly used Nginx to generate cache for the page. The efficiency is much higher than using the PHP cache plug-in, which is especially suitable for use on VPS with small configurations.

For more experience articles about WordPress and server optimization, here are:
- Linux php-fpm optimization experience-php-fpm process takes up large memory and does not release memory problems
- WordPress adds Alipay, WeChat reward button production examples and Paypal.me reward link
- Linux Crontab command scheduled task basic syntax and operation tutorial-VPS/Server Automation
PS: Updated on December 19, 2018, The on-site search that comes with WordPress is not only slow but also cannot search for more keywords. We can build one ourselves or use a third-party search to embed WP: Improved Website search within the site - Baidu, Google custom search and Elasticsearch self-built search.
PS: Updated on September 29, 2019, Due to the server optimization artifact ngx_pagespeed developed by Google, it integrates a complete set of optimization tools such as image delayed loading, adaptive webp, JS and CSS optimization, and image optimization: PageSpeed Server optimization artifact-Nginx deploys the ngx_pagespeed module and accelerates the effect experience.
1. Install Nginx ngx_cache_purge module
website:
- HTTP://labs.Frick.com/files/
1.1 LNMP
If you are using the LNMP one-click installation package, edit the lnmp.conf file in the lnmp installation package directory, add –add-module=/root/ngx_cache_purge-2.3 in the single quotes of Nginx_Modules_Options=" , save and upgrade nginx is installed in one click, and other modules can also refer to this.
ngx_cache_purge-2.3 requires you to download the installation package from the frickle.com official website and unzip it. The latest version is 2.3.

1.2 Oneinstack
If you are using the OneinStack panel, you can compile the ngx_cache_purge module with the following command.
# nginx -V 2>&1 | grep -o ngx_cache_purge 查看ngx_cache_purge是否安装,没有数据表示未安装
cd /root/oneinstack/src
wget http://labs.frickle.com/files/ngx_cache_purge-2.3.tar.gz
tar xzf ngx_cache_purge-2.3.tar.gz

#以下几个安装包都是Oneinstack自带的,不同的版本可能会不同,请根据情况调整
tar xzf nginx-1.14.0.tar.gz
tar xzf pcre-8.42.tar.gz
tar xzf openssl-1.0.2o.tar.gz
cd /root/oneinstack/src/nginx-1.14.0

nginx -V #查看nginx编译参数,最后加上--add-module=../ngx_cache_purge-2.3
./configure --prefix=/usr/local/nginx --user=www --group=www --with-http_stub_status_module --with-http_v2_module --with-http_ssl_module --with-http_gzip_static_module --with-http_realip_module --with-http_flv_module --with-http_mp4_module --with-openssl=../openssl-1.0.2o --with-pcre=../pcre-8.42 --with-pcre-jit --with-ld-opt=-ljemalloc --add-module=../ngx_cache_purge-2.3

make  #编译
mv /usr/local/nginx/sbin/nginx{,_`date +%F`}  #备份nginx
cp objs/nginx /usr/local/nginx/sbin
nginx -V 2>&1 | grep -o ngx_cache_purge
# 显示ngx_cache_purge表示已经安装成功
When using Nginx -V to view compilation parameters and add add-module, be sure to operate according to your own Nginx compilation parameters, that is to say, keep the original Nginx parameters and add add-module. For example mine:

2. Nginx enables fastcgi_cache caching - configuration example
2.1 Configuration Example
Below I directly post an example of wzfou.com's Nginx enabling fastcgi_cache cache configuration. The detailed instructions are as follows:
#路径需要提前创建好
fastcgi_cache_path /tmp/nginx-cache levels=1:2 keys_zone=WORDPRESS:250m inactive=1d max_size=500m;
fastcgi_temp_path /tmp/nginx-cache/temp;
fastcgi_cache_key "$scheme$request_method$host$request_uri";
fastcgi_cache_use_stale error timeout invalid_header http_500;
#忽略一切nocache申明,避免不缓存伪静态等
fastcgi_ignore_headers Cache-Control Expires Set-Cookie;

server {
   listen 80;
   listen 443 ssl http2;
  …………………此部省略……………………

   set $skip_cache 0;
   #post访问不缓存
   if ($request_method = POST) {
            set $skip_cache 1;
        }
   #动态查询不缓存
   if ($query_string != "") {
            set $skip_cache 1;
        }
   #后台等特定页面不缓存(其他需求请自行添加即可)
   if ($request_uri ~* "/wp-admin/|/xmlrpc.php|wp-.*.php|/feed/|/zhuye/|/wzfou.com/||/question/|/bbs/|/dongtai/|/haoyou/|/qun/|index.php|sitemap(_index)?.xml") {
            set $skip_cache 1;
        }
   #对登录用户、评论过的用户不展示缓存
   if ($http_cookie ~* "comment_author|wordpress_[a-f0-9]+|wp-postpass|wordpress_no_cache|wordpress_logged_in") {
            set $skip_cache 1;
        }
   #这里请参考你网站之前的配置,特别是sock的路径,弄错了就502了!
   location ~ [^/].php(/|$) {
    #fastcgi_pass remote_php_ip:9000;
    fastcgi_pass unix:/dev/shm/php-cgi.sock;
    fastcgi_index index.php;
    include fastcgi.conf;
    add_header Strict-Transport-Security "max-age=63072000; includeSubdomains; preload";
    #新增的缓存规则
    fastcgi_cache_bypass $skip_cache;
    fastcgi_no_cache $skip_cache;
    add_header X-Cache "$upstream_cache_status From $host";
    add_header Cache-Control  max-age=0;
    add_header Nginx-Cache "$upstream_cache_status";
    add_header Last-Modified $date_gmt;
    add_header X-Frame-Options SAMEORIGIN; # 只允许本站用 frame 来嵌套
    add_header X-Content-Type-Options nosniff; # 禁止嗅探文件类型
    add_header X-XSS-Protection "1; mode=block"; # XSS 保护
    etag  on;
    fastcgi_cache WORDPRESS;
    fastcgi_cache_valid 200 301 302 1d;
  }

  #缓存清理配置(可选)
  location ~ /purge( /.*) { #为防止转义,请去掉{ /之间的空格
    allow 127.0.0.1;
    #此处填写你的服务器IP
    allow 89.208.xxx.xxx;
    deny all;
    #请注意此处的WORDPRESS要与上面的keys_zone保持一致
    fastcgi_cache_purge WORDPRESS "$scheme$request_method$host$1";
    }
  …………………此部分省略……………………

}
2.2 Instructions
Local or memory? In fastcgi_cache_path and fastcgi_temp_path, someone would suggest to set it to memory path, for example: /dev/shm/nginx-cache levels=1:2 keys_zone=WORDPRESS:100m inactive=60m;, if your If the disk IO is very slow, it is recommended to use this method. After all, the memory read and write speed is very fast.

add_header Cache-Control If the dynamic content needs to be updated in real time, it can be set to 0, otherwise the time can be set longer.

3. Install Nginx Helper plug-in - automatically refresh cache
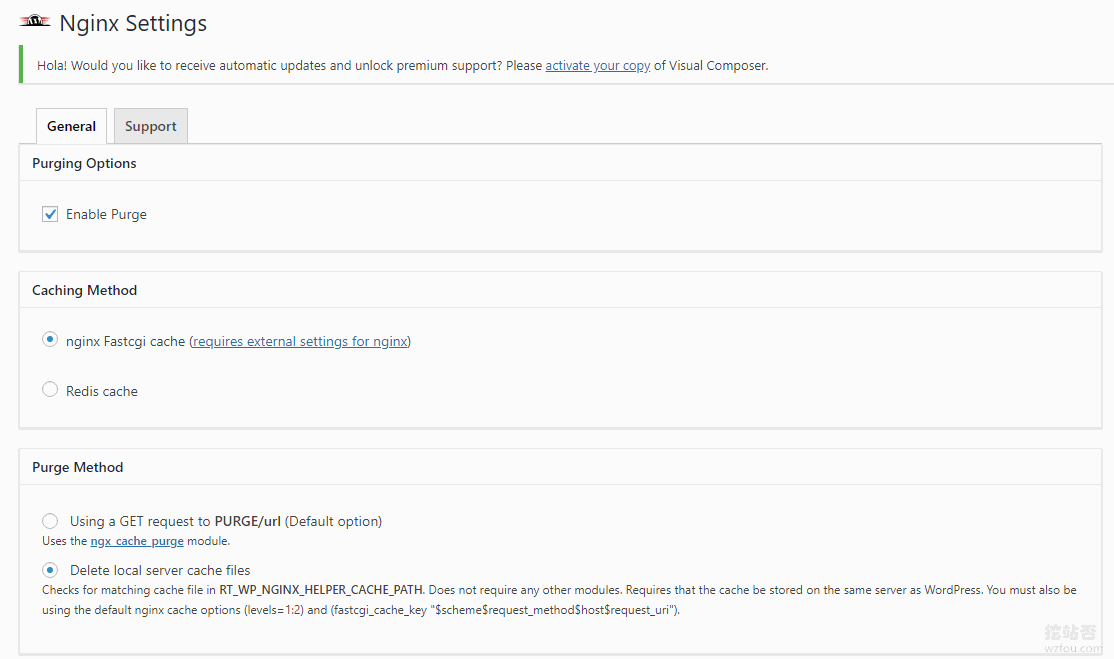
Through the above method, we have configured the fastcgi_cache cache. Next, we have to solve the problem of automatically refreshing the Nginx cache page when WordPress has new comments and new articles. Directly search for the Nginx Helper plug-in to download, then set it up, first enable it, and select local files as the clearing method.

The plug-in also provides other settings, such as whether to update the Nginx cache when publishing new articles and new comments.

Since the cache path defined by the plug-in author is /var/run/nginx-cache, and we may customize the cache path according to the actual situation of the server, the difference in the cache path will cause the plug-in to be unable to find the cache file and delete it!
The solution is to add the following code to wp-config.php in the WordPress root directory:
//根据实际情况定义缓存的存放路径
define( 'RT_WP_NGINX_HELPER_CACHE_PATH','/tmp/wpcache');
If you find that the code defining the path above does not work, you can use the advice of the "natural" blogger:
The first is to modify the plug-in and change the path in the plug-in to your own. The second is to use soft links, /var/run/nginxcache and /tmp/wpcache
3. Nginx fastcgi_cache effect preview
After enabling Nginx fastcgi_cache, we can see that it has been hit in the browser Header header information.

For pages that have been configured not to be cached, Nginx fastcgi_cache will directly display BYPASS.

In addition, Nginx fastcgi_cache will also BYPASS directly for users who have logged in and users who have posted comments.

At the same time, the cache file generated by Nginx fastcgi_cache can also be seen in the cache path of our server.

If you find that your commented users are still using cache, it should be that WP does not remember cookies. Just add the following code to functions.php.
add_action('set_comment_cookies','coffin_set_cookies',10,3);
function coffin_set_cookies( $comment, $user, $cookies_consent){
   $cookies_consent = true;
   wp_set_comment_cookies($comment, $user, $cookies_consent);
}
4. Summary
Enabling fastcgi_cache caching in Nginx is very important for accelerating web page response speed and saving server resources. The following picture is the test result of alibabacloud.com. It can be seen that the server's carrying capacity has been greatly improved after caching is enabled.

When wzfou.com digs the site to enable fastcgi_cache cache, it is found that Cache-Control information is added to the Nginx configuration file, but it always does not take effect. HTTP header information will always contain the following information:
Cache-Control: no-store,no-cache,must-revalidate,post-check=0,pre-check=0 and Pragma: no-cache,
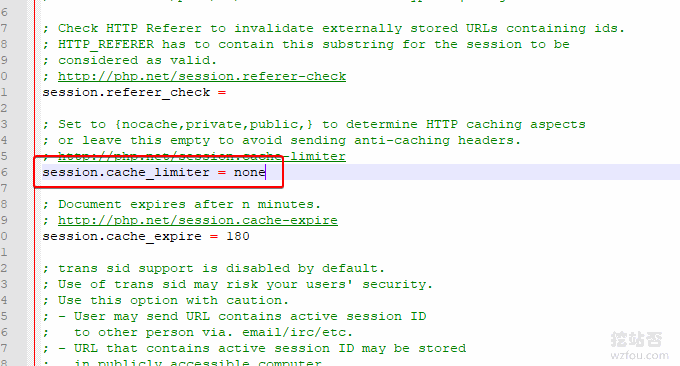
After investigation, the problem lies in the PHP.ini setting section of session.cache_limiter in the LNMP and Oneinstack one-click packages. The default value is nocache, and we need to set it to none.

