ウェブサイトが海外にあるため、ウェブページを開く速度を最大限に高めるにはどうすればよいかを考えています。以前にAlibaba Cloud香港のVPSホストを使用していましたが、速度はかなり速かったのですが、学生から「開けない」「アクセスできない」という報告が相次いでいました。調査の結果、問題は SSL ハンドシェイク段階にあると判明したため、CN2 GIA VPS に切り替えました。
CN2 GIA VPSを使用していますが、速度はかなり速いように感じますが、やはり距離が遠いので回線的には応答速度が若干遅いです、特にWordPressに関しては実行するとやはりホストリソースを消費します。そこで、キャッシュから始めて、Nginx キャッシュを有効にしました: Nginx fastcgi_cache キャッシュ アクセラレーション方法 - Nginx の設定例。
この記事では、Web サイトの最適化と高速化の別の方法、つまり TLSV1.3 と Brotli 圧縮を有効にする方法を紹介します。 TLSV1.2 と比較して、TLSV1.3 は主にハンドシェイク遅延を削減し、クロスプロトコル攻撃の難易度を高め、インターネットをより高速かつ安全にします。 Brotli は Google が開発した圧縮アルゴリズムで、他の圧縮アルゴリズムと比較して圧縮効率が高くなります。
一般に、VPS ホストではデフォルトで GZIP 圧縮がオンになっており、 が両方の圧縮アルゴリズムを同時にオンにすると、Brotli 圧縮レベルが Gzip よりも優先されます。 実際、Pagoda BT パネル、Oneinstack、および LNMP の最新バージョンでは、デフォルトで TLSV1.3 を有効にできます。すべての主要なパネルは、サーバー コントロール パネル リストを使用します。

Web サイトサーバーの最適化と高速化の詳細については、次を参照してください。
- VPS ホストの高速化方法 – ワンクリックでアクセラレーション モジュールをインストールし、「ソフトウェア」から VPS ホストの速度を向上させます
- Cloudflare パートナーのアクセス管理 Cloudflare CDN 対応 Railgun 動的アクセラレーション
- 自己構築された CDN アクセラレーション - Nginx リバース バインディング、キャッシュ アクセラレーション、キャッシュの自動更新と実際の IP の取得
追伸:更新記録:
1. Oneinstack Web サイト構築チュートリアルについて詳しく知りたい場合は、特別トピックを参照してください: Oneinstack の入門から習熟まで - Oneinstack のインストールと使用方法のチュートリアル集 2020.9.20
2. Google が開発したサーバー最適化アーティファクト ngx_pagespeed により、画像の遅延読み込み、アダプティブ WebP、JS および CSS の最適化、画像の最適化などの最適化ツールの完全なセットが統合されています: PageSpeed サーバー最適化アーティファクト - Nginx が展開しますngx_pagespeed モジュールを使用して、効果エクスペリエンスを加速します。 2019.9.29
1.TLSV1.3をオンにする
1.1 ワンインスタック TLSV1.3
追記: 2019 年 1 月 17 日更新、 Oneinstack の最新バージョンではデフォルトで TLSV1.3 が有効になっているため、Oneinstack を新規インストールしている場合は、インストール完了後に TLSV1.3 が有効になります。
Oneinstack パネルのインストールと使用に関するリファレンス: OneinStack のワンクリック インストール スクリプト。 Oneinstack を最初からインストールする場合は、インストールを実行せずに、チュートリアルに従って Oneinstack ワンクリック パッケージをローカル コンピューターにダウンロードできます。代わりに、oneinstack ディレクトリを選択し、version.txt を編集して、openssl_version バージョン番号を 1.1.1 以降に変更します。

次に、1.6 アップグレード スクリプトを使用して nginx をアップグレードします。 LNMP 1.5 を LNMP 1.6 にアップグレードしない場合は、lnmp1.5includeversion.sh ファイルを開き、 Openssl_Ver='openssl-1.0.2o' を Openssl_Ver='openssl-1.1 に変更します。 1a '。

次に、lnmp1.5lnmp.conf ファイルを変更し、Nginx_Modules_Options='' を次のように変更します: Nginx_Modules_Options='--with-openssl-opt=enable-weak-ssl-ciphers' (注) :enable-weak-ssl-ciphers は、OpenSSL が 3DES などの安全でない暗号スイートをサポートし続けることを許可するために使用されます。IE8 をサポートし続ける予定がある場合は、XP IE8 をサポートする必要がない場合にのみこのオプションを追加する必要があります。にアクセスする場合は、ここでの変更は無視してかまいません)

lnmp1.5 ディレクトリに入り、次のコマンドを実行します。
./upgrade.sh nginx
次に、アップグレードする必要がある nginx のバージョン番号 (最新の 1.15.7 など) を入力します。 nginx の最新バージョン番号は、公式 Web サイト http://nginx.org から入手できます。コンパイルが完了するまで待ちます。 nginx -V を実行して、詳細な構成情報をクエリします。
Checking ...
Program will display Nginx Version......
nginx version: nginx/1.15.7
======== upgrade nginx completed ======

nginx version: nginx/1.15.7
built by gcc 4.8.5 20150623 (Red Hat 4.8.5-28) (GCC)
built with OpenSSL 1.1.1a  20 Nov 2018
TLS SNI support enabled
configure arguments: --user=www --group=www --prefix=/usr/local/nginx --with-http_stub_status_module --with-http_ssl_module --with-http_v2_module --with-http_gzip_static_module --with-http_sub_module --with-stream --with-stream_ssl_module --with-openssl=/root/lnmp1.5/src/openssl-1.1.1a --with-openssl-opt=enable-weak-ssl-ciphers
次のように、ホスト構成ファイルを変更し、TLSv1.3 構成を追加します (上記の Oneinstack と同じ)。ファイルを変更した後、nginx を再起動し、ブラウザーに移動して確認します。
ssl_protocols 加入 TLSv1.3 支持,如:ssl_protocols TLSv1 TLSv1.1 TLSv1.2 TLSv1.3;

#ssl_ciphers 参考配置:

ssl_ciphers TLS13-AES-256-GCM-SHA384:TLS13-CHACHA20-POLY1305-SHA256:TLS13-AES-128-GCM-SHA256:TLS13-AES-128-CCM-8-SHA256:TLS13-AES-128-CCM-SHA256:EECDH+CHACHA20:EECDH+CHACHA20-draft:EECDH+ECDSA+AES128:EECDH+aRSA+AES128:RSA+AES128:EECDH+ECDSA+AES256:EECDH+aRSA+AES256:RSA+AES256:EECDH+ECDSA+3DES:EECDH+aRSA+3DES:RSA+3DES:!MD;
1.3x2 パゴダ BT パネル TLSV1.3
Pagoda BT パネルの新しいバージョンはすでに nginx1.15 をサポートしています。「ソフトウェア管理」ページで直接 nginx1.15 に切り替えることができます。

次に、TLSv1.3 関連の構成を Web サイト構成ファイルに追加するだけです。
ssl_protocols TLSv1 TLSv1.1 TLSv1.2 TLSv1.3;
#ssl_ciphers EECDH+CHACHA20:EECDH+AES128:RSA+AES128:EECDH+AES256:RSA+AES256:EECDH+3DES:RSA+3DES:!MD5;
ssl_ciphers TLS13-AES-256-GCM-SHA384:TLS13-CHACHA20-POLY1305-SHA256:TLS13-AES-128-GCM-SHA256:TLS13-AES-128-CCM-8-SHA256:TLS13-AES-128-CCM-SHA256:EECDH+CHACHA20:EECDH+CHACHA20-draft:EECDH+ECDSA+AES128:EECDH+aRSA+AES128:RSA+AES128:EECDH+ECDSA+AES256:EECDH+aRSA+AES256:RSA+AES256:EECDH+ECDSA+3DES:EECDH+aRSA+3DES:RSA+3DES:!MD5;

2. サーバーSSLの最適化
SSLの最適化:
- 効果デモンストレーション: https://www.ssllabs.com/ssltest/analyze.html?d=wzfou.com
以下に示すように:

この記事で説明した TLSV1.3 をオンにする最適化方法に加えて、最適化の経験 (主に SSL デュアル証明書と HSTS) は次の 2 つの記事でも共有されています。
1. HSTS を有効にし、HSTS プリロード リストに参加して、Web サイトの HTTPS アクセスをより安全にします - HSTS を削除する方法を添付します
2. HTTPS と SSL を最適化するための 8 つのヒント - 待ち時間を短縮し、HTTPS パフォーマンスの損失を軽減します
3. Brotli圧縮をオンにする
プロジェクト:
- HTTPS://GitHub.com/Google/農業放送学校_OTliなど
3.1 ワンインスタック ブロトリ
Oneinstack で Brotli を開くには、最初に Brotli をコンパイルする必要があります。最も簡単な方法は、Oneinstack に付属のアップグレード スクリプトを使用して Brotli を Nginx にコンパイルすることです。
cd oneinstack/src
git clone https://github.com/google/ngx_brotli.git
cd ngx_brotli
git submodule update --init
#修改options.conf
nginx_modules_options中新增--add-module=../ngx_brotli
./upgrade.sh web nginx

#20190118更新,新版Oneinstack需要到oneinstackinclude目录,找到upgrade_web.sh,修改:
 ./configure ${nginx_configure_args}
#新增:
 ./configure ${nginx_configure_args} --add-module=../ngx_brotli
#最后(执行升级,选择Nginx):
~/oneinstack/upgrade.sh

#修改/usr/local/nginx/conf/nginx.conf


    brotli             on;
    brotli_comp_level  6;
    brotli_types       text/plain text/css application/json application/x-javascript text/xml application/xml application/xml+rss text/javascript application/javascript image/svg+xml;
または、Brotli を手動で Nginx に直接コンパイルします。この方法は、以前に wzfou.com で共有されていた Oneinstack でコンパイルされた ngx_cache_purge モジュールと同じです。
cd oneinstack/src
git clone https://github.com/google/ngx_brotli.git
cd ngx_brotli
git submodule update --init

#以下几个安装包都是Oneinstack自带的,不同的版本可能会不同,请根据情况下载到/root/oneinstack/src/并解压
tar xzf nginx-1.14.2.tar.gz
tar xzf pcre-8.42.tar.gz
tar xzf openssl-1.1.1a.tar.gz
cd /root/oneinstack/src/nginx-1.14.2
nginx -V #查看nginx编译参数,最后加上--add-module=../ngx_brotli

./configure --prefix=/usr/local/nginx --user=www --group=www --with-http_stub_status_module --with-http_v2_module --with-http_ssl_module --with-http_gzip_static_module --with-http_realip_module --with-http_flv_module --with-http_mp4_module --with-openssl=../openssl-1.1.1a --with-pcre=../pcre-8.42 --with-pcre-jit --with-ld-opt=-ljemalloc --add-module=../ngx_cache_purge-2.3 --add-module=../ngx_brotli


make  #编译
mv /usr/local/nginx/sbin/nginx{,_`date +%F`}  #备份nginx
cp objs/nginx /usr/local/nginx/sbin
nginx -V
Nginx Brotli が正常にコンパイルされました。

Web サイトの Nginx 構成ファイルを開き、次のコードを追加します。
#修改/usr/local/nginx/conf/nginx.conf


    brotli             on;
    brotli_comp_level  6;
    brotli_types       text/plain text/css application/json application/x-javascript text/xml application/xml application/xml+rss text/javascript application/javascript image/svg+xml;
以下に示すように:

Nginx を再起動し、Web ページを更新し、Chrome を使用して要素を検査すると、Web ページに「br」という単語が表示され、Brotli 圧縮が使用されていることを確認できます。

3.2 LNMP ブロトリ
LNMP での Brotli のコンパイルは、上記の Oneinstack と同様です。まず、Brotli をローカルにダウンロードし、構成を編集して、Nginx を再コンパイルします。コマンドは次のとおりです。
#下载
cd lnmp1.5/src
git clone https://github.com/google/ngx_brotli.git
cd ngx_brotli
git submodule update --init
#编辑配置,请根据你自己的路径调整
vi /root/lnmp1.5/lnmp.conf
#添加
Nginx_Modules_Options='--add-module=/wzfou/lnmp1.5/ngx_brotli'
#最后,重新重新编译或者升级Nginx
cd /root/lnmp1.5
./upgrade.sh nginx
構成ファイルを次のように編集します。

最後に、Web サイトの構成を変更して Brotli コードを追加します。
brotli             on;
brotli_comp_level  6;
brotli_types       text/plain text/css application/json application/x-javascript text/xml application/xml application/xml+rss text/javascript application/javascript image/svg+xml;
3.3 パゴダ パネル ブロトリ
Pagoda パネルのコンパイルは Brotli と同じです。Pagoda 独自のスクリプト www/server/panel/install/nginx.sh を使用して Nginx を再コンパイルし、アップグレードします。コードは次のとおりです。
#安装libbrotli
cd /www/server
git clone https://github.com/bagder/libbrotli
cd libbrotli
./autogen.sh
./configure
make && make install

#下载ngx_brotli模块及其依赖:
cd /www/server
git clone https://github.com/google/ngx_brotli
cd ngx_brotli && git submodule update --init

#获取Nginx Arguments
nginx -V

#编辑配置
vi /www/server/panel/install/nginx.sh

#在你需要安装的Nginx版本下增加:--add-module=/www/server/ngx_brotli

  if [ "${nginx_version}" == "1.12.2" ] || [ "${nginx_version}" == "1.14.2" ];then
    ./configure --user=www --group=www --prefix=${Setup_Path} --with-openssl=${Update_Path}/src/openssl --add-module=${Update_Path}/src/ngx_devel_kit --add-module=${Update_Path}/src/lua_nginx_module --add-module=${Update_Path}/src/ngx_cache_purge --add-module=${Update_Path}/src/nginx-sticky-module --with-http_stub_status_module --with-http_ssl_module --with-http_image_filter_module --with-http_v2_module --with-http_gzip_static_module --with-http_gunzip_module --with-stream --with-stream_ssl_module --with-ipv6 --with-http_sub_module --with-http_flv_module --with-http_addition_module --with-http_realip_module --with-http_mp4_module --with-ld-opt="-Wl,-E" --with-pcre=pcre-${pcre_version} ${jemallocLD} --add-module=/www/server/ngx_brotli
  elif [ "${nginxVersion}" == "1.15.6" ]; then
    ./configure --user=www --group=www --prefix=${Setup_Path} --with-openssl=${Setup_Path}/src/openssl --add-module=${Setup_Path}/src/ngx_devel_kit --add-module=${Setup_Path}/src/lua_nginx_module --add-module=${Setup_Path}/src/ngx_cache_purge --add-module=${Setup_Path}/src/nginx-sticky-module --with-http_stub_status_module --with-http_ssl_module --with-http_v2_module --with-http_image_filter_module --with-http_gzip_static_module --with-http_gunzip_module --with-stream --with-stream_ssl_module --with-ipv6 --with-http_sub_module --with-http_flv_module --with-http_addition_module --with-http_realip_module --with-http_mp4_module --with-ld-opt="-Wl,-E" --with-openssl-opt="enable-tls1_3 enable-weak-ssl-ciphers" ${jemallocLD} --add-module=/www/server/ngx_brotli
  elif [ "$nginx_version" == "openresty" ]; then
    ./configure --user=www --group=www --prefix=${Setup_Path} --with-openssl=${Update_Path}/src/openssl --with-pcre=pcre-${pcre_version} --add-module=${Update_Path}/src/ngx_cache_purge --add-module=${Update_Path}/src/nginx-sticky-module --with-luajit --with-http_stub_status_module --with-http_ssl_module --with-http_image_filter_module --with-http_v2_module --with-http_gzip_static_module --with-http_gunzip_module --with-stream --with-stream_ssl_module --with-ipv6 --with-http_sub_module --with-http_flv_module --with-http_addition_module --with-http_realip_module --with-http_mp4_module --with-ld-opt="-Wl,-E" ${jemallocLD}
  elif [ "${nginxVersion}" = "-Tengine2.2.3" ]; then
    ./configure --user=www --group=www --prefix=${Setup_Path} --with-openssl=${Update_Path}/src/openssl --add-module=${Update_Path}/src/ngx_devel_kit --add-module=${Update_Path}/src/lua_nginx_module --add-module=${Update_Path}/src/ngx_cache_purge --add-module=${Update_Path}/src/nginx-sticky-module --with-http_stub_status_module --with-http_ssl_module --with-http_image_filter_module --with-http_v2_module --with-http_gzip_static_module --with-http_gunzip_module --with-ipv6 --with-http_sub_module --with-http_flv_module --with-http_addition_module --with-http_realip_module --with-http_mp4_module --with-ld-opt="-Wl,-E" --without-http_upstream_session_sticky_module --with-pcre=pcre-${pcre_version} --add-module=/www/server/ngx_brotli

#最后,重新编译Nginx(请根据自己的需要来选择)
sh /www/server/panel/install/nginx.sh install 1.14
最後に、Brotli コードを Web サイトの Nginx 構成に追加するだけです。
brotli             on;
brotli_comp_level  6;
brotli_types       text/plain text/css application/json application/x-javascript text/xml application/xml application/xml+rss text/javascript application/javascript image/svg+xml;
Brotli のいくつかのパラメータの説明については、必要に応じて調整できます。
  brotli on;              #启用
  brotli_comp_level 6;    #压缩等级,默认 6,太高的压缩水平可能需要更多的 CPU
  brotli_buffers 16 8k;   #请求缓冲区的数量和大小
  brotli_min_length 20;   #指定压缩数据的最小长度,只有大于或等于最小长度才会对其压缩。这里指定 20 字节
  brotli_types *;         #指定允许进行压缩类型
# brotli_types text/plain application/javascript application/x-javascript text/javascript text/css application/xml text/html application/json image/svg application/font-woff application/vnd.ms-fontobject application/vnd.apple.mpegurl image/x-icon image/jpeg image/gif image/png image/bmp;
  brotli_static always;   #是否允许查找预处理好的、以 .br 结尾的压缩文件,可选值为 on、off、always
  brotli_window 512k;     #窗口值,默认值为 512k
4. まとめ
TLSV1.3 を使用する必要がありますか? 一般的に、TLSV1.3 はブラウザがサポートしていないのではないかと心配する人もいます。実際、IE だけでなく、Chrome や Firefox の最新バージョンも TLSV1.3 をサポートしています。 TLSV1.3対応ブラウザ:https://caniuse.com/#feat=tls1-3

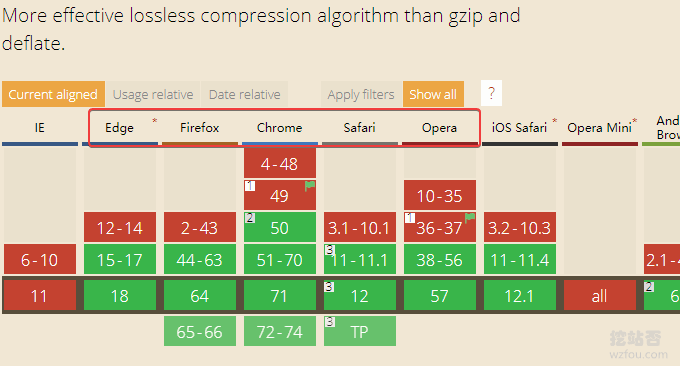
Brotli を使用する必要がありますか? 理論的には、Brotli の圧縮率は GZIP よりもはるかに高いため、Web ページを開く速度にも一定の影響を与えます。ただし、Web ページを数秒で開きたい場合は、まず改善する必要があります。ハードウェアによる速度 Brotli をサポートする主要なブラウザは次のとおりです: https://caniuse.com/#feat=brotli

TLSV1.3 と Brotli を自動的に有効にするワンクリック方法はありますか? はい、CloudFlare の無料 CDN アクセラレーションを使用している場合、CF はすべての Web サイトに対して TLSv1.3 と Brotli を自動的に有効にします。アクセラレーションの効果は、私のデモ サイト losv.wzfou.net で確認できます。
