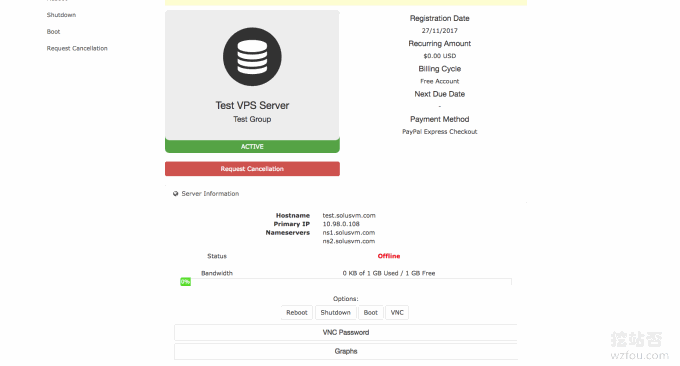
SolusVM has been shared before in the server virtualization panel SolusVM installation and use. This foreign powerful VPS host management and control system mainly allows you to virtualize VPS hosts from independent servers for different users, and SolusVM can also be used with With WHMCS and other integrations, everyone has seen that Chinese VPS on the market is basically this combination.
SolusVM's current authorization is divided into master and controlled, which are respectively 10 US dollars/month and 2.5 US dollars/month. If you want to install SolusVM on the local machine and open an OpenVZ VPS host, then it will cost 10 US dollars. If you want to control + Charged, then it's at least $12.5/month. In short, the license fee of SolusVM is not very expensive, and it is not bad to use it to open a NAT VPS host on a VPS.
The so-called NAT VPS host shares an IP address, but at the same time is independent of each other. Users can still reinstall the system and install various software just like using an ordinary VPS host. NAT VPS relies on intranet port jumping to realize network data connection, so users need to enter in the form of IP+port when using NAT VPS host connection.
This article will share how to use SolusVM to open a NAT VPS host on a server/VPS. In addition, SolusVM can also be integrated with WHMCS. If you already have WHMCS, you can start selling VPS now. Although shared IP VPS hosting is not very suitable for building a website, many people know that it has other uses.

For more experience and tutorials about using independent servers, you can check out:
- Classic VPS host CN2 GIA VPS performance speed test-triple network direct connection two-way CN2 speed
- Five security tips for using a free VPS control panel – don’t let hackers take advantage
- Server log analysis tools: ngxtop and GoAccess - real-time monitoring and visual management to quickly find the source of exceptions
PS: Updated on September 23, 2018, If many Chinese people have already opened NAT VPS hosts, if you want to experience it, you can check out: Domestic Telecom NAT VPS, China Unicom NAT VPS and Mobile NAT VPS usage review-CloudIPLC and Uovz VPS.
PS: Updated on November 2, 2018, Friends who have not used an independent server can learn how to use IPMI to install the operating system on an independent server: Independent server uses IPMI to install the operating system graphic tutorial - iKVM use , hard disk partition and mount ISO.
1. Preparation conditions
1.1 A VPS host or server
The VPS host requires KVM architecture or Hyper-V, and the operating system is Centos6.
1.2 SolusVM License
Official website: https://solusvm.com/. If you want to open an OpenVZ VPS on this machine, you need to purchase a $10/month license from the SolusVM official website. However, SolusVM has a 30-day trial period, and you can apply for a 30-day trial first.

2. SolusVM installation
Upgrade first:
yum update -yThen install the wget command:
yum install wget -yThen install SolusVM using the following command:
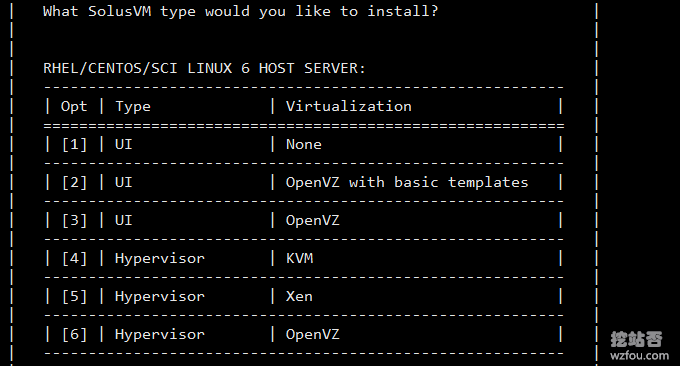
wget https://files.soluslabs.com/install.sh;sh install.shThe following interface appears. We choose 3, which means installing the panel and virtual machine in a VPS. 1 is suitable for the situation where the main control and the controlled are installed separately, which means that only the control panel is installed.
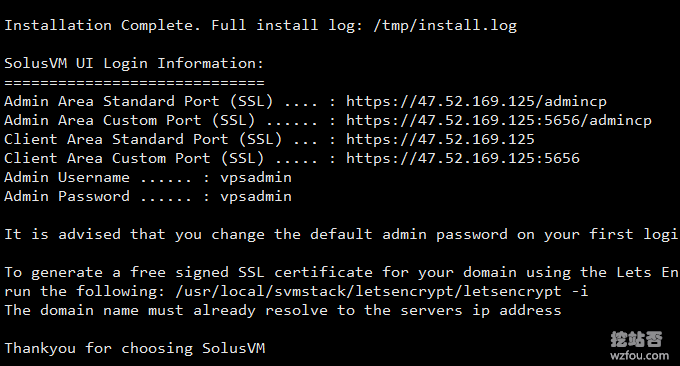
After a while, we can see the successful installation interface. The detailed backend login address, account number and password will be listed here.
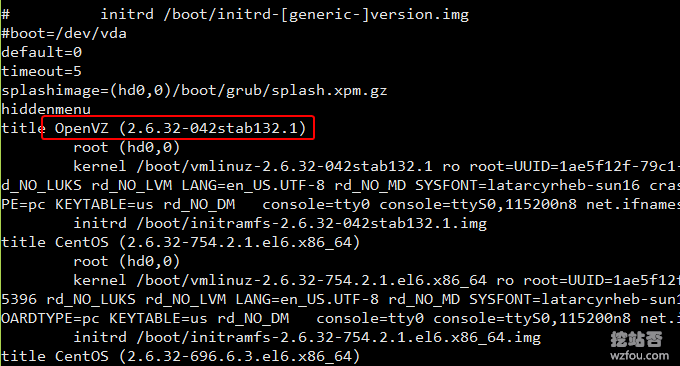
Use the following command to confirm whether boot has been written into kernel of OpenVZ:
vi /boot/grub/grub.confAs shown in the picture below, it indicates that the installation has been successful.
The SolusVM management terminal does not have a Chinese language, but the SolusVM client (i.e. the controlled terminal) has a Chinese language, which can be translated into Chinese through the following command:
cd /usr/local/solusvm/language/client/
wget "https://documentation.solusvm.com/download/attachments/7667936/Simplified-Chinese.lang.txt?api=v2" -O Chinese.lang.txt
chown solusvm:solusvm Chinese.lang.txt
3. Set up server nodes
This is the operation interface of SolusVM. Before setting up a VPS host, we need to set up the node first.
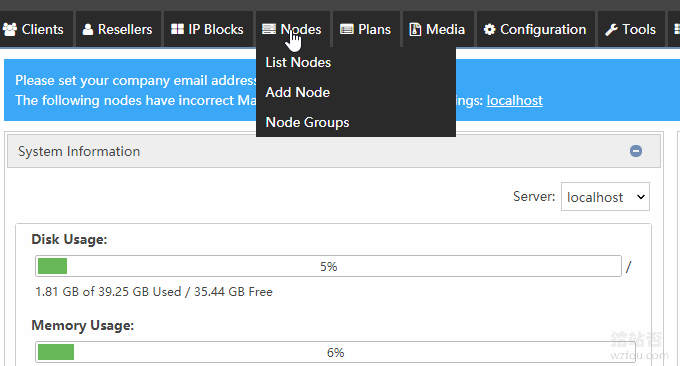
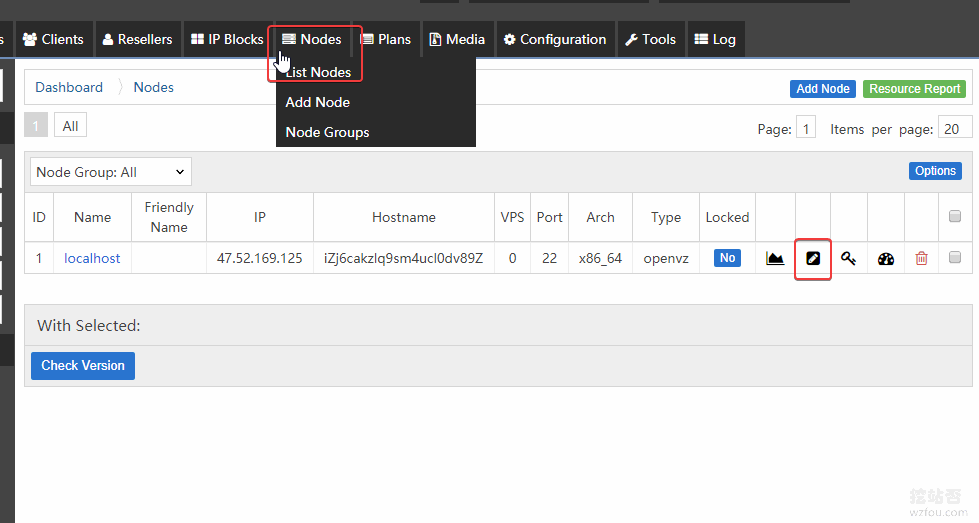
Since we are setting up the OpenVZ VPS host locally, we need to click Edit on the local node. (Click to enlarge)
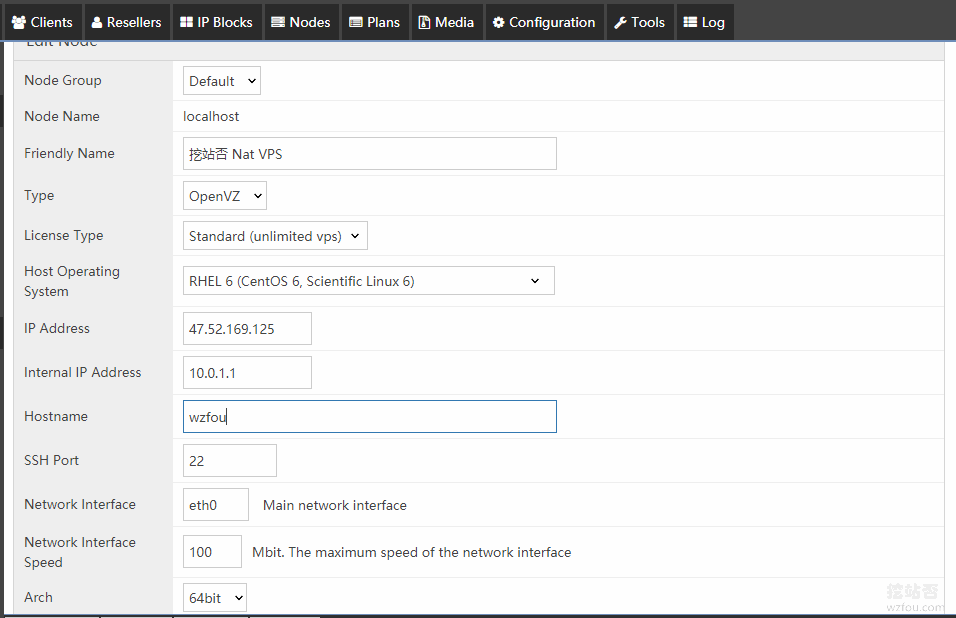
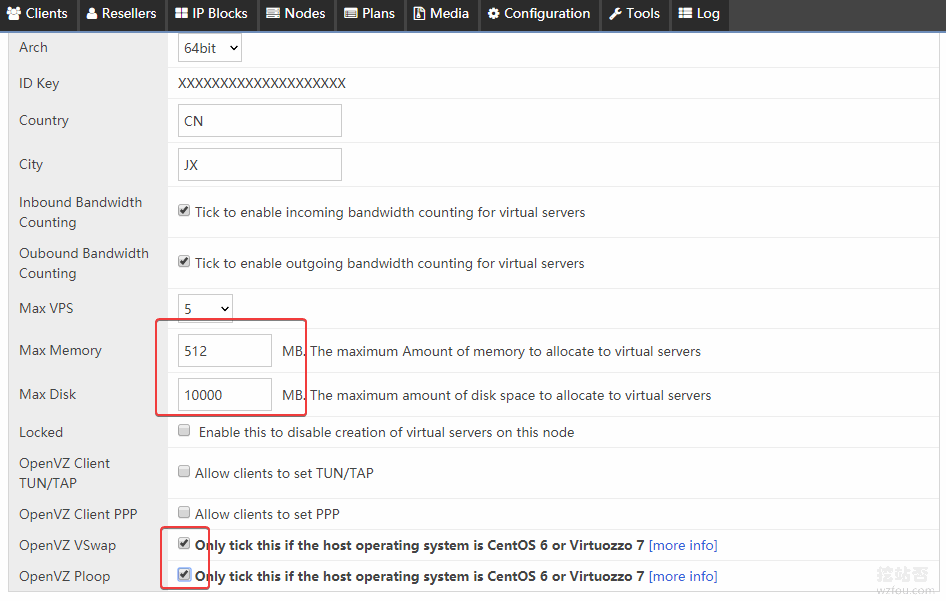
Here you need to set the name, server IP address, internal IP address, etc. The relevant instructions are as follows:
Friendly Name: Just pick a name such as: wzfou
Type: type, openvz must be selected here
License Type: Select according to the picture
Host Operating System: Choose according to the picture, ours is centos6
IP Address: Fill in the public IP address of your VPS.
Internal IP Address: In order to facilitate subsequent NAT settings, fill in here: 10.0.1.1
Hostname: Fill in whatever you want, such as: wzfou
Network Interface:eth0
Arch: Choose 64-bit, that is, 64 bit
county:wzfou
city:wzfou
Max VPS: Just how many OVZ virtual machines you want to open
Max Memory: Your maximum memory, which can be set to exceed the actual memory.
Max Disk: Your largest hard drive, which can be set to exceed the actual hard drive.
Check OpenVZ VSwap&OpenVZ Ploop. Then Update Node
My setup is as follows: (click to enlarge)
Remember to check OpenVZ VSwap&OpenVZ Ploop at the end. (Click to enlarge)
4. Set VPS IP range
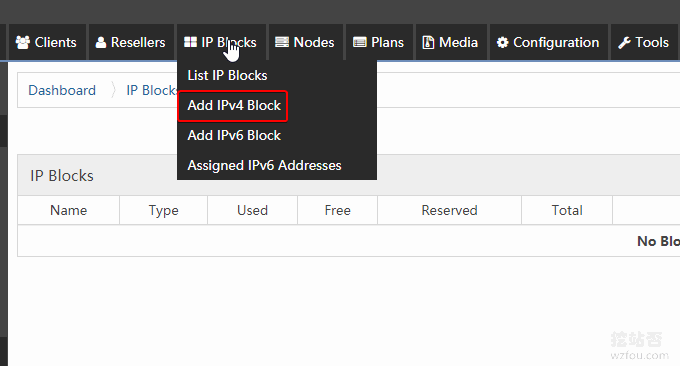
We just added the node, now we need to set the IP range for the VPS host, click IP Blocks and then click Add IP Block.
Examples of filling in are as follows:
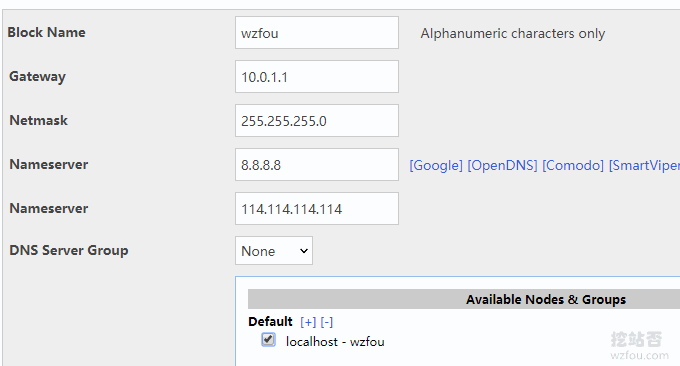
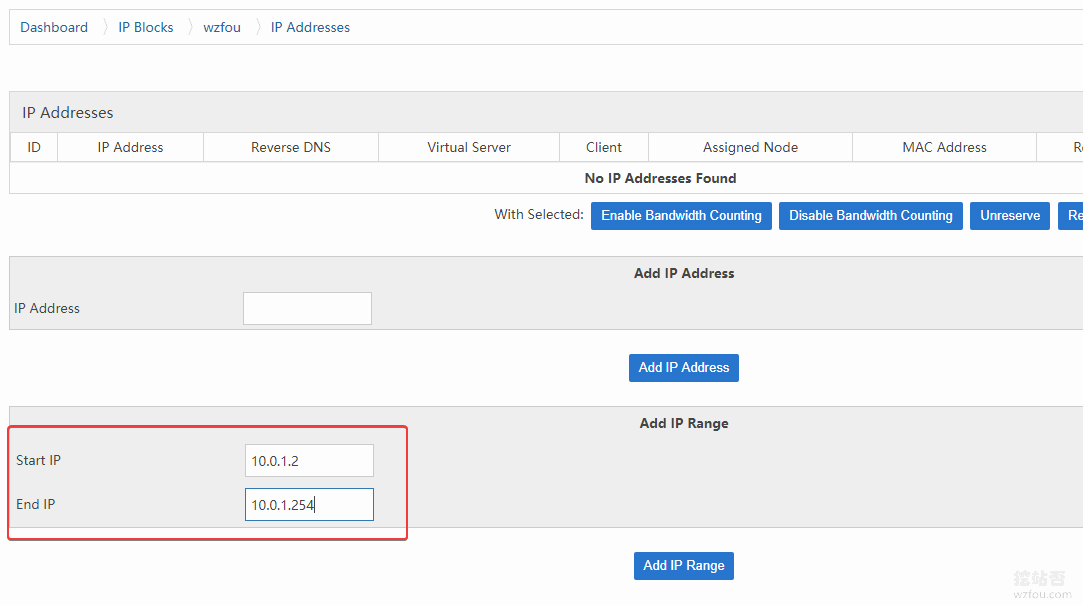
After clicking OK, continue to add the internal IP range. What we just set is 10.0.1.1. We can set the IP range for the VPS host to 10.0.1.2-10.0.1.254.
5. Set up OpenVZ VPS
Click Add OpenVZ Plan in Plans. Here we need to set configuration parameters for our OpenVZ VPS.
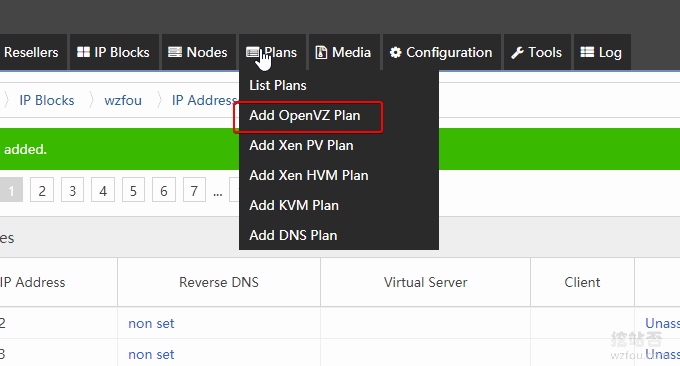
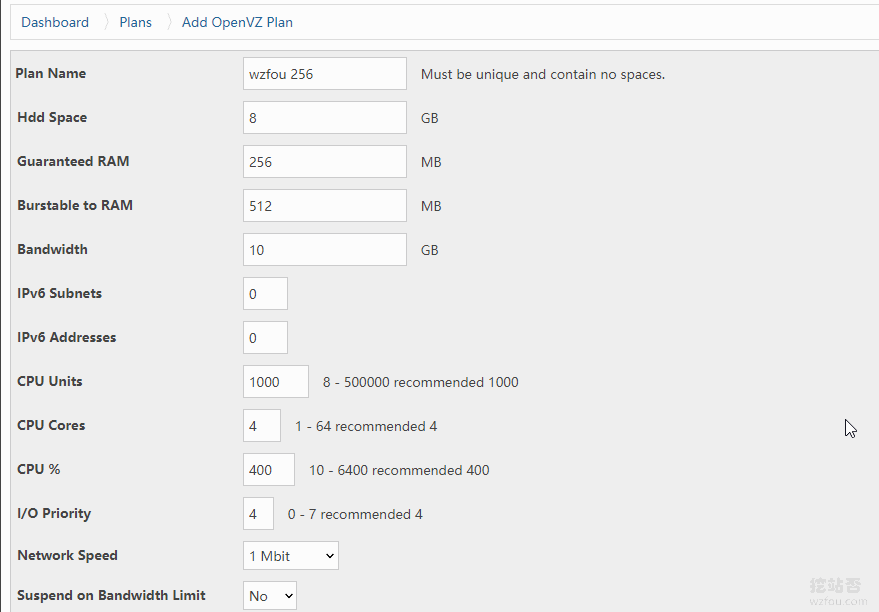
Here you can specify the memory, hard disk, bandwidth, network speed limit and other parameters of the newly opened OpenVZ VPS. Reference is as follows: (click to enlarge)
Then, it’s time to add an operating system to the OpenVZ VPS.

Set up operating system instructions for OpenVZ VPS so that users can choose to install different operating systems in SolusVM.
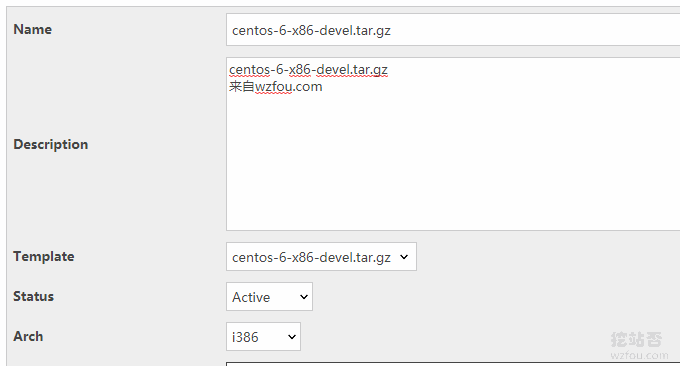
Before performing the above operation, you need to download the files of each major operating system to your server in advance. First go to: https://openvz.org/Download/template/precreated/.
Choose your favorite operating system as the operating system of the OVZ virtual machine, and copy the download address of the system. Then enter the hen's /vz/template/cache file directory. The command is:
cd /vz/template/cacheThen download the system with the following command:
wget http://download.openvz.org/template/precreated/centos-7-x86_64-minimal.tar.gzThe added system template can be seen in SolusVM.

6. Manually set up a VPS host
After completing the above operations, we can now manually set up a VPS host on SolusVM. Start by adding a new user.
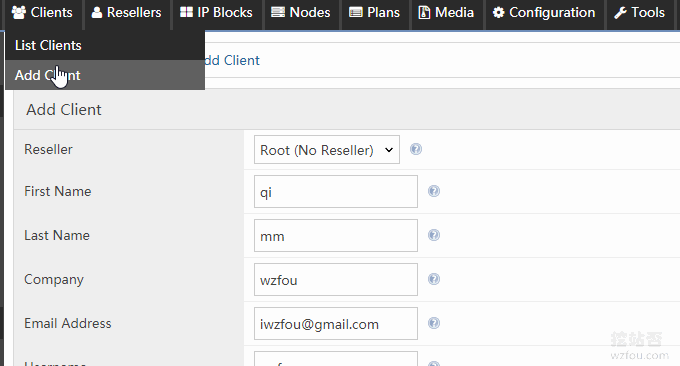
Then open a new VPS host for this new user. Naturally, the host type is OpenVZ. (Click to enlarge)

Select the VPS server node and configure it. This configuration is the parameter we just set in "Setting up OpenVZ VPS".
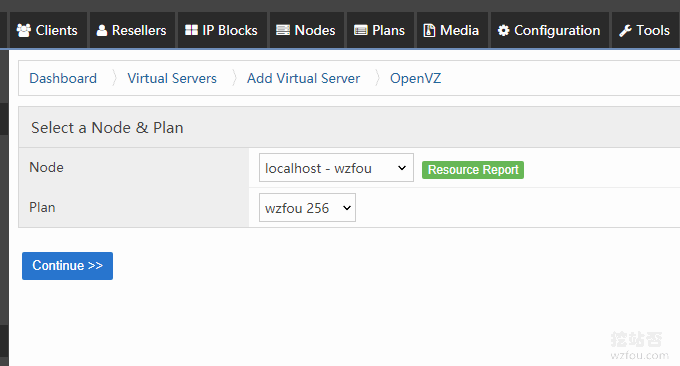
Continue to assign VPS IP, operating system, etc. to new users.
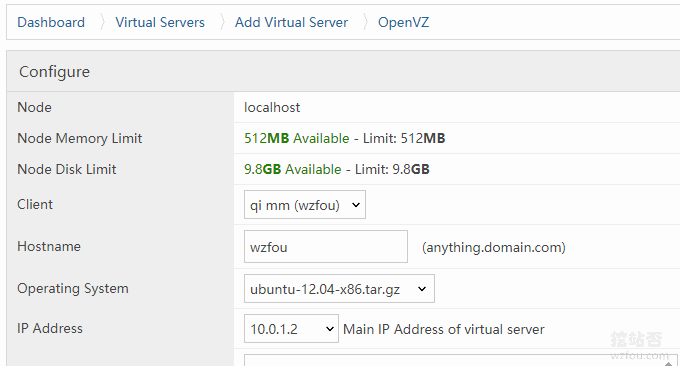
After confirming, a new OpenVZ VPS host has been successfully opened. This VPS is assigned to the new user we just created.
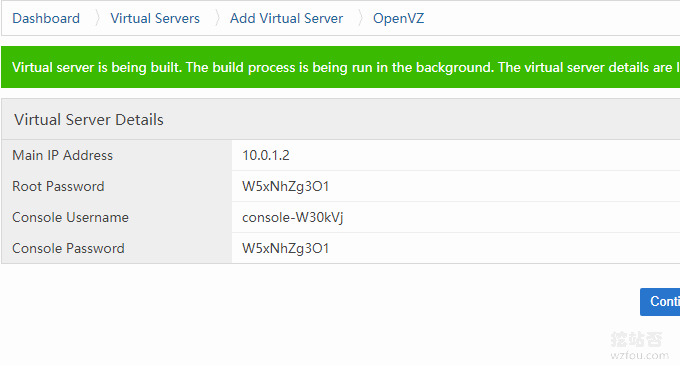
7. NAT network settings
Above we have successfully enabled SolusVM to open a new VPS host on this machine for users to use, but because we use a shared IP, we also need to set up a NAT network. The basic operation is as follows:
Modify the file
vi /etc/modprobe.d/openvz.confand change the last=1to=0, save and exit.Reboot the system
rebootUse
iptables -t nat -Lto check. If it is the following code, it means the setting is correct.
As shown below:
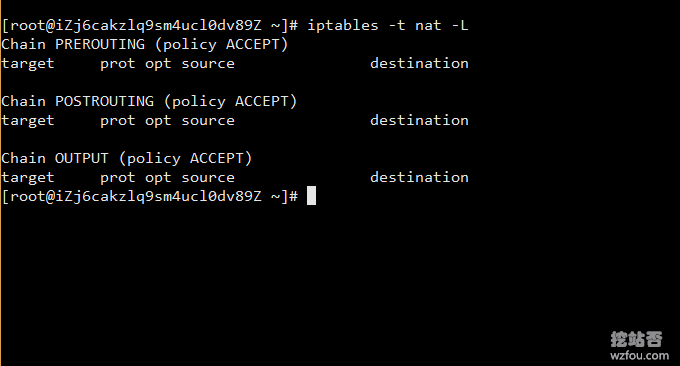
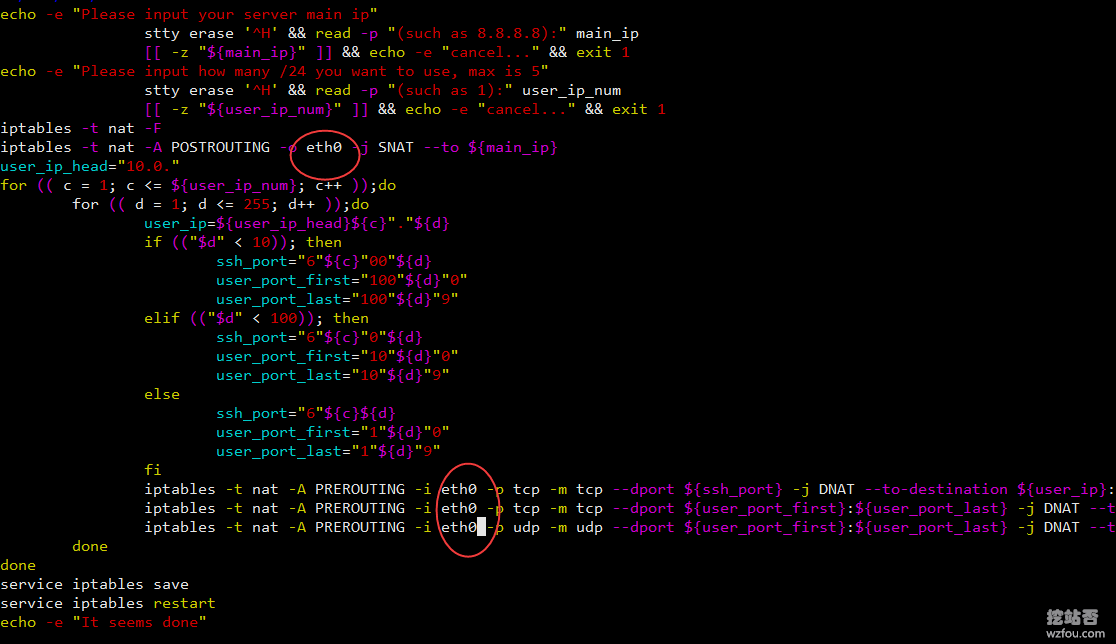
Intranet port forwarding. We need to use a script file to add port intranet forwarding in batches. Script download address: https://do.wzfou.net/wzfou/addnat.sh. When using this script, you need to modify the parameters according to the network card name of your hen.
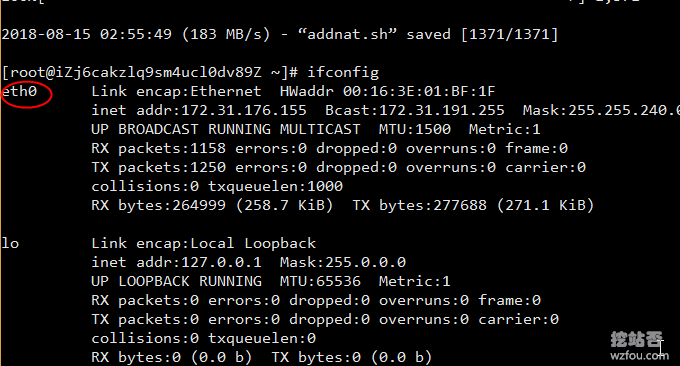
Use the command on the hen to view the network card information:
ifconfigFind the network card name that begins with your hen's IP address, write it down, and change addnat.sh accordingly to your network card name. As shown below:
Use the vim command to edit the addnat.sh script and replace the network card name.
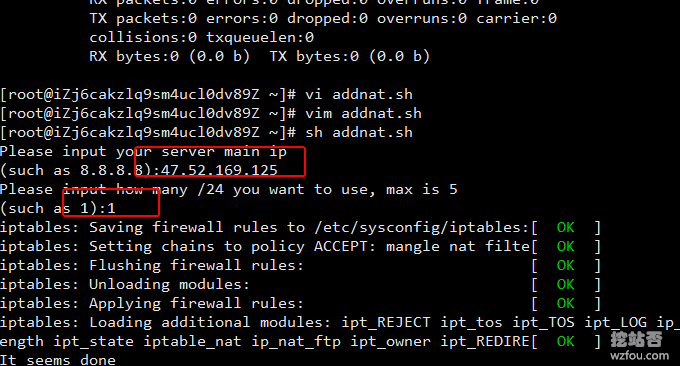
Then a command to execute the script:
sh addnat.shor
bash addnat.shThere are two operations here: fill in the public IP of your hen in the first place, and generally fill in 1 in the second place, which is the intranet IP of a segment. As shown below:
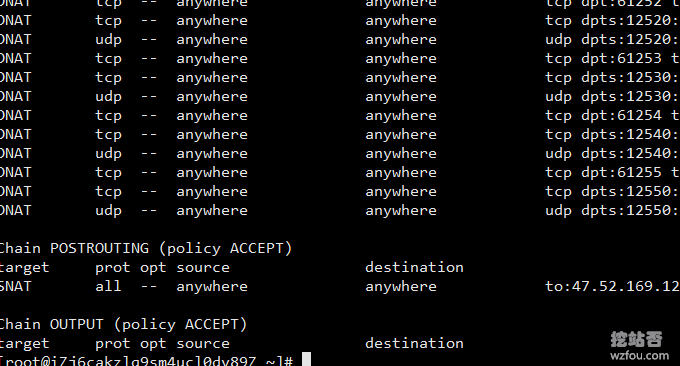
Use the following command to check whether the intranet port is assigned:
iptables -t nat -LAs shown below:
PS: Updated on January 11, 2019, This part involves Linux network configuration. For related command usage tutorials, refer to: VPS host and independent server network configuration method-Linux manual setting of IPv4 and IPv6 addresses.
8. NAT VPS usage experience
Through the above method, we have successfully opened an OpenVZ VPS host and forwarded different ports to the same IP, which means that NAT VPS has been implemented. Open the SolusVM client login address and log in using the new user account and password you just created.
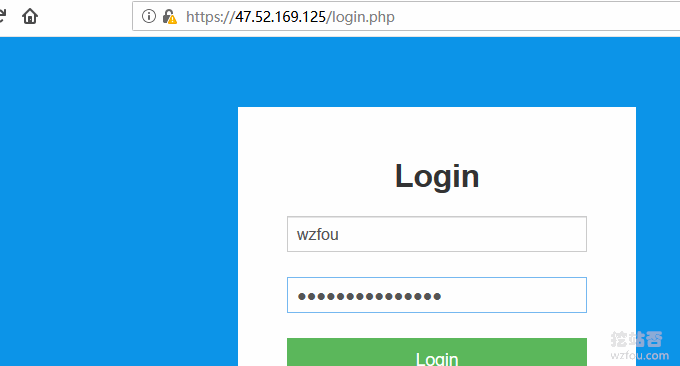
Here we can see the familiar SolusVM operation interface, and we can see the newly opened OpenVZ VPS configuration and other information.
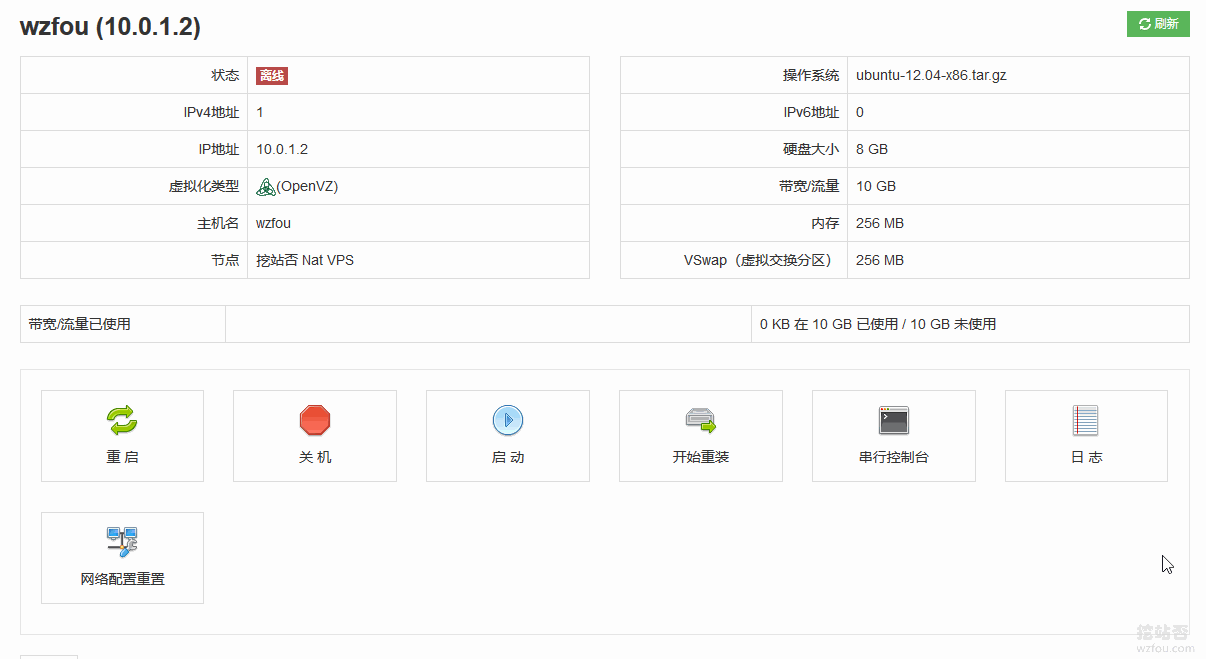
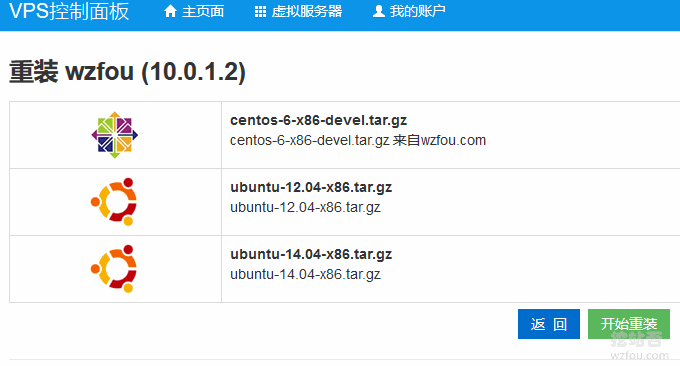
Shutting down and reinstalling the system can be performed directly on SolusVM. The difference from the usual VPS hosts is that the NAT VPS hosts share an IP address, and the login connection needs to be done in the form of IP + port.
9. Integration of SolusVM and WHMCS
After reading so much, someone must have thought about whether it is possible to integrate SolusVM with WHMCS, that is, to automatically register an account, purchase a host, and open a VPS? It's actually very simple, download the WHMCS SolusVM module. After decompression, add the solusvmpro folder to the root directory /modules/servers .
- HTTPS://marketplace.i wasn't born yet.com/product/3861
- https://GitHub.com/with-etch/so-svm-WH-MCs-module
- https://GitHub.com/with-etch/so-svm-WH-MCs-module/archive/master.zip
Then go to WHMCS to add the server, Setup – Products – Servers. Then add products at WHMCS, which is equivalent to setting configuration parameters for the VPS host.
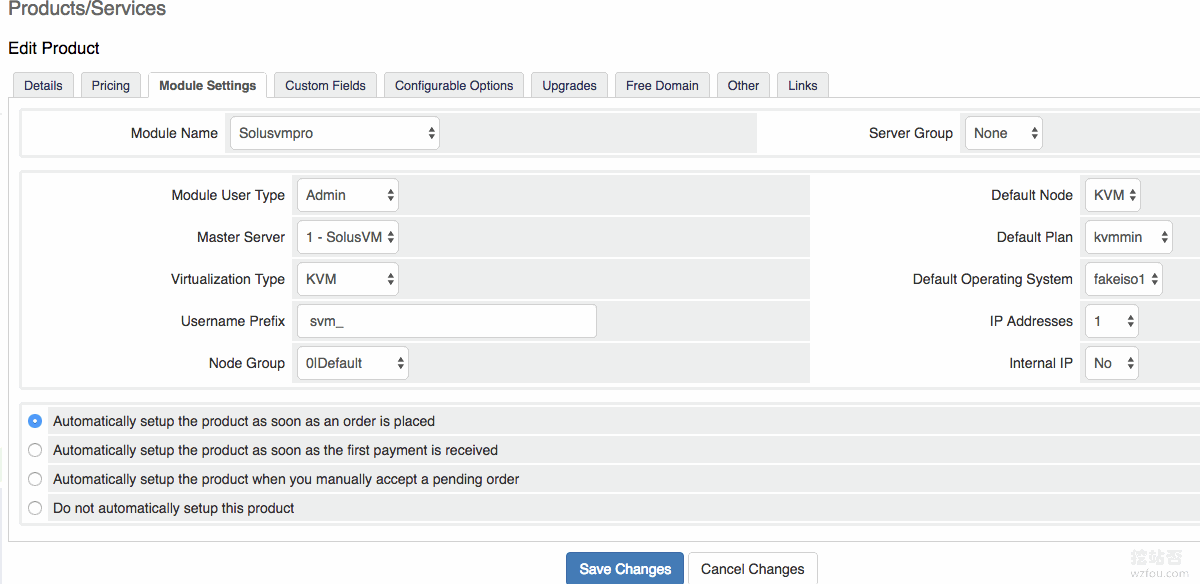
Once confirmed, SolusVM can be successfully integrated with WHMCS. After the user registers and purchases a VPS in WHMCS, the VPS host will be automatically activated in SolusVM, and then the user can directly log in to SolusVM to manage his or her VPS.

For those who have not used WHMCS, I strongly recommend that you choose to read the WHMCS tutorial topic I wrote: WHMCS from entry to mastery.
PS: Updated on April 3, 2019, WHMCS open source payment gateway can be found here: WHMCS payment gateway - the installation and use of open source and free WHMCS Alipay, WeChat and Youzan plug-ins.
10. Summary
NAT VPS hosts have two major advantages over ordinary VPS hosts: one is shared IP, which greatly saves costs; the other is that multiple users can operate independently without affecting each other. The NAT VPS launched by SolusVM has been welcomed by many merchants, and buyers also take what they want.
Judging from the operating experience of mining sites, it is not technically difficult for SolusVM to set up a NAT VPS host. The key point lies in the SolusVM authorization issue. If you are using a formal production environment, it is strongly recommended that you use formal SolusVM authorization to avoid unavoidable losses.
