Although the blog is now placed on Alibaba Cloud Hong Kong CN2 VPS host, Telecom uses the CN2 line, so the access speed will be faster (but I have also received feedback from friends of Telecom that access is slow (⊙﹏⊙)). However, China Unicom and mobile users will have slower access, especially during the evening peak period. Many friends said that they cannot open it at all.
Judging from the official announcement, Alibaba Cloud Hong Kong CN2 VPS has indeed encountered problems with China Unicom lines or telecommunications line nodes, resulting in access problems to the entire computer room. Of course, Alibaba Cloud will naturally leave the "pot" to the operators. Some time ago, China Unicom users had to bypass Japan or other places to access Alibaba Cloud Hong Kong VPS.
When I moved from Kdatacenter Korea VPS to Alibaba Cloud Hong Kong VPS, firstly, I felt that Alibaba Cloud Hong Kong VPS was indeed cheap and attractive enough; secondly, I felt that the CN2 line might be good, at least much faster than the American line. Now it seems that except for telecom users, access will be smoother, while users of other operators will have problems from time to time.
In order to solve this problem, the natural thing to think of is to accelerate CDN for the website. Naturally, domestic VPS cannot be used without a BA number, so I found a Korean VPS method that uses Nginx reverse proxy to transfer the access requests of China Mobile and China Unicom users to the CDN server, which can maximize the speed of website access.

This article will explain in detail how to build a CDN for the website to accelerate and cache the corresponding pages and files. At the same time, when the website content is updated, use ngx_cache_purge to promptly update the cache on the CDN server. Finally, solve the problem of source server acquisition during use. The problem of the user’s real IP. More CDN acceleration and website building tools include:
- Join Cloudflare Partner to provide CloudFlare CDN acceleration service for free - no need to modify NS to support SSL
- Use Fikker to build your own CDN - supports HTTPS, page caching, real-time monitoring, traffic statistics, and CC attack prevention
- Two excellent server network traffic monitoring tools: Ntopng and Munin - powerful and intuitive
PS: Updated on April 27, 2018. Currently, Youpaiyun CDN is used for images and static files such as JS and CSS on the website. Review article: Youpaiyun CDN accelerated application and usage tutorial-1 Key mirroring, static dynamic CDN and free SSL.
PS: Updated on March 6, 2018, If you don’t want to build a CDN by yourself, you can try a third-party CDN acceleration service. The familiar CloudFlare is a very good choice: Ten things you may not know about CloudFlare Free CDN acceleration tip-SSLDDOSCache.
1. Install Nginx
You can manually install and configure Nginx, or use the LNMP one-click installation package to install Nginx. The more useful ones are: Oneinstack and LNMP. If you don’t want to use it, you can try xiaoz’s one-click Nginx installation package (applicable to Centos 7 and Deebian 8).
- https://GitHub.com/hellonow/nginx-cdn
Linux installs Nginx with one click and turns on CDN (reverse proxy). Just execute the following command to install it.
wget https://raw.githubusercontent.com/helloxz/nginx-cdn/master/nginx.sh
chmod +x nginx.sh && ./nginx.sh
2. Nginx related configuration
Here I use wzfou.com for acceleration as an example. There is an origin VPS and a VPS used as a CDN reverse proxy. The corresponding IPs of the two are as follows:
1. Source site: 192.168.1.100, which is where the wzfou.com website data is actually stored.
2. CDN:192.168.1.101 CDN node, if there are multiple CDN nodes, the operation method is the same
First modify the Hosts on the CDN node. The purpose is to tell the CDN node where to obtain website data, that is, the return-to-source address. The modification is as follows:
vi /etc/hosts
192.168.1.100	www.wzfou.com
Then create the nginx configuration file wzfou.com.conf on the CDN node
#创建缓存目录
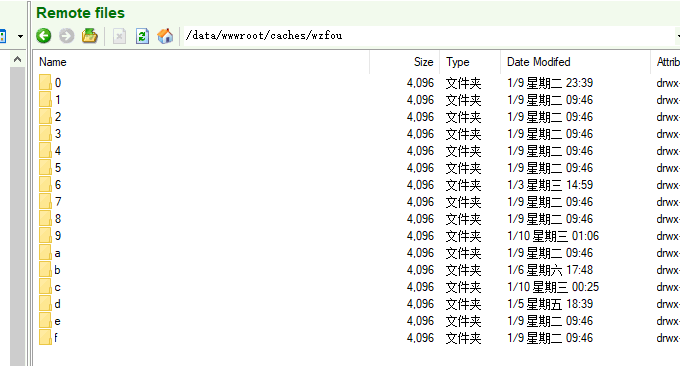
mkdir -p /data/wwwroot/caches/wzfou.com
#设置缓存目录权限
chown -R www:www /data/wwwroot/caches/wzfou.com
#创建wzfou.com.conf
vi /usr/local/nginx/conf/vhost/wzfou.com.conf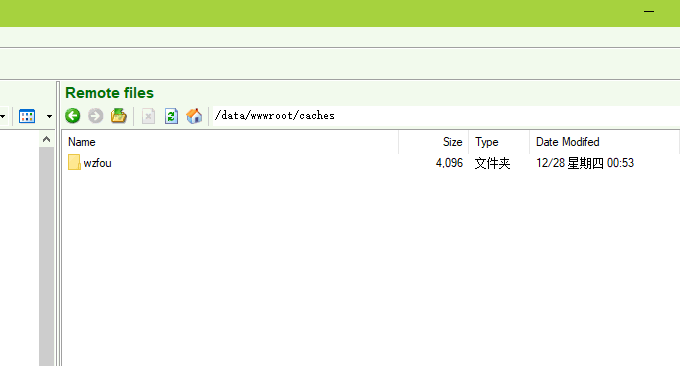
Add the following content to wzfou.com.conf. Please adjust the cache directory/cache time according to the actual situation. The meaning of each parameter will be explained in detail later.
proxy_cache_path /data/wwwroot/caches/wzfou.com levels=1:2 keys_zone=wzfou:50m inactive=30m max_size=50m;
server {
    listen 80;
    server_name wzfou.com;
    charset utf-8,gbk;
        location / {
        proxy_set_header Accept-Encoding "";
           proxy_pass https://wzfou.com;
           proxy_redirect off;
           proxy_set_header X-Real-IP $remote_addr;
           proxy_set_header X-Forwarded-For $proxy_add_x_forwarded_for;
           proxy_cache wzfou;
           proxy_cache_valid  200 304  30m;
           proxy_cache_valid  301 24h;
           proxy_cache_valid  500 502 503 504 0s;
           proxy_cache_valid any 1s;
           proxy_cache_min_uses 1;
           expires 12h;
    }
}
The relevant instructions are as follows:
1.
/data/wwwroot/caches/wzfou.com: is the cache directory2.
levels: Specify that the cache space has two levels of hash directories, the first level directory is 1 letter, and the second level is 2 letters.3.
keys_zone=wzfou:50m: Give the cache space a name, here it is named "wzfou", and the following 50m refers to the memory cache space.4.
inactive=30m: If the resource is not accessed within 30 minutes, it will be deleted.5.
max_size=50m: refers to the hard disk cache size of 50MB6.
proxy_cache_valid: Specify the status code cache time. Write the status code in the front and the cache time in the back.
Finally, reload nginx to make the configuration take effect. If you are using oneinstack, enter the command directly: service nginx reload. If it is xiaoz one-click script, enter: /usr/local/nginx/sbin/nginx -s reload .
3. HTTPS site reverse proxy
What is shared above is the Nginx reverse proxy settings for HTTP sites. If you want to reverse proxy HTTPS sites, you need to apply for an SSL certificate for your domain name first, and then you only need to set it up. For a good SSL certificate path, please refer to the following configuration to adjust it:
proxy_cache_path /data/wwwroot/caches/wzfou.com levels=1:2 keys_zone=wzfou:50m inactive=30m max_size=50m;
server {
  	listen 443 ssl http2;
	ssl_certificate	/data/ssl/wzfou/wzfou.com.crt;
	ssl_certificate_key	/data/ssl/wzfou/wzfou.com.key;
	ssl_session_timeout 1d;
	ssl_session_cache builtin:1000 shared:SSL:10m;
    #ssl_dhparam /data/ssl/dhparam.pem;
    ssl_protocols TLSv1 TLSv1.1 TLSv1.2;
    ssl_ciphers 'ECDHE-ECDSA-CHACHA20-POLY1305:ECDHE-RSA-CHACHA20-POLY1305:ECDHE-ECDSA-AES128-GCM-SHA256:ECDHE-RSA-AES128-GCM-SHA256:ECDHE-ECDSA-AES256-GCM-SHA384:ECDHE-RSA-AES256-GCM-SHA384:DHE-RSA-AES128-GCM-SHA256:DHE-RSA-AES256-GCM-SHA384:ECDHE-ECDSA-AES128-SHA256:ECDHE-RSA-AES128-SHA256:ECDHE-ECDSA-AES128-SHA:ECDHE-RSA-AES256-SHA384:ECDHE-RSA-AES128-SHA:ECDHE-ECDSA-AES256-SHA384:ECDHE-ECDSA-AES256-SHA:ECDHE-RSA-AES256-SHA:DHE-RSA-AES128-SHA256:DHE-RSA-AES128-SHA:DHE-RSA-AES256-SHA256:DHE-RSA-AES256-SHA:ECDHE-ECDSA-DES-CBC3-SHA:ECDHE-RSA-DES-CBC3-SHA:EDH-RSA-DES-CBC3-SHA:AES128-GCM-SHA256:AES256-GCM-SHA384:AES128-SHA256:AES256-SHA256:AES128-SHA:AES256-SHA:DES-CBC3-SHA:!DSS';
    ssl_prefer_server_ciphers on;


    ssl_stapling on;
    ssl_stapling_verify on;

    server_name wzfou.com;
    access_log /data/wwwlogs/wzfou.com_nginx.log combined;

    charset utf-8,gbk;
        location / {
        proxy_set_header Accept-Encoding "";
           proxy_pass https://wzfou.com;
           proxy_redirect off;
           proxy_set_header X-Real-IP $remote_addr;
           proxy_set_header X-Forwarded-For $proxy_add_x_forwarded_for;
           proxy_cache wzfou;
           proxy_cache_valid  200 304  30m;
           proxy_cache_valid  301 24h;
           proxy_cache_valid  500 502 503 504 0s;
           proxy_cache_valid any 1s;
           proxy_cache_min_uses 1;
           expires 12h;
    }
}
server {
    listen 80 default_server;
    return 301 https://$host$request_uri;
}
4. ngx_cache_purge clears the update cache
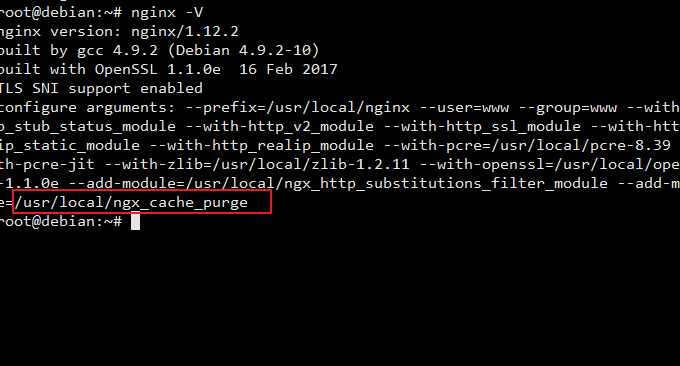
Cleaning the Nginx cache requires the help of the ngx_cache_purge module. You can enter the command nginx -V to view the compiled modules. If there is no ngx_cache_purge, it means that the module is not installed, and you need to recompile Nginx.
4.1 Configure ngx_cache_purge
Add the following configuration to the server section and reload Nginx. Please keep the following wzfou consistent with the value defined by keys_zone, otherwise nginx will not start.
location ~ /purge(/.*) {
allow all;
proxy_cache_purge wzfou $proxy_host$1$is_args$args;
error_page 405 =200 /purge$1;
}
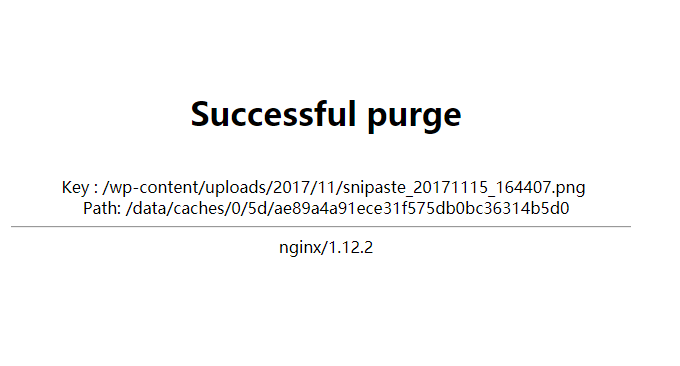
If you want to clear the cache, just add the purge parameter, such as https://www.xiaoz.me/purge/xxx.png. If the file exists in the cache, you will be prompted as follows. screenshot. If there is no cache, 404 will be returned. If 404 is returned no matter what, the configuration may not be successful.
4.2 WordPress automatically refreshes cache
For WordPress blogs, if the page is cached after CDN is enabled and cannot be displayed immediately after the user submits a comment, you can use the Ajax asynchronous request ngx_cache_purge interface to clear the page cache when the user submits a comment. Just add the following js to footer.php.
<script>
		$(document).ready(function(){
			$("#submit").click(function(){
				var uri = "https://wzfou.com/purge" + window.location.pathname;
				$.get(uri,function(data,status){
					return true;
				});
			});
		});
	</script>
The following is the complete configuration of Xiaoz Blog CDN, for reference only. You need to replace Keys_zone, SSL path, domain name, etc.:
proxy_cache_path /data/caches levels=1:2 keys_zone=xiaozcdn:100m inactive=30m max_size=100m;
server
    {
    listen 443 ssl http2;
    listen [::]:443 ssl http2;
    ssl on;
    ssl_certificate /xxx/www_xiaoz_me.crt;
    ssl_certificate_key /xxx/www_xiaoz_me.key;
    ssl_session_timeout 1d;
    ssl_session_cache shared:SSL:50m;
    ssl_session_tickets off;
    ssl_protocols TLSv1 TLSv1.1 TLSv1.2;
    ssl_ciphers 'ECDHE-ECDSA-CHACHA20-POLY1305:ECDHE-RSA-CHACHA20-POLY1305:ECDHE-ECDSA-AES128-GCM-SHA256:ECDHE-RSA-AES128-GCM-SHA256:ECDHE-ECDSA-AES256-GCM-SHA384:ECDHE-RSA-AES256-GCM-SHA384:DHE-RSA-AES128-GCM-SHA256:DHE-RSA-AES256-GCM-SHA384:ECDHE-ECDSA-AES128-SHA256:ECDHE-RSA-AES128-SHA256:ECDHE-ECDSA-AES128-SHA:ECDHE-RSA-AES256-SHA384:ECDHE-RSA-AES128-SHA:ECDHE-ECDSA-AES256-SHA384:ECDHE-ECDSA-AES256-SHA:ECDHE-RSA-AES256-SHA:DHE-RSA-AES128-SHA256:DHE-RSA-AES128-SHA:DHE-RSA-AES256-SHA256:DHE-RSA-AES256-SHA:ECDHE-ECDSA-DES-CBC3-SHA:ECDHE-RSA-DES-CBC3-SHA:EDH-RSA-DES-CBC3-SHA:AES128-GCM-SHA256:AES256-GCM-SHA384:AES128-SHA256:AES256-SHA256:AES128-SHA:AES256-SHA:DES-CBC3-SHA:!DSS';
    ssl_prefer_server_ciphers on;
    ssl_stapling on;
    ssl_stapling_verify on;

    server_name     www.xiaoz.me;
    charset utf-8,gbk;

   #删除缓存
    location ~ /dcache(/.*) {
    allow all;
    proxy_cache_purge xiaozcdn $proxy_host$1$is_args$args;
    error_page 405 =200 /purge$1;
    }

       location / {
       #proxy_set_header Accept-Encoding "";
       proxy_pass https://www.xiaoz.me;
       proxy_redirect off;
       proxy_set_header X-Real-IP $remote_addr;
       proxy_set_header X-Forwarded-For $proxy_add_x_forwarded_for;
       proxy_cache xiaozcdn;
       proxy_cache_valid  200 304  30m;
       proxy_cache_valid  301 24h;
       proxy_cache_valid  500 502 503 504 0s;
       proxy_cache_valid any 1s;
       #达到第几次被缓存?
       proxy_cache_min_uses 1;
       expires 12h;
       proxy_cache_key    $uri$is_args$args;
    }
}
server
{
    listen 80;
    server_name www.xiaoz.me;
    rewrite ^(.*) https://www.xiaoz.me$1 permanent;
}
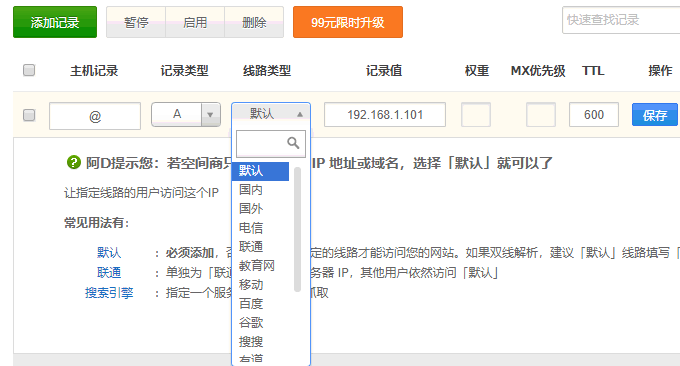
5. Do a good job in DNS domain name resolution
Using the DNS resolution functions such as lines, regions, and clients provided by DNS domain name resolution, we can resolve different broadband users, provincial users, and client users to CDN nodes.
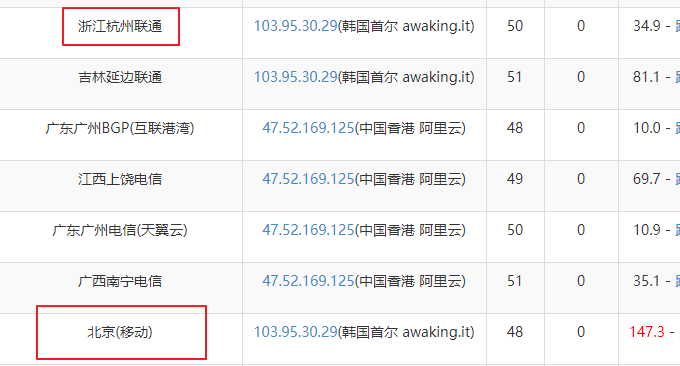
Use the webmaster tool test to see that users from different places on wzfou.com access different CDN nodes, which means that our CDN acceleration deployment is successful.
6. Unable to obtain real IP after enabling CDN
If you are a WordPress user, when you enable Nginx CDN acceleration, you will find that the user comment IPs obtained by the WP backend have become CDN nodes. Solving this problem is also very simple. You only need to add the following code to wp- In the config.php file:
if (isset($_SERVER['HTTP_X_REAL_IP'])) {
$_SERVER['REMOTE_ADDR'] = $_SERVER['HTTP_X_REAL_IP'];
}
7. Summary
Nginx reversely binds domain names to build a CDN acceleration server with low cost and simple installation and configuration. It is especially suitable for friends who do not want to use a paid CDN. In fact, many professional CDN acceleration also uses Nginx reverse proxy to accelerate website access. It can be said that Nginx CDN is a very effective acceleration method.

There are two issues that need to be paid attention to when using Nginx CDN acceleration. One is the cache update issue. If your web page is updated frequently, you can set an update time interval. The second is the issue of the user’s real IP. We can use PHP Or Nginx, etc. directly obtain the real IP address.
