When we use WordPress, we often encounter problems such as blank WordPress pages, inability to log in to the WordPress backend, and server 500 errors. These problems often occur after the WordPress version is updated and upgraded, plug-ins are installed, and after the server PHP, Mysql and other major versions are updated, the WordPress function does not work. Caused by supported reasons.
In addition, if there are too many WordPress plug-ins installed, like wzfou.com, it can easily lead to conflicts. I previously shared in the article The WordPress Plug-in I’m Using that the plug-in I’m using has such a problem. The old version of MailPoet is actually incompatible with PHP 7.2 and PHP 7.3, resulting in a blank WordPress page.

This article will share the WordPress error diagnosis mode, which is mainly used to deal with issues such as blank WordPress pages, server 500 errors and plug-in conflicts. More WordPress optimization tips are as follows:
- WordPress uses MailPoet to build its own RSS update email notification system - user subscription and management
- Use Algolia to add real-time on-site search function to WordPress - higher search quality and more accurate content
- WooCommerce Alipay payment-WooCommerce payment plug-in setup and use
PS: Updated on December 8, 2019, For WordPress that does not have its own mobile adaptive function or its own mobile theme is not very good-looking, we can try AMP adaptive: WordPress AMP mobile optimization-build Suitable for mobile search engines and mobile phone browsing to access WP.
PS: Updated on December 25, 2019 , sometimes 502 errors are prone to occur when operating in the WordPress background. Solution: Solve the 502 error in the WordPress background editing and saving menu.
1. Manually enable WP error debugging
Open the wp-config.php file and add the following code (note that if there are define('WP_DEBUG', true); and other codes in the original configuration file, please comment them out) :
/**
 * This will log all errors notices and warnings to a file called debug.log in
 * wp-content (if Apache does not have write permission, you may need to create
 * the file first and set the appropriate permissions)
 */
define('WP_DEBUG', true);
define('WP_DEBUG_LOG', true);
define('WP_DEBUG_DISPLAY', false);
@ini_set('display_errors',0);
After saving, you can see the corresponding error message in the wp-content/debug.log file. If you want to display the error message directly on the web page, replace it with:
/ 开启WP_DEBUG模式
define( 'WP_DEBUG', true );

// 开启DEBUG日志,一定要记得关闭这个日志功能并清理这个日志文件哦,产生的日志文件在: /wp-content/debug.log
define( 'WP_DEBUG_LOG', true );

// 显示errors and warnings
define( 'WP_DEBUG_DISPLAY', true );
@ini_set( 'display_errors', 'On' );
Finally, be sure to comment out or delete the above code after the test is completed to prevent bad guys!

2. WP error diagnosis and debugging plug-in
2.1 Query Monitor
Plug-in: https://wordpress.org/plugins/query-monitor/
The Query Monitor plug-in can help you debug database queries, PHP errors, hooks and actions, block editor blocks, enqueued scripts and stylesheets, HTTP API calls, etc. When enabled, it will display as shown below:

Query Monitor can display detailed WordPress error messages and query information for easy reference:

2.2 Debug Bar
Plug-in: https://wordpress.org/plugins/debug-bar/
Before enabling the plug-in, you need to edit your WP configuration file and add the following code (remember to delete when you are done with it):
#Debug Bar插件
define( 'WP_DEBUG', true );
define( 'SAVEQUERIES', true );
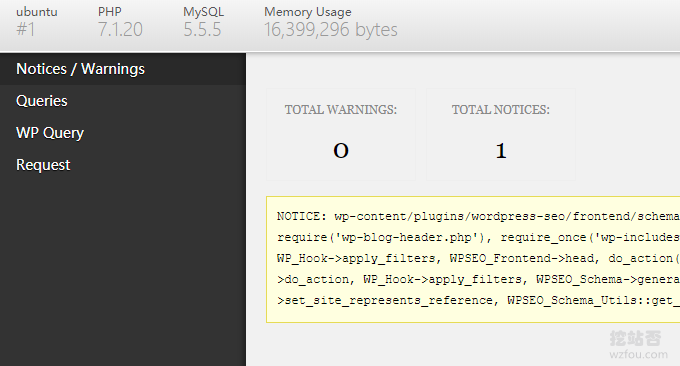
The Debug Bar plug-in can display PHP errors, mysql queries, etc., and displays the Debug Bar button in the upper right corner of WordPress.

After clicking, you can view detailed PHP errors and Mysql query information, as shown below:

3. Summary
Manually turn on the WordPress error diagnosis mode. You can choose whether to display the error message directly on the page or output it to the log in the directory. For some important websites, it is recommended not to display the error message but to view it in the log.
Use Query Monitor and Debug Bar to turn on the diagnostic mode. Compared with turning on the diagnostic mode manually, the error information will be displayed more intuitively and it will be easier to query. In short, in order to avoid WP errors as much as possible, we should use less plug-ins.
