Recently, a new SSD server has been online. The cost of SSD is too high, so the online SSD hard drive cannot directly have a few TB capacity like HDD. It can only gradually expand the hard drive according to business needs, so the theme of this article is born: Linux Dynamically expand hard drive capacity while keeping original data unchanged.
In the traditional sense, VPS hard disk expansion uses mounting, that is, redividing a new hard disk into another partition, and then mounting the partition to a certain directory of the original hard disk. This approach is simple and convenient. It is feasible if it is only used for storage expansion, but it is insufficient for storage services with multiple needs.
Dynamic expansion of the hard disk is to increase or decrease the space capacity of the hard disk while keeping the original data unchanged, so as to meet our daily website building needs. This article will introduce how Linux LVM manages disk space. LVM is a mechanism for managing disk partitions in the Linux environment.

Linux LVM is a logical layer built on the hard disk and partition and under the file system, which can improve the flexibility of disk partition management. Regarding Linux disk space management issues, we can also solve the problem of insufficient space by cleaning, mounting cloud disks, sharing, etc. Here are:
- Solution to Linux system disk space full-No Space Left on Device error
- VPS mounts domestic and foreign network disks to achieve free expansion tools: Rclone, COS-Fuse and OSSFS
- Three ways to share folder directories in Linux - NFS remote mounting, GlusterFS shared storage and samba shared directories
1. The resize2fs command directly expands the capacity.
Command usage example:
resize2fs -f /dev/vda1  #针对的是ext2、ext3、ext4文件系统
#参数说明
-d:打开调试特性;
-p:打印已完成的百分比进度条;
-f:强制执行调整大小操作,覆盖掉安全检查操作;
-F:开始执行调整大小前,刷新文件系统设备的缓冲区。
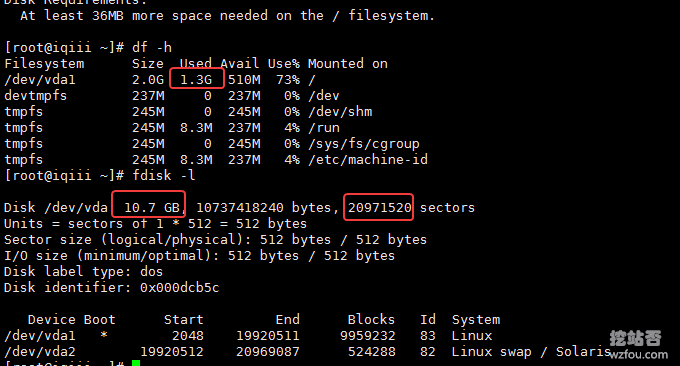
If your Linux partition uses LVM (the LVM used by SolusVM VPS), then you can directly use the resize2fs command to expand the original disk. This situation generally occurs when the capacity of the hard disk checked using the df -h command is smaller than the capacity of the hard disk partition checked using the fdisk -l command, as shown below:
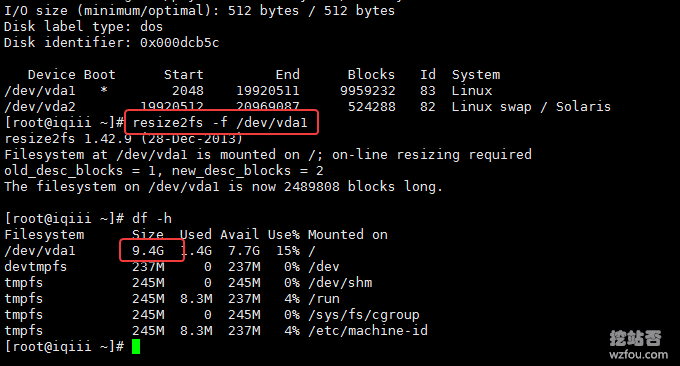
After executing the resize2fs command to expand the capacity, check again and see that the capacity of the hard disk partition has increased.
2. Create a new partition and mount it to expand the hard disk capacity.
If your hosting provider did not partition all the hard disks when originally allocating them, or re-divided the hard disk size (this is the case with SolusVM VPS upgrading the hard disk), then you will find that you can use the df -h command to view the hard disk. The capacity is equal to the capacity of the hard disk partition viewed using the fdisk –l command, but is less than the total space of fdisk, as shown below:
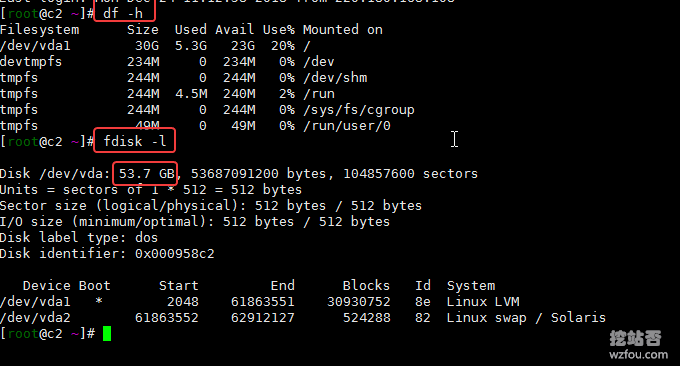
At this time, we can create a new partition and mount it to the hard disk to achieve capacity expansion. Execute the command: fdisk /dev/vda (adjust the hard disk path according to the actual situation), enter the fdisk partition, and enter n (new partition) → p (primary partition) → 1.2.3 ( Partition number) → Enter → p (view partition) → w (save).
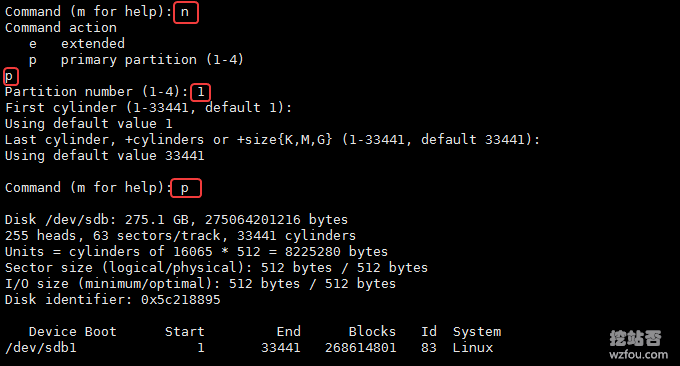
The newly created partition is not in LVM format. We need to enter the fdisk command again, and then enter: t (convert format) → partition number 1.2.3 → 8e (LVM) → p (view partition) → w ( save). As shown below:
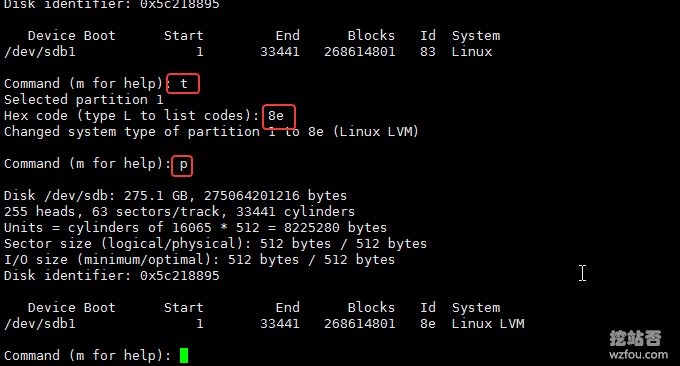
Using the above method, we created a new sda3 partition on the extra 3GB hard disk and set it to LVM format. Restart the VPS host to take effect, or execute the command (this command may not be supported in CentOS 6): partprobe. (If the prompt does not exist, perform the installation first: yum -y install parted)

Use the following command to create the entire partition as an LV logical volume: (For detailed introduction to PV, VG, and LV, please refer to the third part)
pvcreate /dev/vda3  //创建物理卷
vgcreate qyfoutt /dev/vda3   //创建逻辑卷组
vgchange -ay qyfoutt //激活逻辑卷组
vgdisplay qyfoutt | grep "Total PE"  //查看该卷组所有的PE
lvcreate -l 17919 -n qimm qyfoutt  //创建逻辑卷
mkfs.ext4 /dev/qyfoutt/qimm //格式化逻辑卷
Here I create a logical volume group named qyfoutt, with a total of 70GB available for allocation. Then a logical volume named qimm was created and 70GB was assigned to it. It is automatically mounted at boot, and the newly added /dev/qyfoutt/qimm partition is mounted to a certain directory. The format is as follows:
vim /etc/fstab
/dev/sdb1(磁盘分区)  /data1(挂载目录-需要提前创建好) ext4(文件格式,也可写ext3)defaults  0  0

/dev/qyfoutt/qimm     /ttfou            ext4    defaults        0 0
Mount all directories: mount -a (note it is in English -) and the mount is successful.
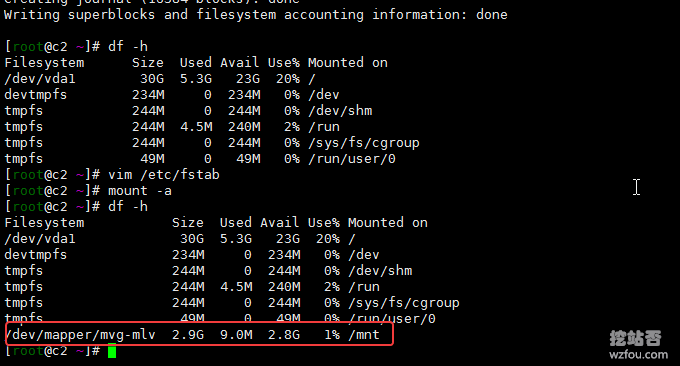
3. The new hard drive is directly expanded to the original hard drive.
If you purchase a second hard drive, there is no need to mount it at this time. You can directly add the space capacity of the new hard drive to the original hard drive. As shown in the picture below, there is already a 256GB hard disk (divided into 3 partitions, of which sda3 is in lvm format). According to the method of creating a new partition above, divide the entire hard disk into one partition: sdb1.

3.1 Create a new PV physical volume
Basic commands:
pvcreate /dev/sda3 #新建PV
#有两个以上的分区还可以一起新建PV
pvcreate /dev/sda3 /dev/sdb1

-f:强制创建物理卷,不需要用户确认;
-u:指定设备的UUID;
-y:所有的问题都回答“yes”;
-Z:是否利用前4个扇区。

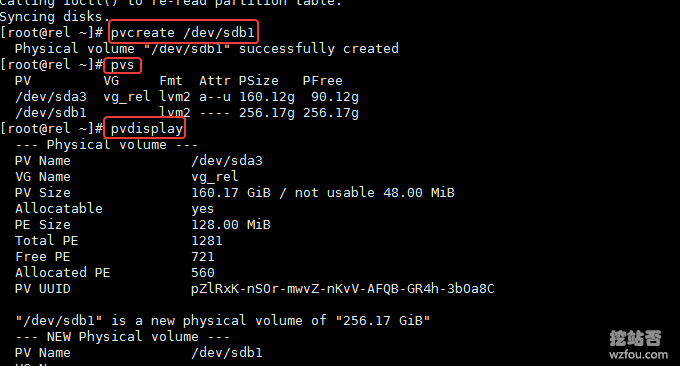
pvs  #查看pv基本信息
pvdisplay  #查看pv详细信息
As shown below, a PV physical volume is created for sdb1.
3.2 Expanding the VG volume group
According to the above method, we have created PV, VG and LV, and mounted the LV to a certain directory. Now add the PV to be built to the original VG. Basic command example:
vgcreate wzfou /dev/sda3 /dev/sdb1 #将两个PV卷加入到卷组wzfou
-l:卷组上允许创建的最大逻辑卷数;
-p:卷组中允许添加的最大物理卷数;
-s:卷组上的物理卷的PE大小。

vgs或者vgdisplay来查看创建的卷组

vgextend qyfoutt /dev/sdb1 #扩容VG组
As shown below, I added sdb1 and sda3 to the same VG group.
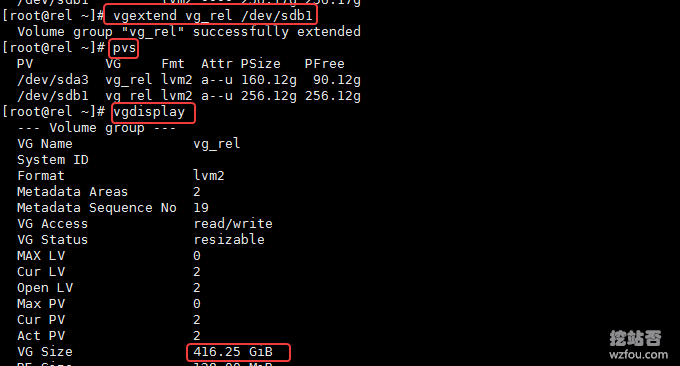
s can specify the PE size. For example, during the SolusVM master and controlled installation process, we require the PE to be 128MB. Here we can specify the PE size through this command. If there are new PVs later, you can continue to add them to VG:
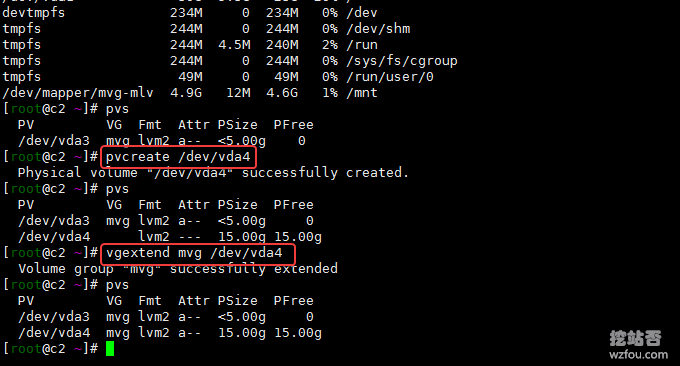
3.3 Expand LV logical volume
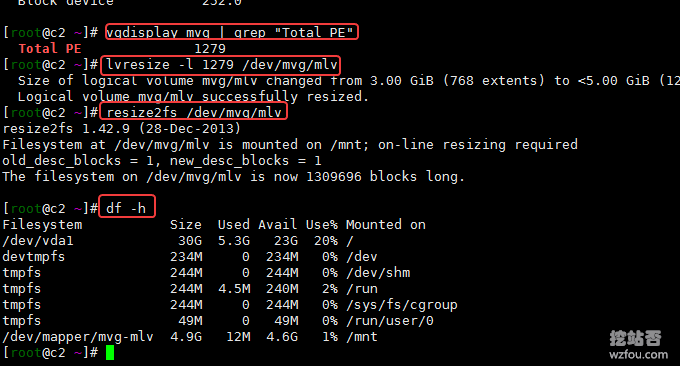
We have already expanded the VG volume capacity above. Now we only need to expand the original LV to the entire VG volume capacity. The command is as follows:
vgdisplay qyfoutt | grep "Total PE"  #查看所有PE

lvresize -l 1279 /dev/qyfoutt/qimm  #将VG组所有空间都给LV,1279是最后一个PE

resize2fs /dev/qyfoutt/qimm  #重设LV大小
Example: The VG group has 5GB capacity, and the LV under VG has only 3GB.

Now all the remaining 2GB space of the VG group is given to the LV to complete the expansion of the LV.

4. Summary
If you want to expand the hard drive, it is recommended to use LVM to manage the hard drive expansion. If you want to add more hard drives later, it is a very simple matter for LVM. The basic sequence of expansion is: add PV → VG group expansion → LV expansion .
There are two ways to add PV: one is to add a new hard disk and then partition it, and the other is to create a new partition on the original hard disk. No matter which method is used to expand the hard disk, you must first create the physical volume PV, then create the volume group VG, and finally create the logical volume LV.
