
ISPConfig 3 is a very excellent foreign VPS host control panel. It is free and open source and has been continuously developed for several years. Currently, ISPConfig 3 can basically be installed on all major Linux operating systems and supports one-click installation, including Apache2 and nginx, Postfix, Dovecot, PureFTPD, Bind, PowerDNS, MySQL, etc.
It is somewhat similar to the VestaCP we shared before. It has comprehensive and powerful functions. It can be integrated with WHMCS to build a virtual host automatic activation system. However, the biggest problem with both of them is that ISPConfig 3 does not have an online file management system. Currently, you can install an online file manager yourself through FTP, or use Web FTP to manage files.
ISPConfig 3.1 comes with a post office and DNS domain name resolution system, making it easy for you to set up a domain name mailbox and use your own DNS to resolve domain names. Like VestaCP, it supports automatic deployment of SSL certificates and automatic installation of Let’s Encrypt certificates. Users only need to check the Let’s Encrypt certificate option when creating a website to automatically install the certificate.

For more information about VPS control panels and website builders, you can also check out:
- VestaCP installation and usage tutorial-free VPS and virtual host control panel comes with post office and DNS resolution system
- WHMCS installation and usage tutorial-WHMCS email sending and customizing WHMCS template theme methods
- BlueMix free Kubernetes cluster application tutorial - 4GB memory supports Root permission login management
1. ISPConfig 3.1 installation method
ISPConfig 3.1 official website: https://www.ispconfig.org/. The help documents on the official website of detailed installation tutorials for major operating systems are very detailed. You can refer to: https://www.ispconfig.org/documentation/.
Here is a one-click method to install ISPConfig 3.1. Supported operating systems: Debian 7, Debian 8, Ubuntu 14.10, Ubuntu 15.10, Ubuntu 16.04, Centos 7. The installation command is as follows:
apt-get update && apt-get -y upgrade
apt-get install -y unzip
cd /tmp
wget --no-check-certificate -O installer.tgz "https://github.com/servisys/ispconfig_setup/tarball/master"
tar zxvf installer.tgz
cd *ispconfig*
bash install.sh
In particular, I would like to remind you that it is recommended to modify the hostname before installation to facilitate subsequent DNS and post office configurations. The modification methods for Debian and Ubuntu are as follows:
Enter the command in the terminal window: hostname or uname -n, you can view the host name of the current host. The modification reference is as follows:
vim /etc/hosts
150.95.150.57 host.wzfou.net host

vim /etc/hostname
host.wzfou.net
重启:hostname -F /etc/hostname
再次查看:hostname
During the installation process, ISPConfig 3.1 will ask you which components you want to install, mainly as follows:
Web Server (Apache or Nginx)
FTP server (optional pureftpd)
DNS Server (bind9)
MySQL server
Awstats analysis
Clamavd anti-virus detection
Let's encrypt free certificate
IMAP and POP3 (optional courier or dovecot)
webmail (optional RoundCube or squirellmail)
It is recommended to just select the default selection during the installation process.
After the entire installation, the comparisons to be selected are listed below:
Select Mysql version: Mysql o Mariadb
Require a MySql password
Choose between Apache and Nginx
Whether to use Xcache (PHP cache)
Whether to install PHPMyAdmin
Mail server type dovecot or other
Choose to update virus definitions (recommendation: yes)
Whether to enable quotas (recommendation: yes)
Finally select the installation mode as expert or standard
There is one thing to pay special attention to. When the following prompt appears, press Enter and select No.
===========================================================================================
Attention: When asked 'Configure database for phpmyadmin with dbconfig-common?' select 'NO'
Due to a bug in dbconfig-common, this can't be automated.
===========================================================================================
Press ENTER to continue...
This is a prompt for successful installation of ISPConfig 3.1.

2. Introduction to using ISPConfig 3.1
Open: https://YOURIP:8080 or https://domain name:8080, enter the default account and password: admin and admin, and log in to ISPConfig 3.1.
This is users, websites, post offices, DNS, monitoring, tools and systems. (Click to enlarge)

Website management. Here you can add new domain names and websites, set up SSL, redirection and backup for the website, etc.
When creating a website, you can add SSL certificate support to the website. Check Let’s Encrypt to automatically install a free SSL certificate.
In the website management interface, you can add FTP accounts, WebDav accounts, and database users.
Email post office. You can add a new email account or add a new domain name email in the email management office.
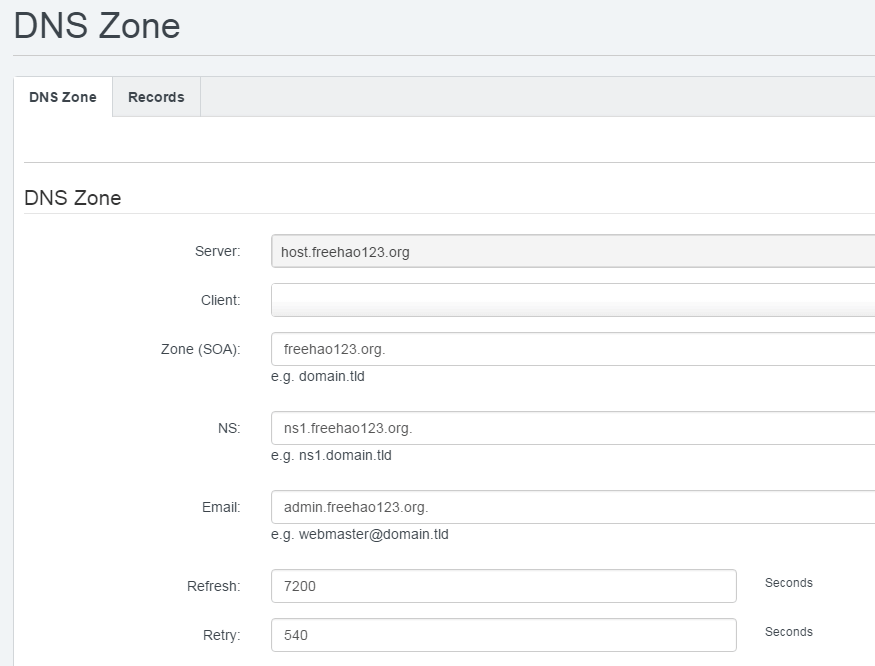
DNS management. The main purpose here is to add domain name DNS resolution, mainly A, CNAME and other resolution records.

Monitoring service. Here is to view the server's CPU, memory, hard disk, bandwidth and other usage statistics.
System settings. Here are the setting options of ISPConfig 3.1, which mainly include adding remote users, system configuration, server status, etc.
There are many server configuration options, including Server, Mail, Getmail, Web, DNS, FastCGI, XMPP, Jailkit, vlogger, Cron, Rescue, etc.
Panel language can be managed in system settings. The default ISPConfig 3.1 does not have Chinese. You can download and import it here: https://www.ucblog.net/wzfou/ispconfig_cn.zip

3. Several issues with ISPConfig 3.1
Here I summarize several problems during the installation and use of ISPConfig 3.1, hoping to help everyone. ISPConfig 3.1 is really good to use, but since the tutorials on the official website are almost all in English, many things can only be understood after you practice it yourself.
3.1 Backend SSL certificate
ISPConfig 3.1 uses a self-signed certificate in the background. When opening the browser, you will be prompted not to trust it. The solution is to replace the SSL certificate generated during the installation of ISPConfig 3.1 with the certificate file we purchased or applied for free. The path is as follows:
3.2 Build DNS system
To set up a DNS system, the first problem to be solved is to add glue records to your domain name registrar and register your private NS server. After registering, you can then return to ISPConfig 3.1 to add DNS resolution records.
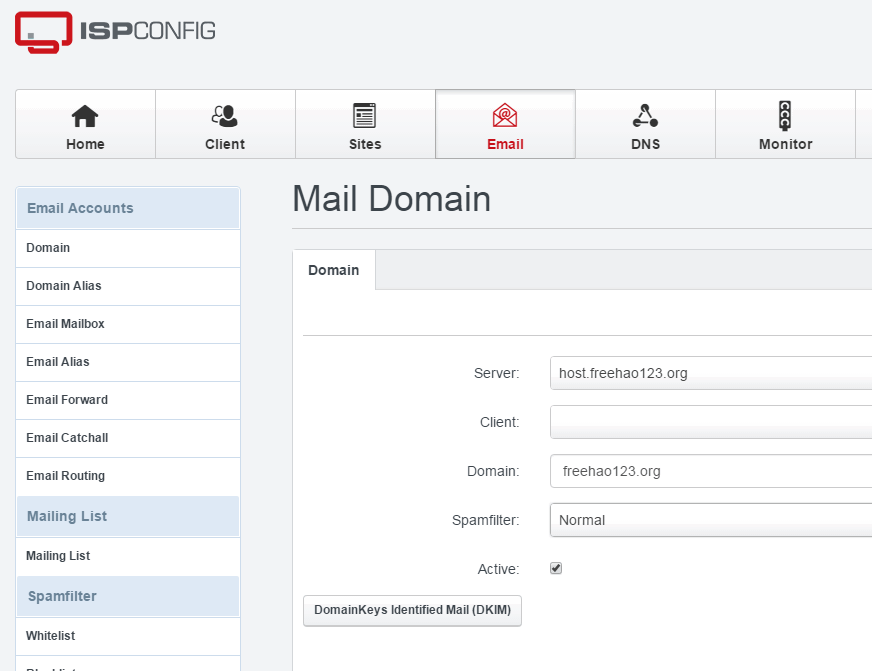
3.3 The process of building your own post office
First, enter the post office interface of ISPConfig 3.1 and add and bind a new domain name. (Click to enlarge)
Next, click Add a new email account in Email Accounts. (Click to enlarge)
Finally, after adding the email address, click Open Online. (Click to enlarge)

4. Summary
After my testing, ISPConfig 3.1 one-click installation package runs without any problems on Ubuntu 16.04, while others will have more or less inexplicable states. In addition, if you want ISPConfig 3.1 to be installed on multiple servers, you need to select the Debian 8 system.
The Chinese translation of ISPConfig 3.1 is not very complete. You can directly export the original English version, then manually translate it yourself and then upload it. Or you can merge the Chinese translation with the original English translation, and then find the ones that don’t have the right translation and translate them yourself.
PS: Updated on July 11, 2017, For the integration method of ISPConfig and WHMCS, please refer to: Integration method of ISPConfig and WHMCS - Automatic activation of virtual host and management space users.