

LNMP is a very classic one-click installation package for Nginx/MySQL/PHP and other web environments. It supports Nginx, Apache or front-end Nginx + back-end Apache. It supports multiple PHP versions (currently PHP 7.3 can be installed) and common caching components such as Redis/Xcache. Install.
The LNMP one-click installation package has been updated to version 1.6. Compared with the previous version, it mainly adds support for PHP 7.3, MariaDB 10.3, and Nginx/Apache TLS 1.3. Friends who want to experience TLS 1.3 can upgrade their LNMP. LNMP 1.6 will automatically turn on TLS 1.3 after installation.
If you have a VPS host and want to use it for building a website, it is recommended to use Oneinstack or LNMP to build a website environment. For novice friends, it is recommended to use the Pagoda BT panel and WDCP panel. It allows you to use the VPS host like a virtual host, and more For more VPS host control panels, please refer to the special topic: Server Control Panel List.
There are tutorials about Oneinstack, Pagoda BT panel and WDCP panel, here are:
- OneinStack one-click installation script - easily deploy Let’s Encrypt certificate and configure HTTPS site
- WDCP Free Server Control Panel - Switch NginxApache and PHP versions with one click SSL
- The new version of BT.cn Pagoda VPS host panel website building experience - refreshing and fool-like operation with comprehensive functions
PS: Updated on January 21, 2019, If you are using Oneinstack or Pagoda BT panel, the methods to enable TLSV1.3 are: website optimization acceleration-enable TLSV1.3 and Brotli compression-Oneinstack, LNMP , pagoda panel.
1. LNMP 1.6 installation
website:
- HTTPS://Liaoning famous brand.org/
The installation command is as follows (if you need to install LNMPA or LAMP, replace the parameter lnmp after ./install.sh with lnmpa or lamp):
#安装screen
screen -S lnmp
#如果网络掉线,可以重新连接S-S-H,再执行 screen -r lnmp 就会看到你的lnmp安装进程。
#有时候screen异常退出可能会提示状态为Attached,可以执行:screen -D -r lnmp 进行恢复。
#有时候可能会创建了多个同名的screen会话,可以执行:screen -ls 查看对应会话的session id,然后使用screen -D -r sessionid 进行恢复。

#下载安装包,并开始安装
wget http://soft.vpser.net/lnmp/lnmp1.6beta.tar.gz -cO lnmp1.6beta.tar.gz && tar zxf lnmp1.6beta.tar.gz && cd lnmp1.6 && ./install.sh lnmp
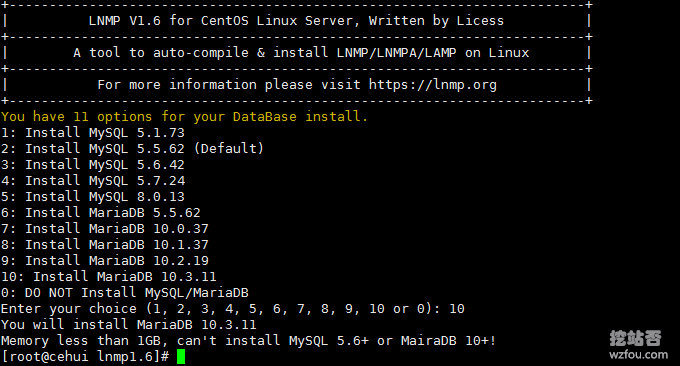
After executing the command, you will be asked to choose PHP, Mysql and other versions. If there is a prompt: Memory less than 1GB, can't install MySQL 5.6+ or MairaDB 10+!, means that memory less than 1GB must be installed. MysqL 5.6 or below and MairaDB 10 or below.
For friends who are quite speechless about this requirement, you can use Oneinstack one-click package, and you can freely choose the combination. For others such as PHP, you can choose the latest PHP 7.3 version.

The LNMP installation process takes a long time. Generally speaking, it takes half an hour. If the machine performance is poor, it may take up to an hour.
2. LNMP extension installation
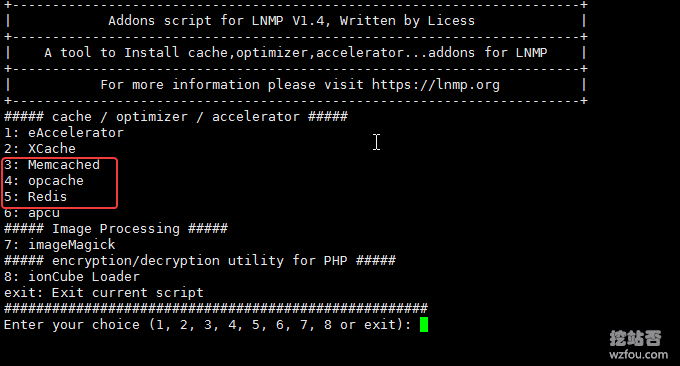
Execute the following commands to install xcache, Redis, memcached, eAccelerator, imageMagick, and ionCube:
./addons.sh
If you are running WordPress, it is recommended to install Memcached, opcache, and Redis, which will be very helpful for running WordPress.
3. LNMP adds virtual host
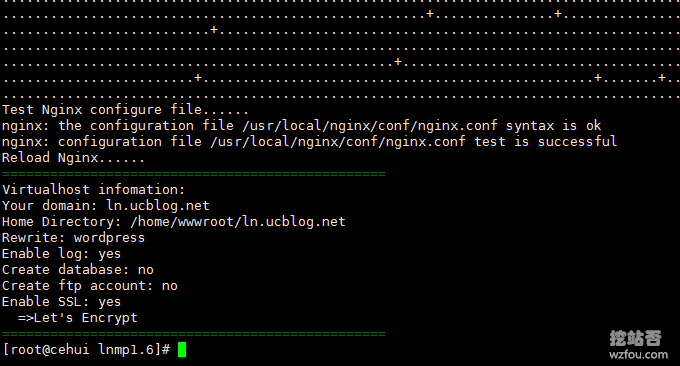
Execute the command: lnmp vhost add, you can start binding your domain name, set the website path and whether to enable website logs, etc., as shown below:
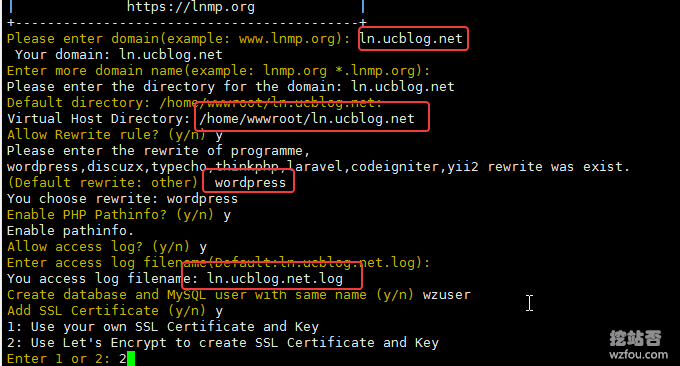
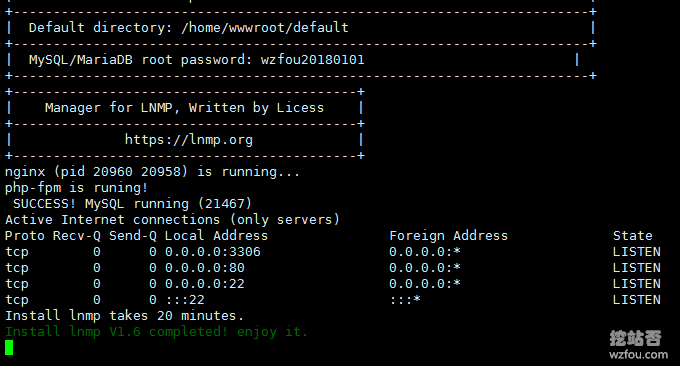
Note that if you want to use Letsencrypt free SSL certificate, please resolve the domain name to your server IP first. Of course, you can also use your own SSL certificate (more: Free SSL certificate collection and summary). You are required to enter the SSL certificate and key. The full path and file name. Successful installation:
4. Summary
The new version of LNMP 1.6 enables TLS 1.3 by default. Friends of LNMP 1.5 only need to execute the command: ./upgrade1.x-1.6.sh Upgrade the management script, then upgrade nginx, and finally adjust it Just configure Nginx for your website. The following is the configuration for turning on TLS 1.3 in LNMP 1.6. For related explanations, see: Website Optimization Acceleration - Turn on TLSV1.3.
ssl_protocols TLSv1 TLSv1.1 TLSv1.2 TLSv1.3;

ssl_ciphers "TLS13-AES-256-GCM-SHA384:TLS13-CHACHA20-POLY1305-SHA256:TLS13-AES-128-GCM-SHA256:TLS13-AES-128-CCM-8-SHA256:TLS13-AES-128-CCM-SHA256:EECDH+CHACHA20:EECDH+CHACHA20-draft:EECDH+AES128:RSA+AES128:EECDH+AES256:RSA+AES256:EECDH+3DES:RSA+3DES:!MD5";
After my testing, if you use LNMP 1.6 to install PHP 7.3, memcached and other installations may fail. This may be because PHP 7.3 has just been launched and the relevant components have not been updated in time. Maybe it will be relevant when the official version of LNMP 1.6 is launched in June. problems can be solved.