

Caddy server (or Caddy Web) is an open source web server written in GoLang and supports HTTP/2. It uses the GoLang standard library to provide HTTP functionality. A notable feature of Caddy is that HTTPS is enabled by default. It is the first web server to provide HTTPS features without additional configuration.
Compared with our commonly used web servers such as Nginx and Apache, the biggest feature of Caddy is that it is simple to deploy. It has the basic web server module of apache or nginx, and also has some unique functions, such as: HTTP/2, Automatic HTTPS, Multi-core, Websockets, Markdown, IPv6 and more.
Caddy can be used for static and dynamic websites. Of course, many people have seen that Caddy is easy to install and deploy. They integrate Caddy with various applications such as network disks and downloads. This not only takes advantage of Caddy’s simple deployment and configuration, but also maximizes the Save server resources to the maximum extent and focus on the development and management of third-party applications.

This article will share the installation and use of Caddy server, more website building tools and scripts, and:
- Comparison of three excellent online file managers (directory list) - Directory Lister, h5ai and FileRun
- Smokeping installation and configuration - free open source network performance monitoring tool visual master/slave deployment
- OneinStack one-click installation script - easily deploy Let’s Encrypt certificate and configure HTTPS site
PS: Updated on February 21, 2018 , looking for a free network disk program, you can also try this: Use Pydio to build free private cloud storage - multi-terminal automatic synchronization can play music videos online.
1. Caddy installation method
Caddy official website:
- Website: https://caddyserver.com/
- Download: https://caddyserver.com/download
- Github: https://github.com/mholt/caddy
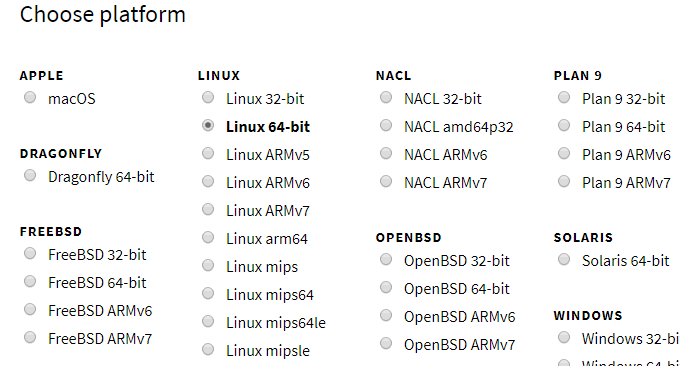
There are only three steps to install and deploy Caddy. First, select the Caddy version according to your server operating system and download it (both Linux and Windows are supported).
2. Caddy configuration method
2.1 Create configuration file
First create a configuration file and put it in /etc/caddy.
sudo mkdir /etc/caddy
sudo touch /etc/caddy/Caddyfile
sudo chown -R root:www-data /etc/caddy
In addition to the configuration file, caddy will automatically generate an SSL certificate and requires a folder to place the SSL certificate.
sudo mkdir /etc/ssl/caddy
sudo chown -R www-data:root /etc/ssl/caddy
sudo chmod 0770 /etc/ssl/caddy
Because the private key will be placed in the ssl folder, the permissions are set to 770 to prohibit other users from accessing it. Finally, create the directory where the website files are placed. If it already exists, there is no need to create it.
sudo mkdir /var/www
sudo chown www-data:www-data /var/www
2.2 Set up startup
After creating these files and directories, we need to configure caddy as a service so that it can run automatically on boot and is easy to manage. Because most distributions currently use systemd, I will only talk about how to configure systemd here.
sudo curl -s https://raw.githubusercontent.com/mholt/caddy/master/dist/init/linux-systemd/caddy.service -o /etc/systemd/system/caddy.service   # 从 github 下载 systemd 配置文件
sudo systemctl daemon-reload        # 重新加载 systemd 配置
sudo systemctl enable caddy.service # 设置 caddy 服务自启动
sudo systemctl status caddy.service # 查看 caddy 状态
2.3 Edit Caddyfile.
You can directly use vim /etc/caddy/Caddyfile to modify the Caddyfile, or you can modify it on your own computer and upload it to the server. If you modify the Caddyfile and find that it does not take effect, you need to execute sudo systemctl restart caddy.service to restart caddy.
2.4 Caddyfile format
The format of Caddfile is relatively simple. First, the first line must be the address of the website, for example:
localhost:8080or
wzfou.comThe address can carry a port number, then caddy will only open the http service on this port, but not https. If the port number is not written, caddy will bind ports 80 and 443 by default, and start the http and https services at the same time. The address can be followed by a bunch of instructions. The basic format of a Caddyfile is this, consisting of a website address and instructions.
2.5 directive
The purpose of the directive is to enable certain functions for the website. There are three formats of instructions. Let’s first talk about the simplest instructions without parameters, such as:
wzfou.com
gzip
The gzip in the second line is an instruction, which means to turn on the gzip compression function, so that the website can reduce the traffic when transmitting web pages. The format of the second command is a command with simple parameters:
wzfou.com
gzip
log /var/log/caddy/access.log
tls iwzfou@gmail.com
root /var/www/
In the third line, the log command will enable the log function for the website. The parameters after the log command tell caddy where the log file is stored. The tls command in the fourth line tells caddy to enable https for the website and automatically apply for a certificate. The following email parameter is to inform the CA of the applicant's email address. (caddy will use let’s encrypt by default to apply for a certificate and renew it, which is very convenient)
In addition, there may be more than one simple parameter, such as the redir directive:
wzfou.com
gzip
log /var/log/caddy/access.log
tls /etc/ssl/cert.pem /etc/ssl/key.pem
root /var/www/
redir / https://wzfou.com/archive/{uri} 301
The above redir command takes three parameters, which means to use 301 redirection for all requests. This command is very useful when changing the domain name of the website. In addition, the tls command has changed. It does not only pass the email parameter, but also passes the path of the certificate and private key respectively. In this way, caddy will not automatically apply for a certificate, but will use the certificate given by the path.
In this example, placeholders such as {uri} are also used. A detailed list can be found here: https://caddyserver.com/docs/placeholders. The last type of instruction takes complex parameters. This type of instruction may contain many parameters, so it needs to be enclosed in a pair of curly braces, such as the header instruction:
wzfou.com
gzip
log /var/log/caddy/access.log
tls iwzfou@gmail.com
root /var/www/
header /api {
    Access-Control-Allow-Origin  *
    Access-Control-Allow-Methods "GET, POST, OPTIONS"
    -Server
}
fastcgi / 127.0.0.1:9000 php {
    index index.php
}
rewrite {
    to {path} {path}/ /index.php?{query}
}
The header directives in lines 6-10 represent adding Access-Control-Allow-Origin and Access-Control-Allow-Methods< to all /api/xxx requests. ept2> These two headers can support javascript cross-domain access. Line 9 represents deletion of the Server header to prevent others from seeing the server type.
Lines 11-13 use the fastcgi instruction, which means that the request is passed to back-end programs such as php and ruby through fastcgi.
Lines 14-15 use the rewrite instruction. The function of this instruction is to redirect the server internally to . After the following parameter to, there are three more parameters. This function is somewhat similar. try_files for nginx. Tell caddy to first check whether there is a file corresponding to {path} in the URL root directory /var/www. If there is no file corresponding to {path}, then check whether there is a directory corresponding to {path}. If there is none, forward it to the index.php entry file. This feature is generally used in PHP's MVC framework.
2.6 Multi-domain website
The above mentioned are all URLs of a single domain name, so what if multiple domain names are deployed on the same server? It's very simple. You just need to expand it with a curly bracket after the domain name, as follows:
wzfou.com {
    gzip
    log /var/log/caddy/wzfou_com.log
    tls iwzfou@gmail.com
    root /var/www/
    header /api {
        Access-Control-Allow-Origin  *
        Access-Control-Allow-Methods "GET, POST, OPTIONS"
        -Server
   }
    fastcgi / 127.0.0.1:9000 php {
        index index.php
    }
    rewrite {
        to {path} {path}/ /index.php?{query}
    }
}
wzfou.com{
    tls iwzfou@gmail.com
    log /var/log/caddy/wzfou_com.log
    redir / https://wzfou.com/{uri} 301
}
This is the basic caddy configuration. For more information, please refer to the official website documentation: https://caddyserver.com/docs.
3. Caddy one-click website building script
After looking at the Caddy configuration above, some friends may wonder if there is a Caddy script for one-click website building?
3.1 Caddy-Web-Server-Installer
- Project address: https://github.com/sayem314/Caddy-Web-Server-Installer
System requirements: Ubuntu 14.x, 15.x, 16.x, Debian 7.x , 8.x, 9.x, CentOS 6.8, 7.2. Run the following command:
wget https://git.io/vra5C -O - -o /dev/null|bash
Then use the following command to do it:
caddy start  #开启Caddy Web Server
caddy stop  #停止Caddy Web Server
caddy reload  #重载Caddy Web Server
caddy restart  #重启Caddy Web Server
caddy status  #查看Caddy Web Server状态
caddy install  #安装Caddy Web Server
caddy edit  #编辑配置文件Caddyfile
caddy service  #使Caddy Web Server成为一项服务(upstart/systemd)
caddy update  #升级Caddy Web Server
caddy delete  #卸载Caddy and data
caddy about  #关于Caddy Web Server
caddy version  #检测脚本/Caddy/PHP5-fpm版本信息
Install plugin command:
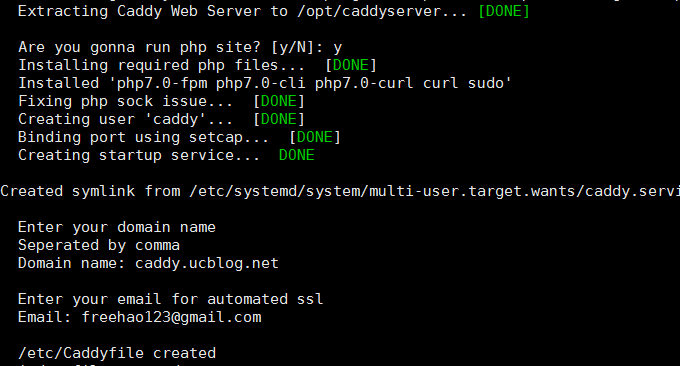
caddy install http.cache,http.filemanager,http.ipfilter,http.ratelimitWhen installing caddy, you will be asked to enter your domain name and email address (it will automatically issue ssl for you), and then use the command to start caddy!
虚拟主机文件夹:/var/caddywww
配置文件夹:/etc/Caddyfile
This is the interface for successful installation:
Audio, video, etc. can also be inserted online.
4. Summary
Using Caddy as a web server almost only takes a few minutes to install and run. Of course, Caddy can also implement caching, mirroring, etc. like nginx. The configuration rules of Caddy are also relatively simple. You only need to spend a few minutes studying the official website. The document can be copied by yourself.
Caddy will automatically issue a free Let’s Encrypt certificate, but you need to resolve the domain name to the server first, otherwise you will get an error when adding a virtual host. Whether Caddy can be used as a formal production environment is still open to question, but there is no problem in using Caddy as a simple HTTP server.