After using WHMCS with Vestacp, I found that Cpanel is indeed no longer needed. In fact, we don’t use many functions to build the website. The virtual host management panel only needs a few basic functions such as binding a domain name, FTP file management, MysqL database management, etc. Although Cpanel is very powerful, many functions are not needed.
There are many free panels like Vestacp, but Vestacp and WHMCS are the best integrated free hosting panels. The official has developed the WHMCS interface, including domain name DNS resolution, post office, website management, file management, etc., and of course SSL certificates. Installation supports one-click addition of Lets Encrypt SSL certificate, which can meet most website building needs.
What I want to talk about today is the issue of adding and binding SSL certificates when using the Vestacp panel. In addition, the default Vestacp panel uses HTTP/1.0. If HTTP/2 is enabled, it is best to naturally turn on HTTP/2. This article will also share a way to open Vestacp online file manager for free.

For more information on how to install and use the VPS host panel, you can try these:
- ISPConfig 3.1 Excellent VPS host control panel installation and use-DNS domain name resolution SSL automatic deployment
- Integration method of ISPConfig and WHMCS - automatically activate virtual host and management space users
- WHMCS adds Alipay and WeChat payment, theme template modification method and PDF invoice garbled problem resolution
1. Add SSL certificate to Vestacp
Automatically enable Lets Encrypt SSL certificate. First, enter Vestacp's WEB service and add a new website domain name.

Enter the new domain name. Note that if you are using a second-level domain name like me, please delete the automatically generated www third-level domain name in "Alias".

Then check "SSL Support" below. If you have your own SSL certificate, directly fill in the CRT and KEY below. If not, directly check "Lets Encrypt SSL" support ( Note: You need to resolve the domain name to on the server IP, otherwise SSL cannot be applied for).

Confirm and click Save. Note: From my experience, the administrator can see that the SSL certificate has been applied for after five minutes after clicking Save. However, for multiple users, it may be necessary to click Save twice. Everyone makes a decision based on the actual situation during use.

If you have not applied for an SSL certificate, you can also check whether Snginx.conf, CRT, Key and other files are automatically generated by checking the WEB configuration file in the website directory. If it is not generated, it means the application failed.

Finally, when you open the web page, you can see that the SSL certificate has been added successfully.

Vestacp enables SSL in the background. The default SSL of Vestacp is self-signed. Although it does not affect its use, friends with obsessive-compulsive disorder may want to change it to SSL trusted by the browser. This is actually simple. Go to the Vestacp backend and add the SSL certificate in the server settings.

2. Vestacp enables HTTP/2
First, confirm that the SSL service is activated for the domain name you bound, then go to: /home/(vesta_user)/conf/web/snginx.conf, and open the following:
server {
listen xx.xx.xx.xx:443;
…
}
Change to the following code:
server {
 listen xx.xx.xx.xx:443 http2 ssl;
...
}
Then, add the following code:
location / {
proxy_pass https://%ip%:%web_ssl_port%;
location ~* ^.+.(%proxy_extentions%)$ {
root %sdocroot%;
access_log /var/log/%web_system%/domains/%domain%.log combined;
access_log /var/log/%web_system%/domains/%domain%.bytes bytes;
expires max;
try_files $uri @fallback;
}
}
Change it to this:
 location / {
 proxy_pass https://%ip%:%web_ssl_port%;
 location ~* ^.+.(%proxy_extentions%)$ {
 root %sdocroot%;
 access_log /var/log/%web_system%/domains/%domain%.log combined;
 access_log /var/log/%web_system%/domains/%domain%.bytes bytes;
 expires max;
 try_files $uri @fallback;
  add_header Access-Control-Allow-Origin *;
 }
 }
Finally save and restart: nginx -s reload. If you want to automatically enable HTTP/2 when creating, you need to modify the template file:
/usr/local/vesta/data/templates/web/nginx/default.stpl
/usr/local/vesta/data/templates/web/nginx/hosting.stpl
/usr/local/vesta/data/templates/web/nginx/caching.stpl
Place the following code:
server {
listen %ip%:%proxy_ssl_port%;
server_name %domain_idn% %alias_idn%;
ssl on;
Change it to this:
server {
 listen %ip%:%proxy_ssl_port% http2 ssl;
 server_name %domain_idn% %alias_idn%;
 ssl on;
Finally, open the browser to see if HTTP/2 has been successfully enabled.

3. Vestacp enables Awstats statistics
PS: Updated on March 3, 2018, more professional independent statistical systems can try the free and open source PHP statistical system Piwik (Matomo): Piwik (Matomo) free and open source PHP statistical system - easy to install Powerful functions comparable to Google statistics.
Vestacp already comes with Awstats website statistics. Many friends may not pay attention to it. In fact, it is in the advanced options when creating a website. You can check and confirm to turn on Awstats statistics.

After turning it on, return to the website list and you can see the website statistics.

Click on it to open Awstats online statistics, here are the website visit data statistics. (Click to enlarge)

4. Free File Manager and SFTP Chroot
Use WinSCP to connect to SFTP, enter /usr/local/vesta/conf, edit vesta.conf, and add two lines at the end of the file:
FILEMANAGER_KEY='KuwangNetwork'
SFTPJAIL_KEY='KuwangNetwork'
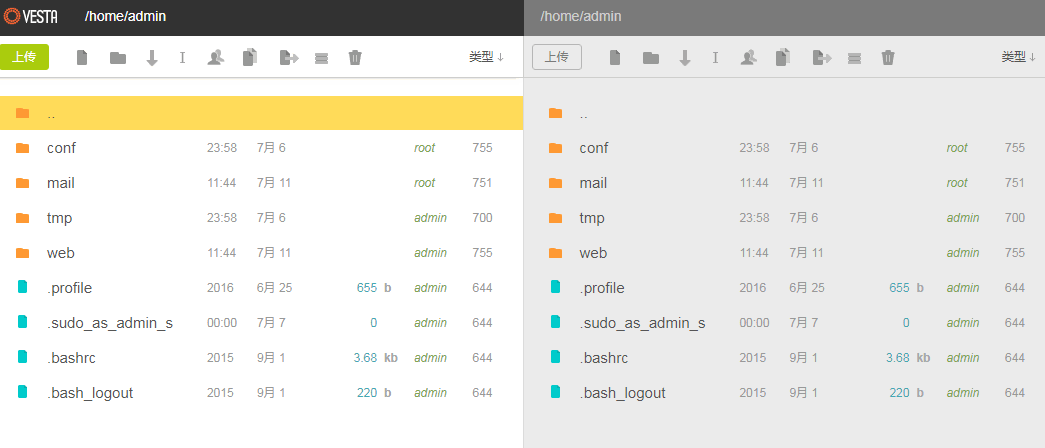
After saving, you can see the file manager in VestaCP, and there is no problem in uploading, copying, deleting, etc. (Click to enlarge)

There are two places to pay attention to:
1. vesta.conf will be automatically modified by the system. It is recommended to change vesta.conf to read-only (440).
2. The file manager uses Google's JS library, but Google's JS library may not be available in some areas of the country (although it has been moved back to China), please modify the main of /usr/local/vesta/web/templates/file_manager. Line 119 of the php file is changed to "code.jquery.com/jquery-1.11.1.min.js" (no need to enter quotation marks)
5. Vestacp 301 redirection method
HTTP redirect to HTTPS. Open: /home/USER/conf/web/nginx.vestacp.com.conf and add the following code (note to replace your USER path and your domain name):
if ($scheme = http) { return 301 https://vestacp.com$request_uri; }
HTTPS redirects HTTP. Open: /home/USER/conf/web/nginx.vestacp.com.conf and add the following code (note to replace your USER path and your domain name):
if ($scheme = https) { return 301 http://vestacp.com$request_uri; }
WWW redirects to non-WWW. Open: /home/USER/conf/web/nginx.vestacp.com.conf, and add the following code (note to replace your USER path and your domain name):
if ($host = "www.vestacp.com") { return 301 https://vestacp.com$request_uri; }
#未使用Https的,可用以下代码:
if ($host = "www.vestacp.com") { return 301 http://vestacp.com$request_uri; }
Non-WWW redirects to WWW. Open: /home/USER/conf/web/nginx.vestacp.com.conf, and add the following code (note to replace your USER path and your domain name):
if ($host = "vestacp.com") { return 301 https://www.vestacp.com$request_uri; }
#未使用Https的,可用以下代码:
if ($host = "vestacp.com") { return 301 http://www.vestacp.com$request_uri; }
Force the domain name to use HTTPS. Use the following command:
cd /usr/local/vesta/data/templates/web
wget http://c.vestacp.com/0.9.8/rhel/force-https/nginx.tar.gz
tar -xzvf nginx.tar.gz
rm -f nginx.tar.gz
The downloaded files mainly include two files: force-https.tpl and force-https.stpl. You can also put these two files in your original package configuration. Or you can create a new package and use this Nginx as the template. This new configuration can be applied when a new user creates a website.
6. Summary
When Vestacp creates a Lets Encrypt SSL certificate, if there are multiple users, different domain names may access the SSL certificate of the same domain name. In this case, a server can be restarted. In addition, multiple users may fail to create SSL certificates and need to save them several times.
Vestacp 301 redirect requires the right to modify nginx.vestacp.com.conf. FTP users do not have permission to view and modify this file. They need to manage and use Winscp to log in to the server to access the conf under different users for modification. Of course, if your Vestacp uses Apache, you can modify .htaccess yourself.
