Cloudflare Partner is a distribution cooperation program launched by Cloudflare. It is currently divided into two types: Self-Serve Partner and Enterprise Reseller. There are functional differences between the two. Enterprise Reseller has more pricing power, optional features and better products and services. .
Most of the Cloudflare Partners you see now are Self-Serve Partners. When it was first launched, the application threshold was not high, and the pass rate was still good. As more and more people apply, Cloudflare Partner review is now much slower, and The conditions have also been improved, but I still have some trouble if I want to pass.
Of course, if you don't care about Cloudflare Partner and just want to use CNAME and IP to access Cloudflare CDN instead of modifying NS, you can directly use a third-party Cloudflare Partner with confidence. We know that the CDN provided by Cloudflare's official website requires modifying the NS server of the domain name.
If you use Cloudflare Partner, you can only modify the A or CNAME record of the domain name to use Cloudflare CDN. At the same time, Cloudflare Partner does not store user data, it is just a management interface. More Cloudflare security protection services are also available on the Cloudflare official website. operate.

This article will share how to build a Cloudflare Partner access management system and how to use Cloudflare CDN. More CDN accelerations include:
- Baidu Cloud Storage BOS and Baidu Cloud CDN usage experience - automatic image storage and accelerated domain name delivery
- Youpaiyun CDN acceleration application tutorial - one-click mirroring, static dynamic CDN and free SSL
- Self-built CDN acceleration-Nginx reverse binding, cache acceleration, automatically update cache and obtain real IP
PS: Update record:
1. Updated the method of adding CloudFlare CDN server IP to the firewall in batches. 2020.9.23
2. Apply to join Railgun acceleration for free. Welcome to discuss here: https://wzfou.com/question/17493/. 2019.9.7
3. If you have a free CDN and want a free domain name, you can refer to this article to register a free top-level domain name: Free domain name .tk, .ml, .ga, .cf, .gq to apply for registration and DNS resolution - free binding Space Tutorial. 2018.12.4
1. Apply for Cloudflare Partner
PS: If you only want to use https://cdn.wzfou.com/, please jump directly to the third part. The first two parts share how to set up Cloudflare Partner.
website:
- Official website: https://www.cloudflare.com/
- Apply: https://www.cloudflare.com/partners/become-a-partner/
During the process of filling out the application form, according to the reminders of several friends, using the domain name email and filling in the host domain name-related product website will get a higher pass rate. Tutorial: Join Cloudflare Partner to provide CloudFlare CDN acceleration service for free.

Cloudflare Partner panel. If it is for personal use, there is no need to use this panel at all. Please refer to the tutorial on joining Cloudflare Partner and use the commands. If you want to provide it to others, you can use the following open source panel:
- https://GitHub.com/Z e3-guest/cloud-flare-C name-setup
Properties of this panel
Manage all your DNS records. This panel uses Cloudflare API v4, so it supports various formats of DNS records.
Advanced statistics. You can view stats for the past entire year, not just one month.
Also supports NS access. This panel provides NS access information so you can switch to Cloudflare DNS at any time. Additionally, this panel also supports DNSSEC.
IP access is also supported. You can see Anycast IPv4 and IPv6 information for DNS so you can safely use third-party DNS under the root domain name.
Adapted to mobile devices.
Supports multiple languages.
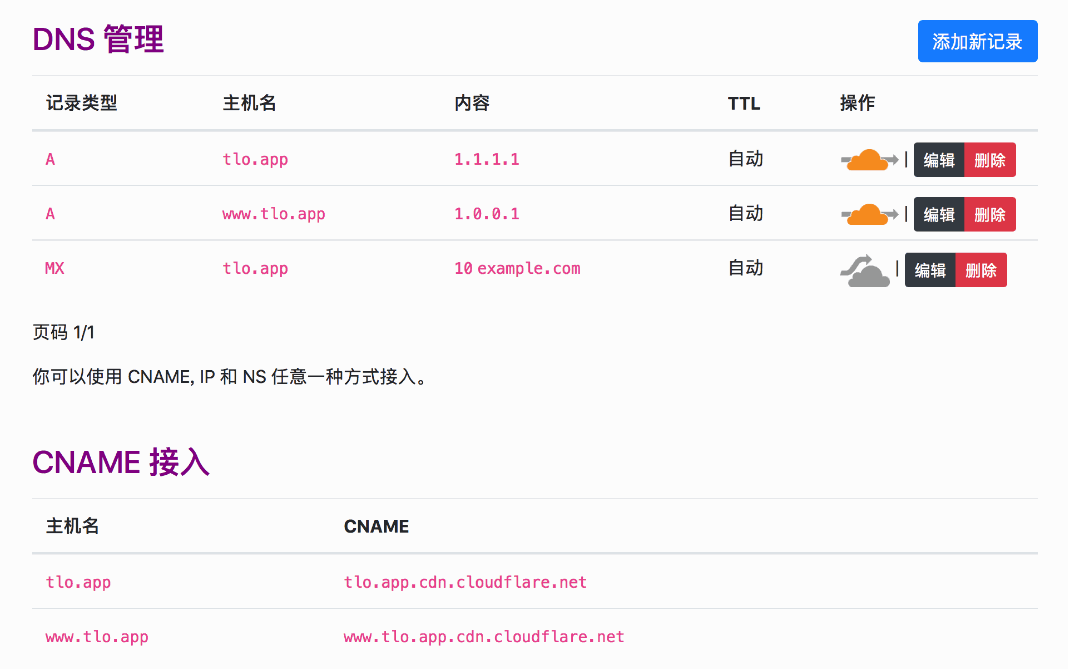
The panel management interface is as follows:
2. Enable CloudFlare Railgun
Installation documentation:
- HTTPS://wuwuwu.cloud flare.com/docs/Let love roll/installation.HTML
The benefit of being a Cloudflare Partner is that you can turn on CloudFlare Railgun (this service was originally a paid service of CloudFlare) and log in to the Cloudflare Partner management panel.

Then agree to the agreement.

There are quite few Chinese documents about CloudFlare Railgun installation. The faster method is to use Docker. The official installation method is provided here.
2.1 Add repository and installation method
Updating repository GPG key
The Cloudflare public packaging GPG key was updated in March of 2015 and will need to be updated if you are using the old key with an ID of 8e5f9a5d..
apt-based OS
Install the new key:
$ curl -C - https://pkg.cloudflare.com/pubkey.gpg | sudo apt-key add -Remove the old key:
$ sudo apt-key del 8e5f9a5dyum-based OS
Install the new key:
$ sudo rpm --import https://pkg.cloudflare.com/pubkey.gpgRemove the old key:
$ sudo rpm -e gpg-pubkey-8e5f9a5d-*Ubuntu operating system
Add the repository (replace <RELEASE> with the Ubuntu release name):
$ echo 'deb http://pkg.cloudflare.com/ <RELEASE> main' |
sudo tee /etc/apt/sources.list.d/cloudflare-main.list
Example:
$ echo 'deb http://pkg.cloudflare.com/ xenial main' |
sudo tee /etc/apt/sources.list.d/cloudflare-main.list
Import GPG key:
$ curl -C - https://pkg.cloudflare.com/pubkey.gpg | sudo apt-key add -Update apt cache:
$ sudo apt-get updateDebian operating system
Add the repository (replace <RELEASE> with the Debian release name):
$ echo 'deb http://pkg.cloudflare.com/ <RELEASE> main' |
sudo tee /etc/apt/sources.list.d/cloudflare-main.list
Example:
$ echo 'deb http://pkg.cloudflare.com/ jessie main' |
sudo tee /etc/apt/sources.list.d/cloudflare-main.list
Import GPG key:
$ curl -C - https://pkg.cloudflare.com/pubkey.gpg | sudo apt-key add -Update apt cache:
$ sudo apt-get updateRed Hat Enterprise Linux and CentOS operating systems
Install RPM to add repository (replace <VERSION> with the release version number):
$ sudo rpm -ivh http://pkg.cloudflare.com/cloudflare-release-latest.el<VERSION>.rpmExample:
$ sudo rpm -ivh http://pkg.cloudflare.com/cloudflare-release-latest.el7.rpm
$ sudo rpm -ivh http://pkg.cloudflare.com/cloudflare-release-latest.el6.rpm
CloudFlare Railgun currently only supports 64-bit systems. The installation command is:
RPM-based
$ yum install railgun-stable
DEB-based
$ apt-get install railgun-stable
2.2 Start CloudFlare Railgun
After the installation is successful, /etc/init.d/railgun will be automatically added to the startup process. Change setting:
vi /etc/railgun/railgun.conf
Find the following two lines and modify them:
activation.token = <这里填写 Railgun 的 Token>
activation.railgun_host = <这里填写服务器的公网 ip>
Then start Railgun with the following command:
(GNU/Linux)
$ /etc/init.d/railgun start
Starting railgun:                                          [  OK  ]

$ service railgun start
Starting railgun:                                          [  OK  ]
After the command is started, you can see a rg-listener process port (2408 by default). You can use the following command to view it:
(GNU/Linux)
$ netstat -plnt | grep 2408
tcp        0      0 :::2408                     :::*                        LISTEN      2981/rg-listener
Please open the default port in the firewall, and it is recommended to add all CloudFlare CDN node IPs to the iptables firewall. The code example is as follows:
#开放2408端口
/sbin/iptables -I INPUT -p tcp --dport 2408 -j ACCEPT
#把CloudFlare的CDN节点IP加入防火墙中,其它的IP在这里可以找到:https://www.cloudflare.com/ips/
iptables -I INPUT -s 198.41.128.0/17 -j ACCEPT
#更新批量添加方法
for i in `curl https://www.cloudflare.com/ips-v4`; do iptables -I INPUT -s $i -j ACCEPT; done
for i in `curl https://www.cloudflare.com/ips-v6`; do ip6tables -I INPUT -s $i -j ACCEPT; done

for i in `curl https://www.cloudflare.com/ips-v4`; do iptables -I INPUT -p tcp -s $i --dport 2408 -j ACCEPT; done
for i in `curl https://www.cloudflare.com/ips-v6`; do ip6tables -I INPUT -p tcp -s $i --dport 2408 -j ACCEPT; done

for i in `curl https://www.cloudflare.com/ips-v4`; do iptables -I INPUT -p tcp -m multiport --dports http,https -s $i -j ACCEPT; done
for i in `curl https://www.cloudflare.com/ips-v6`; do ip6tables -I INPUT -p tcp -m multiport --dports http,https -s $i -j ACCEPT; done
#保存防火墙
service iptables save

#重启防火墙
service iptables restart

#如果用的是ubuntu,可以使用以下命令永久保存防火墙规则
#安装iptables-persistent
sudo apt-get install iptables-persistent
#持久化规则
sudo netfilter-persistent save
sudo netfilter-persistent reload
If there are errors, please check the log file to /var/log/railgun/panic.log, or use the following command to directly display the errors:
(GNU/Linux)
$ sudo -u railgun /usr/bin/rg-listener -config=/etc/railgun/railgun.conf
As shown below:

2.3 Activate CloudFlare Railgun
After enabling CloudFlare Railgun, you can go to the Cloudflare Partner backend and see that CloudFlare Railgun is already activated. You can add an IP range so that as long as you use the domain name of the IP, you can automatically connect to CloudFlare Railgun.

3. Use of Cloudflare Partner
3.1 Add domain name resolution
website:
Open the Cloudflare Partner login address and enter your Cloudflare account and password. If you do not have a registered account, a Cloudflare account will be automatically registered.

After logging in, you can add a domain name. The requirement is that the domain name does not exist in the Cloudflare system. If it already exists, please go to the Cloudflare official website to delete the domain name.
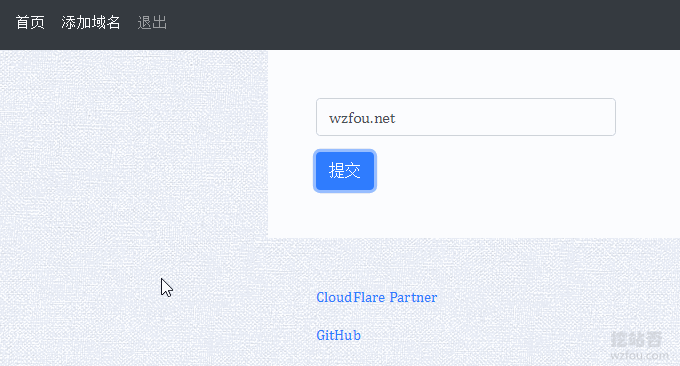
This is Cloudflare Partner’s DNS management interface.

Here you can modify and add A, CNAME and other records, which is the same as other DNS management.
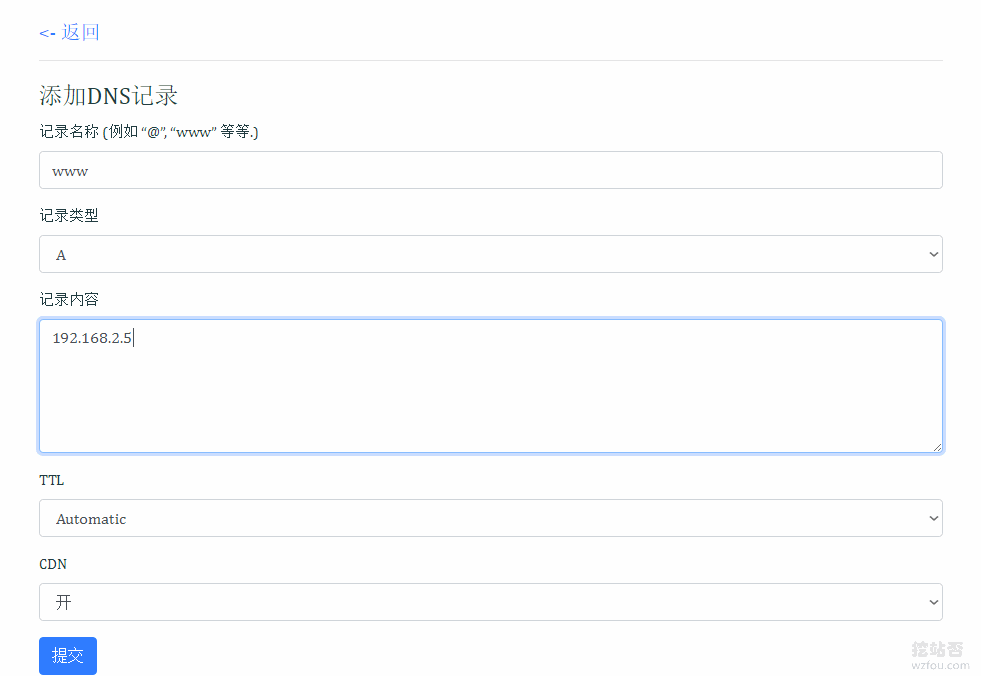
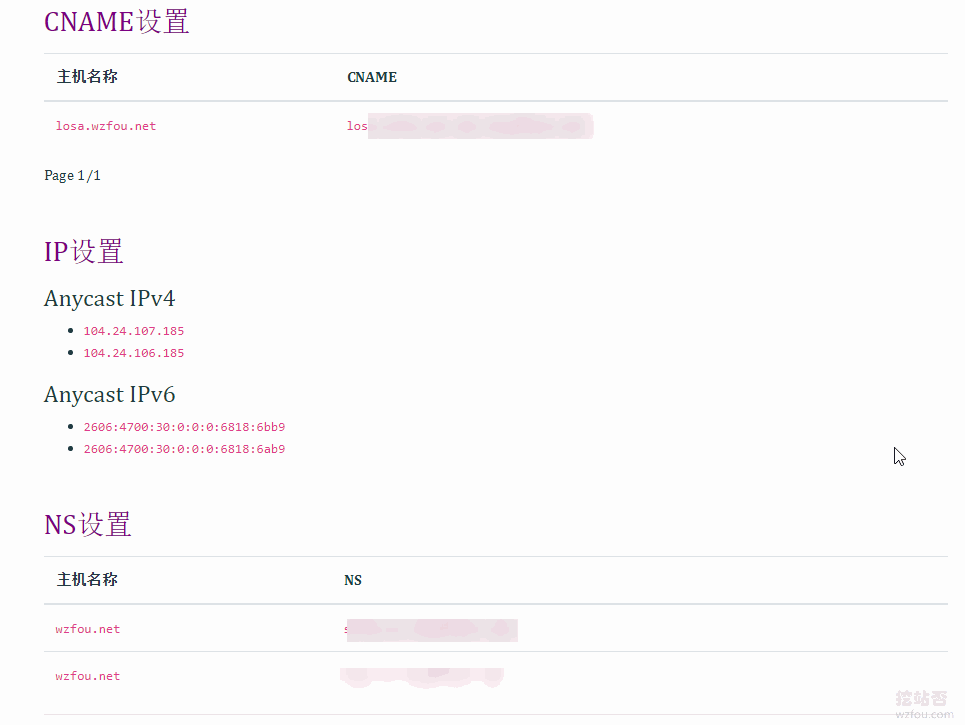
Cloudflare Partner generated records are as follows: (click to enlarge)
3.2 Enable Cloudflare CDN
After we add the domain name DNS, we can return to our own domain name DNS and modify the A record or CNAME to the one provided to us by Cloudflare Partner.

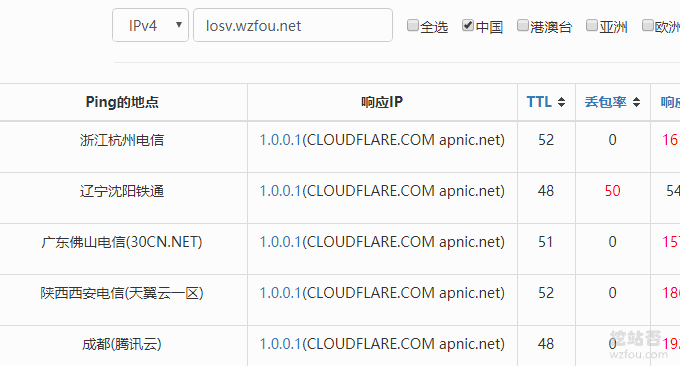
Now you can also specify 1.0.0.1 as the A record, and you can also connect to Cloudflare CDN normally.

The effect of access after specifying 1.0.0.1 is as follows.
3.3 Enable Cloudflare SSL
After adding the domain name to Cloudflare Partner, click "Security" to see whether the SSL certificate has been successfully configured. Generally, after modifying the A or CNAME record, you will see success after a while.

You can also go to the Cloudflare official website and see in the SSL column that a certificate has been generated for the domain name.

When you access it with a browser, you can see that the Cloudflare SSL certificate is used.

When issuing a Cloudflare SSL certificate for the first time, you need to first verify whether your domain name has been pointed to Cloudflare.

After the verification is successful, you can then see that the SSL certificate was successfully issued.

3.4 Cloudflare Railgun Setup
Cloudflare Railgun requires application to activate. Details: Turn on Cloudflare Railgun acceleration for free - reduce connection delays and achieve dynamic page caching and acceleration. If you are using whose cloud is 's host + cdn.wzfou.com management access, Cloudflare Railgun acceleration is enabled by default. You can turn it off if you don't want to use it.

Others currently do not use their cloud hosts, but use cdn.wzfou.com to manage access. If you want to use Cloudflare Railgun, you can contact me separately and require manual activation. The acceleration effect is as follows:

Cloudflare Railgun experience address:
- HTTPS://Losa.Am I here.net/
PS: Updated on December 28, 2018. Some other functions such as CC and DDos protection, page rules and cache clearing need to be operated on the official website. Related instructions: CloudFlare free CDN acceleration-CloudFlare acceleration , DNS resolution, SSL certificate and anti-DDoS attack.
4. Summary
Cloudflare Partner is a very useful service. It is very good for friends who do not want to modify the NS server but want to use Cloudflare CDN. After my test, using Cloudflare Partner+DNSPOD, switching DNS records can take effect immediately.
Cloudflare Railgun can make almost all the dynamic content of the origin site static, thereby greatly speeding up the loading speed, and also mitigating CC attacks on dynamic pages to a certain extent. Rich people can use Cloudflare Railgun to build their own CDN acceleration service.
